How to create your own maps in Google Maps. How to create your own maps in Google Maps Getting a satellite image or map of the area
Undoubtedly Google Maps is the leading mapping service on the market, providing GPS tracking and navigation services. But today the scope of application of cards is constantly expanding and has already gone beyond traditional route planning and searching for objects.
We often come across maps showing environmental pollution, maps of urban transport or airplane traffic (remember the famous one). In business, maps can be used to display and analyze the location of customers or retail chains. Travel companies can use maps to inform their clients about the travel route and tourist sites (attractions, catering establishments, hotels and hostels.
It is clear that geolocation services will play an increasingly important role in the future and the need for such services will only grow.
Taking this into account, there are already several online services on the network that allow create your own maps, i.e. place markers and notes on them, show routes and highlight areas, draw cartograms (also known as heatmaps) and much more.
The created maps can be opened for public access, embedded in a page of your website, or exported to PDF for preparing printed materials - as already mentioned, the scope of application is very wide.
So let's move on to consider the most popular map services.
Mapme
Mapme is a powerful modern tool with rich features. Allows you to manage a set of various cards and their contents. Tags and categories, import from Excel are supported. It has the ability to make maps public and embed them in web applications.Cost: Free, $99 and $199

Animaps
An interesting service that allows create animated maps to describe your journey, schedules of various events, etc. You can add markers, icons, photos, notes to the map, move them, highlight and change the boundaries of territories, and much more. And the created maps can be shared by embedding them into a website.Cost: free

Click2Map
A solid application containing many useful and advanced solutions for creating and editing maps, display equally well on both desktop computers and mobile devices. Click2Map main module - kart, which allows you to place markers on them, and photos, text messages or videos. These marks can contain custom fields, import from various databases and automatic creation of markers based on this data are supported.Cost: $39 per month

Zee Maps
Zee Maps - online service for creating and publishing maps with a whole set of modern and unique tools - a search mechanism, personal cards, more than 30 various markers and the ability to highlight entire areas, three-level access (regular visitors, group members and administrators). In addition, it is possible to attach various media materials to the marker - photographs, audio and video recordings and save maps in PDF and PNG format for brochures and presentations.Cost: free (up to 5 cards) and paid, depending on the tariff plan.

Scribble Maps
Another powerful and multifunctional service for creating and publishing various maps. Also offers the ability to add markers, notes, custom widgets, save maps as PDF or images. In addition, there are tools for measuring distances, areas, as well as integration mechanisms into desktop and mobile applications.Available for integration with .
Cost: free

GmapGIS
Effective tool for creating various static maps- satellite, hybrid, street. There is a set of tools for setting markers and adding various information, as well as exporting them to KML format for viewing in Google Earth.Cost: free

Heatmap Tool
Heatmap Tools uses the full power of the Google Maps API to visualize various geoinformation data and create so-called “cartograms” (aka heatmaps). You can configure various display parameters, such as marker radius, color, transparency, etc. Data import via CSV format is supported.Cost: free (with watermarks and restrictions on the number of objects and views) and paid depending on the tariff plan.

MapTiler
Using MapTiler is as easy as 1-2-3. One - scan a paper map or create it using a GIS system (for example, AutoCAD MAP 3D). Two - process it with MapTiler. Three - publish it on the Internet, embedding it, for example, on a page of your website. At the same time, integration with such popular hosting services as Dropbox, Google Drive and Amazon S3 is provided.
Mapbox
And finally, let's look at Mapbox - a professional service for developers. The application allows you to create vector maps that display various data in real time, has a powerful search engine for coordinates and addresses, and provides several APIs and auxiliary tools (for example, for converting satellite images into vector maps, plotting the optimal route).Cost: Both free and paid plans available

The idea of writing this article was born during the New Year holidays, when I was explaining how to make navigation maps based on satellite images. Then the bulk of the screenshots were taken, but the original article was left gathering dust in the back of the hard drive. And now the sun is shining outside and the snow is melting, a new hiking season is approaching, and I finally overcame laziness and finished writing the text.
Nowadays, many people have devices equipped with GPS satellite navigation in one way or another. It could be a smartphone, a pocket computer, a communicator, or just a navigator. In many cases, the quality of pre-installed maps leaves much to be desired, especially for hiking. Online sources of satellite images and maps can help here. It is enough to compare two images of the same area:
On the left is a Google maps satellite image, on the right is the same area on the map. Which one looks more detailed?
To create a full-fledged raster map, we will need a set of two programs, a certain amount of time and Internet traffic. The resulting maps can be used on any device that has the OziExplorer program or its analogues.
The instructions are step-by-step, thoroughly illustrated and should be understandable to any beginner.
Obtaining a satellite image or map of the area
At this stage we will need the SAS.Planet program, which can be downloaded from the official website sasgis.ru

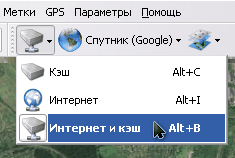
The first step is to specify the Internet and cache as the data source:
And also select the desired type of card. What it will be - a satellite or a Google map, Yandex maps or satellite images from the Roscosmos geoportal, or even General Staff maps - depends only on your personal preferences and the quality of the source in the required area.

So, we find the desired area visually, using coordinates or built-in search. We determine the required detail by increasing the image scale. The current scale is indicated on the left, under the zoom bar, in relative levels (z14, z16, and so on). It will be useful to us in the next step. Make sure that the desired objects are clearly visible and not blurred. But don’t forget that each level of detail increases the size of the resulting map.

We reduce the scale until the entire desired area of the map fits into the screen. Select the “rectangular selection” tool (the second button from the left on the toolbar or the Ctrl + R combination on the keyboard), and select the boundaries of our future map.

When the selection is complete, the Selection Operations dialog box appears. Now we are interested in the “Download” tab. The required map type has already been selected, and the required level of detail must be selected in the drop-down list (we clarified this a little earlier). All that remains is to click the “Start” button.


After some time (depending on the detail and area of the map), its sections will be loaded, and the message “File processing complete” will appear in the window. You can close the download window and move on to the next step - merging images.

We select the “Previous selection” item in the selection menu, or press Ctrl + B on the keyboard so as not to re-select the same area, and a familiar window will appear.

This time we are interested in the “Glue” tab. Here you will need to configure more parameters:
- Resulting Format— the image format in which our map will be saved. For further processing, it is advisable to choose BMP, although it takes up more space, it is understood by all programs and has no encoding losses.
- Where to save— here you need to specify the folder and file name in which the map will be saved.
- Card type— the current source will be automatically substituted.
- Scale — do not forget set the desired level of detail. By default, the program set low detail, which is now displayed on the screen.
- Apply— here you can add additional layers to the map. Such as Hybrid for Google maps, which displays main roads and symbols. Sometimes it can be useful for clarifying satellite images or putting names of settlements on them. To do this, do not forget to load an additional layer with the desired level of detail using the method described above.
- Create a binding file— check the “.map” box, it will be useful to us in the next step. The file will store the geographic coordinates of the corners of the resulting image.
We click the “Start” button and after a while we get two files in the specified folder - an image with a map and a .map file for binding to coordinates. Some navigation programs can directly use such images. But for handheld devices with limited resources, it is still better to save the map in a special format.
Processing a photo in a graphics editor
Often, due to not entirely favorable lighting conditions, or disturbing haze, or for some other reason, satellite images are “blind,” especially when displayed on the screen of a mobile device on a bright sunny day. To improve, you can make a small correction in any graphic editor. I will show this using the free XnView as an example, but you can use any other suitable one (from IrfanView to Photoshop), this procedure is similar everywhere.
But if you are completely satisfied with the quality and contrast of the image obtained at the previous stage, you can skip this stage.

The photo above shows the original image and the location of the "Auto Levels" menu item, which can be used to automatically adjust the contrast. The picture below shows the result of this operation. As you can see, the color and contrast of the image have increased, and the visibility of roads and water bodies has also improved slightly.

You can also use the manual mode - editing contrast and gamma correction (increase both):

or Hue/Saturation/Lightness. Focus on the option that is more suitable for your conditions.

Converting an image to OziExplorer format
To further convert the image into a more compact format that can be understood by OziExplorer, we will need the img2ozf utility. You can download it for free on the official OziExplorer website: oziexplorer3.com/img2ozf/img2ozf.html. The link shows the latest version of the utility that saves the format in ozfx3. For ozf2 files (used in older versions of OziExplorer), you will need to find an older version of the utility. Search will help you with this.
Install and launch the program. In the Source Image Folder field, indicate the path where the prepared images and the corresponding map files are located. In the Destination Folder field, indicate where to put the converted maps (if you click the blue arrow on the left, the folder with the original files will be used). You can play with the number of colors (the Number Colors field on the left side). The greater the number of colors, the smoother the picture, but the larger the size of the resulting file.

Check the boxes for the images you need to convert and click the big Process Image Files to OZF Files button.

The program will rustle for a while, processing files. At the same time, the current operations are displayed in the status line. The program creates several levels of detail for different magnifications, so as not to waste mobile device resources for recalculating large images. Therefore, encoding occurs in several passes.

As soon as Completed appears in the status line, the conversion is complete. In the folder specified in the Destination Folder, two files will appear - .ozfx3 (or .ozf2 for the old version) and the corresponding .map file (which, unlike the original one, will have a name like original_name _ozf.map).
Now all that remains is to upload both of these files to your mobile device and indicate to OziExplorer the location where they are located.
For example, this is what the OziExplorer window with satellite images looks like in Windows Mobile:


That's it, the cards are ready.
If something remains unclear, ask in the comments and I will try to answer.
In this part I will talk about the very first stage of creating a map. - setting up the "site". We will talk about creating objects and events in the following parts, but here I will tell you how to create an empty map, how to make your own copy of a ready-made map, and how to import individual objects from other maps into your own.- There are two ways to create a chronomap - “from scratch” or “copying”. Creating a map is a rather labor-intensive process, and I try to simplify it.
- You want to make a map of other events, but in a close time interval. For example, after "The Russian Civil War" I will want to make "The First World War". Most background objects (countries, cities, railways) will match. There is no need to add them again; you can copy an existing map, delete the unnecessary ones, add a new one and save it with a different name.
- You just want to experiment with a finished map. You can play with your separate copy as much as you like.
In addition to copying the entire map, you can copy individual objects from map to map. For example, rivers and mountains have changed little throughout human history (although there are exceptions). I don't want to re-apply them on every map. They can be imported from another map. Below I will tell you how.
Creating a new map- First, about how to create from scratch.
- To create an chronocard from scratch, you need to click on the “create chronocard” button on the main page and fill in the required fields:
- Name of the card. Here, I think, everything is clear.
- Description and picture for the list of cards on the main page. Your map will not be displayed in the general list of maps on the main page until the “Published” checkbox is checked in the settings (which I will discuss below).
- Time step and time frame of the map (start date and end date). Time on the map is discrete. You can choose a minimum step - day, month or year, depending on how detailed you want to describe the events. The step is common for the entire map; in the current implementation, it is impossible to make part of the map in detail and part not. Unlike all other parameters, the step cannot be changed after the map is created.
- Editors - If you want to fill out the map collectively, enter through "," the names of the users you want to open editing (they must be registered). The card will appear in their “My Cards” window.

A link to the map will appear in your "My maps" section. All parameters can be changed in the "map settings" section (except for the time step).
- In addition, in this section you can add options:
- “Published” - after this the map will appear in the list on the main page and will be available for viewing by users.
“Editing is open” - any registered user can edit the map, not just editors. The history of map changes is saved and you can roll back to the previous version. Permission settings, deleting a map, deleting the latest version are available only to editors.
Copying a card- Now I’ll tell you how to copy the finished map.
- To do this you need:
- Go to the desired map
- Click on the “save a copy” icon on the bottom panel.

Enter the name of the new card and click "save".
An independent copy of the map will be created that only you can edit.- Editing rights can also be configured in the "chronomap settings".
- Importing objects
- "Import objects" allows you to copy individual objects from other maps, so as not to create the same thing again every time. To import you need:
- Login to your card
- Go to editing mode (the "edit" button in the lower right corner).
- Click on the “import objects” icon on the bottom panel.

Select one of the ready-made maps and click the "Show" button. A list of features on this map will be displayed.
Select the required objects by checkboxes and click the "Add" button under the list.
- Copies of objects will be added to your map. After this, do not forget to save your map to the server.
- Next time I'll talk about adding your own objects to the map.
- Maps are a great way to tell how an event unfolded on the ground. If your story has a route or key points in different places, or features a specific area, show it all on a map. The advantage of maps is that they are visual, and with the help of interactive services they are also multifunctional. Using cards you can:
- build a route
- measure distance
- determine location (both your own and others)
- identify and compare characteristics of regions
Maps from Google and Yandex
Two basic and most popular services - Google Maps And Yandex maps. They are quite simple, but their functionality will be enough to briefly describe the route, illustrate the location or distance, and also demonstrate the traffic situation.
You can build your own map by customizing the design, adding layers, labels, and images. Interactive maps from Google and Yandex can be used on your website or application.
You can read about how to do this here:
- Google Maps API
- Yandex Maps API
2. 2 GIS specializes in accurate data about organizations that can be found on the map. Read the instructions to find out how you can use the 2GIS widget on your website. If you want to make a name for yourself through this service, try 2GIS for business with a set of tools for promotion. Useful feature: you can embed a map that will show establishments in a specified region, sorted by category.
3. ZeeMaps offers tools for adding large amounts of information and analyzing it on a map. to understand how to customize the map and add new layers and elements to it.
4. There are a huge number of tools for data visualization. ArcGIS . They are designed primarily for professionals, so they only have a paid subscription. But the possibilities for data analytics and the development of new interactive maps are almost endless.
5. CartoDB also has a rich set of tools for data visualization. You can see in the gallery that the maps turn out to be very dynamic and informative. Learn to make these.
6. Scribble Maps It is distinguished by the ability to download maps in a variety of formats.
7. A service that allows you to create entire stories from cards - StoryMap JS. Create a route and add text, photos or videos to each point on the map. Eg, in this project you can find out how the Olympic torch moved during the Sochi relay.
You can use your own maps or photos by uploading them in image format and adding descriptive dots on them. A convenient feature of StoryMap JS: the service can automatically assemble a map from the 20 most recent photos on Instagram. All you have to do is edit it if necessary.
8. It boasts a similar function Tripline. In addition to Instagram, it integrates with Foursquare, Flickr, Twitter, Facebook and other services.
9. Historical map from GeaCron might be useful for a history project.
10 and 11. If you are talking about the weather, then feel free to embed Windy - a beautiful weather globe with a good set of tools. For industry professionals there is also Planet OS.


