Artistic pencil drawing of a cat. Cat tattoo
Now we will learn how to simply and beautifully draw a cat with a pencil step by step for beginners. For this we need at least one very soft pencil, I use 6B. To draw the outline of a cat (kote), it is better to take a hard or hard-soft pencil.
Step 1. First, we will draw a circle and parallel lines. Then we draw the nose, muzzle and mouth of the cat. Then we start drawing the eyes. First we draw the upper part of the eye in the form of an arc, then the lower part and the pupils in the eyes. Draw three hairs on top of the cat's eyes.

Step 2. Now we sketch the edges of the cat’s eyes and draw the outline of the head.

Step 3. Draw the ears, then draw the cat’s body. First we draw the folds on the neck, then we draw the outline of the back and tail, then the line of the cat’s chest.

Step 4. Draw the cat's paws.

Step 5. Draw a mustache. So we should get a cat (kote), in principle, we can finish drawing here, or we can try the next step.

Step 6. In previous lessons on drawing techniques, we simply drew lines and smeared them (for example, in the lesson about a flower), and also learned to understand how to place a shadow on an object, how the shape of the object itself can change because of the shadow. Now we will draw differently, we will need a soft pencil and an eraser. The whole technique consists of a soft transition of shading from dark to light. To achieve a darker color, press the pencil hard, then loosen and loosen the pressure, and at the end, barely touch the pencil to the paper. We shade either with a zigzag, where appropriate, or with separate lines close to each other so that they merge. And at the end of the hatching, so that it merges with the unhatched area, we go over it with an eraser, but not with the edge, but with the entire side (width), it turns out that the eraser does not erase, but smears. In principle, the edges can be smeared not with an eraser, but with a napkin, cotton wool, paper, just the edges themselves and not be overzealous. You could practice on a ball or cone, as they force you to do in schools, but this is boring and not interesting. We will study on the object that we like, so we can learn faster. The shadow from the edge, for example the muzzle, will always be darker, then it goes lighter into the middle, i.e. to add volume, always make the edge darker than the other part. Let's try and post pictures.
Puss in Boots from a favorite fairy tale or beloved domestic cat often become characters in children's drawings. In addition, such pictures, drawn with pencil or paints, can become good decoration children's room. But in order to draw a cat correctly, let's first learn how to draw it with a simple pencil, then let's try ourselves oil painting, and after that we’ll find out how to depict a furry pet with five different ways.
Pencil drawing step by step
To prevent the cat from looking lonely in the drawing, you can draw several objects nearby, for example, “sit” him on the windowsill.
Oil painting
 For the lesson we will need:
- titanium white;
- gas soot;
- burnt umber; (mars brown)
- cadmium red; (red durable kraplak)
- cadmium yellow medium;
- blue FC;
- cobalt violet dark;
- Thinner for oil paints;
- canvas (square);
- rag;
- brushes (No. 3, No. 1, No. 6, No. 16).
Before you start working with paints, I want to pay attention to some points:
- Start simple.
- If you have never drawn animals before, do not paint them in some complex (incomprehensible) poses, and it is better if the color is limited to one color. This way it will be more clear how to create shadows and light on the fur, and you won’t have to think about how to go from one color to another.
- To avoid gross mistakes in the structure of the animal, it is worth considering that all animals' eyes are on the same line, and their size is the same, especially if they look directly at you. The same can be said about the location of the ears and the length of the paws.
Let's start the oil painting lesson: background and sketch
Making the background. To do this, mix burnt umber and whitewash, add a little thinner to them and cover the entire canvas with a large brush. Give it 10 minutes. so that the paint is absorbed a little.
Sketch. Using a thin brush dipped in white, we plan to paint a kitten. Next is the line of the back of the chair from behind which it peeks out. Cat's head and paws. We evaluate the proportions and shape of the intended objects. For example, we look to ensure that the head is not too large (small) in relation to the canvas and paws, and that our sketch looks symmetrical and harmonious.
We wipe off the paint. Using a cloth, remove the background paint from the areas where you marked the cat’s body and the light-colored chair.
We outline the kitten's head and paws using light white paint. If necessary, we adjust the shape, size or placement. You can also use this paint to mark the back of the chair on which the kitten is leaning.
At this stage, you can immediately mark the shadow under the kitten’s paws with cobalt violet mixed with white and burnt umber.
Continuation of the lesson: background, main character, eyes
Background. Our next task is to draw everything that is behind the kitten. You should not put too much effort and precision into this work. Our background is “out of focus”, a little blurry. Therefore, we can outline it with a fairly large brush.
We are writing the main character. Next we outline the main color and light spots on the kitten’s face. Mix grey colour: with whitewash and gas soot. We mark the light on the nose with clean and thicker white. Lightly mark the darker spots where the eyes will be located. Light on the paws. Let's clarify the shadows. Thus, slowly but surely, step by step without haste, we are moving towards an increasingly detailed elaboration of the portrait of our playful and furry hero. Only at the last stage of work, on top of the main spots, do we sketch out thin, elegant strokes, marking the antennae and fur of the kitten. It should be noted here that when drawing a kitten's fur, even at the initial stage, your strokes should follow the direction of growth of the animal's fur.
Eyes. Next, an important stage, the mirror of all our work - the eyes of the hero. They should be same shape and size, and also be placed on the same line (without distortions). This is extremely important! In order not to get confused and not tormented by doubts and corrections, I advise you to initially outline the size, shape and placement of the eyes simply as darker spots. Evaluate them and adjust if necessary.
Next is work with color. Everything here is quite simple. We outline the pupils, almost pure black (a vertically elongated oval). Then, add eye color. In my case, it’s burnt umber with cadmium yellow and a drop of white. Let's add highlights on top of the essentially finished eye. We do this with thick white paint with a thin brush and quite accurately, since it will be difficult to correct.
Important! - we work on two eyes at the same time, rather than drawing one eye first and then the other. With this approach, there is a very high chance that you will draw different eyes.
Details and clarifications. On last stage we can refine and boldly work with a thin brush. We draw fur, antennae, some highlights on the pile. We specify the shadow under the paws on the chair and the color of the chair. In general, we bring the work to the stage of completion. This work can be completed immediately in one session, and if you are tired, you can safely put it off until tomorrow.That's all! The picture is ready!
Draw a striped cat (felt-tip pen, pen, pencil)
Stage 1. Let's draw the auxiliary lines of the cat. The circle is the head, the oval is the body. In the circle, just above the middle, draw a straight line for the eyes. The tail line extends upward from the oval at the back. From below the oval - straight and broken lines future cat paws. 
Stage 2. We begin to outline the contours of the body of our pussy. Using the auxiliary lines outlined in the previous stage, we outline the cat’s body, showing a thick tail raised up and curved at the end, back, ears, muzzle, chest, paws. 
Stage 3. Draw the cat's eyes on the face. The arrow shows in enlarged form how to draw them correctly. 
Stage 4. Now we will draw spotted areas, cheeks, and nose on the ears and muzzle. In the circle all this is shown in an enlarged form. 
Stage 5. From the bottom of the head along the neck, chest and front legs we will draw transverse lines - future stripes on the fur of our cute little animal. 
Stage 6. We will also draw transverse stripes along the rest of the body, hind legs and tail, giving our cat a special flavor. 
Stage 7. Now let's erase all unnecessary lines and leave only the necessary ones. 
Stage 8. Let's color our kitty. It should be striped. It can be gray with white stripes, or black with white stripes. Or maybe red, also with stripes. 
You know very well what colors cats can be, so color your heroine as you wish.
5 ways to draw a cat
In order to learn how to draw a cat in five different ways, we will need a sheet of paper, a medium-hard pencil and an eraser. Just in case, you can take a compass and a ruler. So, choose the cat that you like and simply repeat each step step by step.

Cats are incredibly graceful and beautiful animals, so drawing them is a real pleasure. For novice artists who have recently begun to master graphics, master classes on how to draw a cat with a pencil step by step are suitable.
Creating such cats does not require skill, talent or artistic taste. If a child asks to draw a cat, and time is short, then you can limit yourself to funny images.
Sleeping kitten
Anyone can easily draw such a sleeping miracle. All you need for this is an A4 sheet, soft and hard pencils, an eraser, a little patience and perseverance.
Stage 1: We start drawing a sleeping cat from the head. To do this, draw a circle with a hard pencil and mark thin auxiliary lines. The vertical divides the muzzle clearly in half, and the horizontal goes so that the upper part accounts for more than half of the circle.
Stage 2: Focusing on the auxiliary lines marked in the first stage, we outline the kitten’s eyes, nose and mouth.
Stage 3: Mark the outline of the head with a soft pencil. We draw the ears, protruding fur, and a funny “whirlwind”.

Stage 4: draw the body of the animal and draw the tail. Please note that the kitten is curled up into a ball, so the tail covers part of the muzzle.

Stage 5: At the last stage, the paws and whiskers are drawn. Use an eraser to carefully erase any excess lines and markings. The kitten is ready. If desired, you can color it with paints or colored pencils, or leave it as is.

Mischievous kitten

Any child will love this naughty baby. You need to start drawing a mischievous kitten from the head. Draw a circle, add triangular ears and draw a muzzle. Then comes the drawing of the torso and paws. Play with your kitten's emotions and show your child that... small parts The mood of the cat shown in the picture depends. Surprise can be conveyed through wide-open eyes; a protruding tongue will add mischief, and by moving the pupils slightly to the side, you can make a thoughtful or sad cat.
Kitten made of circles

Even a child can make this drawing of a cat from circles with a pencil, since it is one of the most simple ways for beginners. The animal is drawn from the back, so there is no need to draw features and maintain proportions.
First, two circles are drawn on the sheet so that they slightly intersect each other. In this case, the diameter of the lower one should be approximately twice as large as the upper one. Then the ears are drawn to the upper part, and the tail to the lower part. Then the mustache is drawn and the fur is randomly marked.
One circle, two circle
Another clear example of how you can quickly and easily draw a cat with a pencil.

The larger circle is drawn first, and then another, smaller circle is drawn inside it. Add ears, facial features and a tail. Children will love a funny sleeping kitten and can quickly distract a child and cheer him up.
Such a sketch is something between simple schematic images and realistic drawings animals.
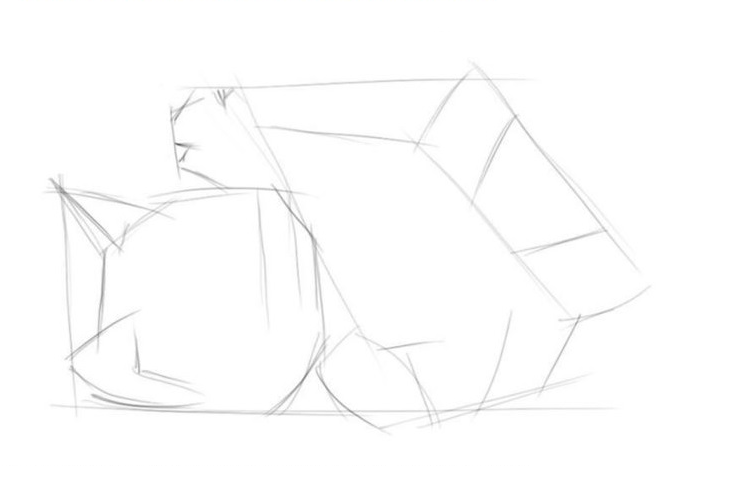
We mark the outline of the animal with thin auxiliary lines made with a hard stylus. The sketch of the head looks like an octagon, the ears are triangles, the body is a rectangle or cylinder. After this we make markings for the paws.
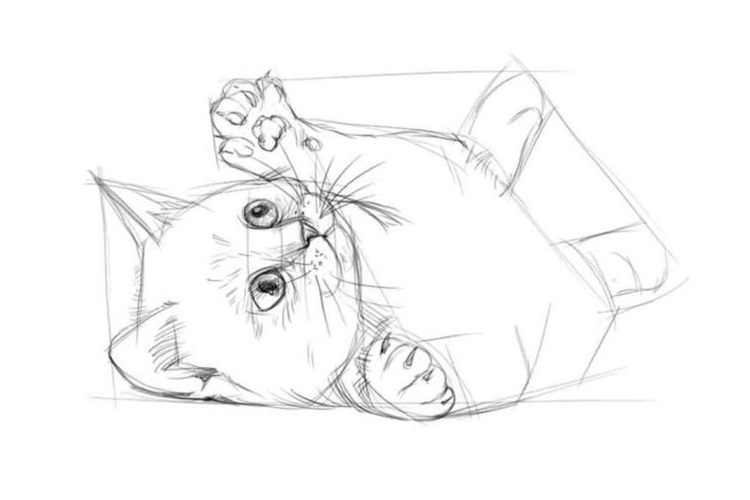
We draw a horizontal line in the center of the head, thus indicating the level of the eyes. We draw sketches of the mouth and nose, round eyes. We draw a chin and mustache.

We define the muzzle more clearly. We draw in detail the eyes, nose, mustache and cheeks. Using a soft pencil, draw fibers on the ears, head and muzzle. Then we draw the front paws with claws and pads, and detail the hind paws.

On final stage All auxiliary lines are carefully erased. It's time to draw fur. For these purposes, a 2M (or 2B) lead is best suited, but in principle you can use any soft one.

Realistic
Many people think that realistic portraits pets is not the easiest task for beginners, but in reality not all sketches are difficult. You can verify this using the example step by step instructions to the portrait of the Scottish Fold.
Draw a Scottish fold cat with a pencil
Scottish Folds are loved by many breeders for their disposition and charming appearance. Thanks to distinctive feature breed - with their ears bent forward and downwards, these cats look so cute that it is impossible to resist squeezing such a mustache. We offer simple step by step lesson for beginners how to draw british cat pencil step by step.
At the first stage, auxiliary lines are drawn with a hard pencil: 1 vertical and 2 horizontal. The vertical one shows the center of the muzzle, so it needs to be shifted slightly to the right relative to the center of the page, since the cat is sitting slightly turned.
The horizontal ones should be parallel to each other, as they indicate the size of the animal's eyes. After this, you need to start drawing the contour of the muzzle and eyes.
Important! For a cat to be proportional, the distance between the eyes must correspond to the size of the eye.
When drawing a nose, remember that its size should be less (narrower) than the distance between the eyes.

Then, using an M or TM stylus, we darken the eyes and nose. More experienced artists If you are confident in your movements, you can use a black pen for these purposes.
To make the cat’s look “alive”, do not forget to leave unpainted, white areas, as in the picture.

For the third step, you will need a 2M (or B2) pencil. Carefully, using smooth lines, shading the strokes, darken the areas around the pupils. Notice how the color goes from darkest (around the pupils) to lightest. Then, with a hard stylus, arrows are marked in the direction from the nose. They show directions for drawing fur.

Using the softest stylus (it is better to use B4 or 4M), focusing on the arrows, draw the darkest fur. The crown and fur under the ears should be the darkest.

To complete the picture, draw in the remaining fur. The cat is ready
Attention! The color of the bristles depends on the force of pressure.

The cat is one of the most favorite animals among children. Cats attract them with their fluffy fur and affectionate playful disposition. In ancient times, cats were considered sacred animals. And still some people are convinced that these animals can heal people.
It doesn't take much skill to draw a cat. With the help of video and photos, we will see step by step how you can easily and beautifully depict the figure of a cat.
1. Draw a circle, from which we lower down an oval, widened at the base. We get the head and torso of the cat.
2. Draw triangular ears on the head.
Stage 1-2: draw the head, ears and body
3. From the middle of the body, draw the paws with four lines.
 Stage 3: adding paws to the body
 4. On the muzzle we add eyes, a nose and a mustache.
Stage 4: draw the face5. All that remains is to draw the raised tail.
Stage 5: draw the tailWe color and tint our cat. The result is a drawing like this.
Stage 6: color the cat
Graceful kitty
In the following steps you can draw an elegant cat. There is a photo and video detailed instructions how to draw a cat with a pencil.
1.Draw an oval and divide it into two perpendicular lines into four parts.
Stage 1: draw an oval with lines
2.Slightly sharpen the corners on the sides, add a nose, mouth and ears.
Stage 2: sharpen the corners, draw ears and nose
Stage 3: finishing the eyes
4. We lower another circle down - the body - and two paws.
Stage 4: draw the torso and front legs
5.On top we draw the base of the ovoid body with the pointed end up.
Stage 5: finishing the torso from behind
6. Draw paws and a tail at the base.
Stage 6: add a ponytail and hind legs
7. Tint the top of the muzzle and tail.
Stage 7: color the cat
We get a beautiful charming cat.
Little kitty
Now let's draw a little kitten. To draw the figure of a cat correctly and beautifully, consider the instructions, photos and videos. Here's how to draw a kitten with a pencil step by step.
1.Draw two circles one above the other: one bigger size, and the other smaller.
Stage 1: draw two circles: head and torso
2. On the muzzle we depict eyes, a nose and a tongue, and on top – two ears.
Stage 2: draw the face and ears
3. The next step is the front and hind legs, tail.
Stage 3: draw the front legs Stage 4: draw the hind legs Stage 5: complete the tail
In the picture there is such a baby kitten.
Ready kitten
How to draw a cartoon kitten:
cartoon pussy
You can draw a cartoon cat for children in an easy and original way in four steps. The video and photo provide detailed instructions on how to do this step by step.
- We draw a circle beveled at the top - the head - and an ovoid body.
- Add a raised tail.
- We draw the eyes and nose, and use a curved line to divide the body in half.
- We depict the cat's pupils and whiskers.
- Color the picture in purple shades.
This is how you can quickly and beautifully depict a cartoon cat.
Muzzle
If you do not want to depict a cat in full height, you can draw only the animal's face. Let's see how to draw a cat's face step by step. Easy drawing and is accessible even for children.
- We draw a circle and divide it into four unequal parts with two smooth lines.
- We place the nose and mouth in the center, and to the right and left of the center are the cat’s eyes.
- On the head in the form of two triangles we depict the ears, below - the contours of the neck.
So, it won’t be difficult to draw an animal’s face beautifully and correctly.
To profile
To depict the cat's face in profile, we start with the same circle. Divide the circle in half horizontally. We draw in the ears and lengthen the circumference with the contours of the nose. On the line we draw the eyes and nose, a little lower - the mouth. We clarify the contours of the ears and remove the circle. We get an easily and beautifully drawn face. Stages of drawing a cat's face in profile
With kittens (1st option)
It will be interesting for children to draw a cat with kittens. However, the drawing is complicated by the fact that in this case you no longer need a separate figure, but a whole composition. You can easily and correctly depict a cat with kittens in stages as follows.
1. Draw an oval (the body and the center of the composition), and a circle on the bottom right.
Stage 1: draw an oval and a circle
2. At the next stage, draw the head and contour of the body.
You can draw a cat using paints, crayons, pencils and other visual arts. However, if you are a beginner, it is better to start with the simplest ones, gradually moving on to more complex ones. Having mastered the technique of drawing with a pencil, in the future it will be easier for you to draw with paints and other materials. It is also worth considering that when using the same drawing technique, the result, due to the individual abilities of each artist, always turns out different.
Learn to draw a cat step by step
First you need to remember what a cat's body consists of - this is the body, head, tail, ears and paws. The listed body parts are simple figures: the body is an oval, the head is a slightly flattened circle, the ears are triangles with rounded corners, and the paws and tail are elongated ovals.
Connecting the drawn figures together
This needs to be done smoothly, as if adding parts of the body to each other, as in the process of modeling from plasticine. If the face of the future cat is designed to be half a turn, then the far ear should be depicted rotated, and its outline in the drawing should be made thinner so that its inner side is almost invisible. To make a cat more believable, you should not draw only straight lines; any part of the body has irregular shape with bulges and smooth curves.

Draw a face
The eyes and nose of the future cat should be drawn in the lower part of the head, having previously delimited the areas on the muzzle: first, mentally divide it in half, determining where the upper border of the eyes will be, and then divide the lower part into three lobes. Thus, in the middle part of the lower lobe the nose will be outlined, and below it - the mouth of the future cat. The inner corners of the eyes should form a triangle with the lower corner of the nose.

Drawing wool
How to draw a cat fluffy? In place of the old outline we apply small lines - wool. There is no need to rush to draw a broom in place of the tail; the result will be much neater and more natural if you draw individual hairs along the contour of the tail.

Shading the body
At this stage, we shade the cat’s body, completely covering it with small hairs, observing the direction and length. The breast and the inside of the ear closest to us can be left unshaded.

Adding volume
We do this by drawing the legs, torso and head with brighter bold strokes. The strokes should go in an arc from the edges to the middle. We make the far paws darker than the near ones. Apply shadows over the nose, eyebrows and on the paws.

Finishing touches
We enhance the shadows, add whiskers and some random lines on the ears, tail and paws. Voila, the cat is ready!

Drawing a cat with a pencil (method for beginners)
A simpler version of drawing a cat using a pencil is clearly shown in the following diagram:
- We depict a circle and an oval, which will later become the head and body of the animal.
- We add 4 small ovals to the large oval - these will be the limbs of the future cat, and in the circle we outline a smaller circle - the muzzle.
- We draw triangular ears, paws in the form of two small ovals and outline places for the eyes.
- We complete the tail with an arc, add the front limbs with elongated oval details - paws, and draw the eyes.
- We finish marking the body parts.
- We draw the mustache in detail, add a little fur on the muzzle, and give the drawing a finished look.

Cartoon cat coloring book for child
It’s not at all difficult to draw a funny cartoon cat in anime style that will bring a lot of joy to your child. We follow the visual instructions and repeat.
- Let's draw big circle, divided into 4 parts, and under it an oval.
- We slightly stretch the face of the future cat to the sides and decorate the ears.

- We designate the nose, eyes and eyebrows.
- We finish drawing the paws.

- We complete the drawing of the animal with the image of the body (in place of the previously outlined oval) and tail.
- We remove the auxiliary lines, outline the outline of the coloring cat and let your child color the resulting cute kitten with paints or felt-tip pens.

Another option for creating a simple but very cute cartoon cat coloring book can be seen in the video below.
Here are a few more simple ways to depict a cat, which are suitable even for beginners.

And, using the step-by-step diagrams below, you can quickly and easily draw cats of various breeds.


