Bread dough recipe. Long-dough bread from the refrigerator
Sourdough is baked in different ways. Each housewife has her own recipe. I will share my experience. I have been baking sourdough recently, but quite successfully (the whole family likes bread and my other baked goods). I would be glad if you share your experience with me.
In the evening (all night) I put the sourdough dough on. I stir 0.5 cups of starter in water at room temperature in a large container. 
It’s better to take the starter out of the refrigerator in advance so that it “wake up” (about 2 hours before). I take water depending on the desired amount of dough. For a “classic” pie pan, 400 ml of water is enough for me. 
I add flour so that the consistency of the dough is like thick sour cream. 
I place the container in a very warm place (in my apartment this is the oven, which I turn on for 1 minute). In the morning the dough should bubble. I stir the dough and set aside 0.5 cups of the starter for next time, “feed” the new starter with flour until it has the consistency of thick sour cream and put it in the refrigerator. 
If I bake simple lean bread, then I add 2-4 tablespoons of olive oil, salt and sugar/honey to the dough (only after I have put aside the new starter(!!!) (I first dilute it in a small amount of water). 
You can add cumin, coriander, bran or other "fillers". I add enough flour so that the consistency of the dough becomes very thick (it’s difficult to mix with a spoon). 
I cover the dough and put it in a very warm place for several hours. When the dough has risen, I add a little more flour, knead with my hands, let the dough rise further, 
Place the dough in the mold and bake at 200C for about 60 minutes. After baking, I wrap the bread in a towel “to rest” for several hours.
If you need butter dough, then in the morning I add 250 ml of milk at room temperature (or a little warmer) to the dough, flour until it has the consistency of thick sour cream and leave it in a warm place for an hour. After an hour, I add butter (pre-melted and cooled), vegetable oil, salt, sugar/honey (pre-diluted in a small amount of water), eggs, and enough flour to the consistency of a “standing spoon.” 
I put it in a warm place for several hours. When the dough rises, add flour, knead, let it rise some more, 
I shape and bake.
P.S. 1. I recommend having a “reserve” jar of sourdough, since several times I forgot to put the sourdough aside in time for the next time (if you added salt or sugar or butter to the dough, then it can no longer be used as a sourdough next time). What helped me out in such a situation was that I had several reserve jars of sourdough
2. For butter dough, use only High-grade flour.
Very tasty homemade bread!
To begin with, I want to say that yeast dough stopped scaring me not so long ago. Just a year and a half ago, I was only licking my lips at yeast baked goods and did not dare to bake myself. No, it’s not that I haven’t baked before... I have baked! There were attempts and, as I remember now, once they even turned out decent buns, a little wooden, of course, but homemade. About a year ago I was forced to start baking because... My little son had a terrible allergy to dairy products. It sprinkled on everything that had even a drop of milk in it, and he loves buns to bits. I can’t count the torment I transferred! The dog got terribly overstuffed on my creations because he was the only one who ate my baked goods. Well, nothing, by trying different types of flour, different yeast, different recipes, I became friends with yeast dough! Now I already understand that many of my mistakes were due to the fact that the vast majority of recipes are written rather superficially. That is, small needs such as, for example, do not work with the dough in a draft (because the dough becomes stiff and turns into a brick) are prescribed in a very small number of recipes, and the result of baking sometimes depends on such small needs. I may also be missing something, but I try to describe the preparation of this or that pastry in as much detail as possible, so that you can get it right the first time without a hitch.
I usually bake quickly Uzbek flatbreads or buns for sandwiches, but then I had two days without a computer... I decided to bake bread according to all the rules with dough, etc., but I got so carried away that I baked 2 types of bread: sponge and unspread and baked it after French bread!
So, let's begin!
Sliced bread at home: (proportions are taken for convenience so that there are no such numbers as 22 gr. 513 gr., etc., GOST ingredients)
*Another small digression: Premium flour (premium grade) also comes in different varieties. Flour with 10% protein content (Sokolnicheskaya, Makfa) is ideal for sweet baked goods, ideal for charlottes and muffins, but in yeast dough it does not always perform well, so I use premium flour with 13% protein content for baking yeast dough products. It is ideal for yeast baked goods. The dough behaves completely differently. More elastic, pliable and pleasant to work with, while sweet baked goods turn out wooden with such flour. The amount of protein (protein) can be found on the packaging. This flour makes simply amazing ciabatta! And the flour takes a little more water per 10-20 grams. Therefore, if you bake with 10% flour, you often need it for 1 tbsp. more spoon than in the recipe, or less water is added.
Dough recipe:
- Premium flour – 200 gr.
- Warm water – 100 ml.
- Yeast (saf-moment) – 1 tsp.
Dough recipe:
- Opara
- Flour – 150 gr.
- Water – 85 ml.
- Salt – 1 tsp. no slide
- Margarine 82.5% – 15 gr. (about 1 tbsp)
Preparing the dough:
Preparation of the dough:

Molding:

Bakery:
- Bake with steam for 10 minutes. Remove the bowl of water and lower the temperature by 200 degrees. and bake until nicely crusted.

The bread turned out amazing! And he ate it almost immediately. It does not have a pronounced crust, the crumb is simply airy. The loaf didn't survive until the morning!
Therefore, in the morning I decided to make more bread, but according to an accelerated program without dough! 
So the recipe for bread at home (safe method):
- Flour – 450 gr.
- Water – 225 ml.-250 ml.
- Saf-moment yeast – 1 tsp. no slide
- Sugar – 1 tbsp. spoon without slide
- Salt – 1 tsp. no slide
- Margarine 82.5% – 15 gr.
Preparation:
- Mix all dry ingredients together
- Pour in the water and mix well (mix with a mixer for 5 minutes at medium speed so that the salt and sugar are completely dispersed throughout the dough)

- Add margarine a little at a time and knead the dough until completely dissolved.

- We beat the bun and leave the dough to proof for 1.5 hours. Fold the dough 2 times! In half an hour and again in half an hour!
- Divide the risen dough into two parts *I thought that two loaves would be enough for more than one meal... I was deeply mistaken...

- Roll out the flatbreads and roll into rolls

- Cover with film and leave to proof completely! *Full proofing means until the loaf has increased in size by 2-3 times. It may take 40 minutes, it may take 1 hour!

Bakery:
- Preheat the oven at 230 degrees. Heat the baking sheet together with the oven
- Place a bowl of water on the bottom shelf *Alternatively, spray the oven walls with water during the first 10 minutes of baking.
- Bake with steam for 10 minutes. Remove the bowl of water and lower the temperature by 200 degrees. and bake until nicely crusted. *This time I also brushed the bread itself with water! If you noticed, the first one set quite hard and I decided to try to moisten these bars a little, because... I know from experience that this will prevent the bread from crusting so quickly and will give it time to bake.

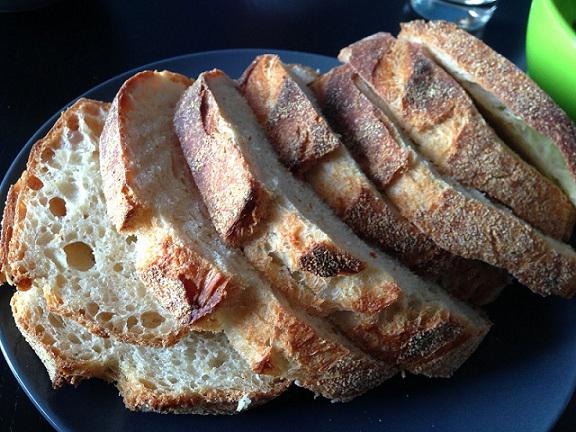
Well... the bread turned out amazing again (I repeat)... I don’t know how different it is from sponge in taste, but it was eaten again instantly, the first loaf didn’t even have time to cool.. I cut off the top of the second loaf and put it in a bag until the morning to say you, as in the morning, when stored in the bag, it remained just as soft and airy!
Well, since it so happened that two versions of bread were already baked, I decided to finish off the bread madness with French rolls!
Ingredients for cooking
In order to bake delicious homemade bread, we will need:
- Whole grain flour – 100 g.
- Rye or wheat flour of the 2nd grade – 100 g.
- Mature sourdough – 30 g.
- Water – 1 glass.
The secret to good dough is any coarse flour: whole grain, coarsely ground, with bran or germ. In order for sourdough bread to come out great in the oven, it is important to avoid premium wheat flour, which is emasculated.
How to prepare the dough?
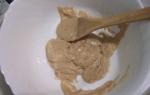
So, the flour should not be emasculated. It is better if half of the total quantity is of one variety, and the remaining part is of another. Housewives can combine different combinations, the quality of the bread will not suffer from this. First, beat the ripe sourdough into a fluffy foam, then add flour and mix everything thoroughly. It is necessary to maintain a sufficient amount of time for the mass to rise well. So, if you plan to bake in the morning, leave the dough in a warm place overnight. For evening cooking, you can make the batch before leaving for work in the morning. The complete preparation of the dough is influenced by temperature factors, as well as the grade of flour.

Ripening time for high-quality dough
To make the bread rise faster, housewives place the pan with the dough in a warm place on a low-heat stove or in an oven that maintains a temperature of no more than 32 degrees. Under these conditions, the bread rises completely in 6-8 hours. When it is not possible to withstand such a temperature regime and the dough arrives at a temperature of 22 degrees, its complete ripening will take place in 9 hours. If you adapt to compliance with the given conditions, then preparing delicious sourdough rye bread in the oven is as easy as shelling pears.
What should be the volume of the resulting mass at the first stage?
Few novice bakers know how many times the initial volume of dough increases. The dough should rise exactly 2 times. If at first it is difficult to navigate purely visually, you can use a container with measuring marks. In the future, everything will go intuitively. If the process seems quite complicated, you can try baking sourdough bread in the oven without dough.
Kneading dough
The second stage of the whole process begins. So, to prepare sourdough bread in the oven, let’s move on to the actual kneading. We take the following ingredients:
- Ready dough.
- Water in the amount of 1 glass.
- Bread flour – 450 g.
- Dry yeast - 0.5 teaspoon.
- Salt - 2 teaspoons.
First breakup
Many bread makers have a bowl covered with a plastic lid. Therefore, for pre-fermentation, you can leave the dough right there. The first proofing time is 50 minutes, during which the mass rises well. The swelling of the base and an increase in size are noticeable to the naked eye. After the required time has been maintained, you can proceed to the next stage of kneading, using salt and vegetable oil. To properly prepare sourdough bread in the oven, the recipe for which is given here, you need to stir the salt until completely absorbed, and only then pour in 2 tbsp. spoons of butter. The dough is ready when it completely leaves the sides and bottom of the bowl. The resulting bread mass looks quite impressive thanks to whole grain flour or flour with bran.
The final stage of proofing
But that is not all. The resulting mass needs to sit a little longer before going to bake. Now you practically know how to cook sourdough bread in the oven, there are very few manipulations left. And if at first it may seem that this process is quite labor-intensive and time-consuming, then it is not so. Having filled your hand, you can later bring the dough kneading to automaticity. So, our bread mass needs another 20-30 minutes of rest, during which you can drink a cup of coffee, check your children’s homework, or watch the latest news. We will carry out the process of forming a loaf on a smooth surface, lightly dusted with flour, using a special scraper. For the final stage of proofing, a bowl or salad bowl covered with a layer of parchment paper is suitable.

Inventing a proofing cabinet
In the kitchen of an ordinary apartment, any dark, enclosed space can be used for the final proofing. A microwave works well, you just need to put a glass of boiling water inside. Sourdough bread in the oven, the detailed description of which you have carefully studied, will not turn out well baked unless cuts are made in a random order on the surface. But first, the future loaf is lightly sprinkled with flour. Experienced bakers use proofing under film. However, if the housewife takes up baking bread for the first time, it is better not to experiment.
Place the loaf in the preheated oven
From the moment the cuts are made, the bread should be placed in an oven preheated to 300 degrees. We will immediately reduce the temperature to 220 degrees. Of course, the oven must be turned on in advance. The baking container must have a lid. The workpiece itself is transferred there directly with the paper. To ensure rich, rather than dry, sourdough bread in the oven, the recipe recommends sprinkling the mixture with water several times before closing the lid. To do this, you can use a spray bottle. Baking time with lid - 15 minutes. Then remove the lid and leave in the oven until fully cooked.
Eating healthy and showing love to your family
No aroma can compare with the smell of freshly baked homemade bread. Household members will be confident in the absolute love of their mother and wife. Anyone who inhales the unsurpassed smell will be intoxicated by it. And when it comes to cutting the beautiful loaf, an elastic crumb with large pores will appear. The taste of the resulting culinary masterpiece is so excellent that the family will ask their mistress to bake homemade bread again and again. After such an ideal taste, not only a gourmet, but also a completely undemanding person will not want to return to the store-bought version. This delicious bread is worth learning how to bake.
The question arises: “Will the strong half of humanity be able to please their family, at least in their leisure time, with delicious aromatic bread?” Yes, men are great cooks, but they usually don’t like fiddling with dough, considering this process quite tedious. We believe that sourdough bread in the oven, the recipe for which is presented in this article, will become a specialty for housewives.
Alternative baking method
Now the reader is aware of how to bake sourdough bread in the oven, the recipe with photo has been studied. A logical question arises in itself: “Are there alternative methods of baking?” Skilled bakers, honing their skills and experimenting, are in search of the best options for creating this indispensable component on the table. Thus, many craftswomen have adapted for this task a round, deep Chinese frying pan with a convex bottom, called a wok. However, traditional, albeit more time-consuming, is baking in the oven on a stone. This method is similar to what our ancestors used when sending bread to
Baking bread in any folk cuisine is always a sacred, mysterious act, almost witchcraft. The secret of making bread was carefully kept in every family and passed on from generation to generation. The sourdough bread baked in a Russian oven was tasty and aromatic, one can say that there is no such bread and cannot be found anywhere else in the world. The ancient science of baking is not forgotten today.
Russian bread starters were prepared from rye flour, straw, barley, wheat, hops... In remote villages, far from “enlightened” civilization, you can still find recipes for making bread without purchased yeast. Yeast-free starters and bread prepared with them enrich the body with organic acids, vitamins, minerals, enzymes, fiber, pectins, biostimulants - in general, all those beneficial substances that are present in whole grains. One experiment that was conducted by journalists from one of our television channels speaks in favor of sourdough bread. They bought a regular loaf of bread and compared it with bread baked at home. The camera recorded changes occurring in the bread throughout the week. Store-bought bread became moldy on the second day. Three days later he was covered in black and green fluff. And the homemade bread has just gone stale. It’s just that sourdough bread, in principle, cannot become moldy - the acidic environment kills all harmful bacteria and does not affect the beneficial ones.
 So, if you are ready to bake homemade bread, the first thing you need to do is prepare a sourdough starter. There is nothing scary or difficult about this. You don’t need to tremble over it like you would over a crystal vase, just mix the right products and wait, and the result will definitely come. First, let's decide what kind of sourdough we will prepare. There are different sourdoughs: rye, wheat, malt, hop, potato, raisin, even rice - they are all good (each in its own way) for baking bread. It must be said that rye flour is best suited for making sourdough, since it retains all the beneficial substances that are not found in refined wheat flour. This is why sourdough made from wheat flour often deviates towards pathogenic flora, sours and becomes unsuitable for use. It is better to prepare wheat sourdough for one or two uses, but rye sourdough can be successfully used for more than one year, the main thing is to store and “feed” it correctly.

1 day: Mix 100 g of rye flour with clean water to the consistency of thick sour cream, cover with a damp cloth and place in a warm place without drafts.
Day 2: bubbles should appear on the sourdough. If there are few of them, it's okay. Now the starter needs to be fed. Add 100 g of flour and add water to get the consistency of thick sour cream again. Leave again in a warm place.
Day 3: the starter has grown in size and has a foamy structure. Add 100 g of flour and water again and leave in a warm place.
After a day, the starter is ready for use. We divide it in half, put one part in a jar and cover it with a cloth or a lid with holes so that it can breathe, and put it in the refrigerator. We use the other part for baking bread.

1 day: mash a handful of raisins with a masher, mix with ½ cup of water and ½ cup of rye flour, add 1 tsp. sugar or honey, put everything in a jar, cover with a cloth or a leaky lid and put in a warm place.
Day 2: strain the starter, add 4 tbsp. flour and warm water until sour cream thickens and put back in a warm place.
Day 3: the starter is ready. Divide it in half, as in the previous recipe, add 4 tbsp to one part. flour, water (until sour cream thickens) and put in the refrigerator. Use the other part for baking bread.

1 day: Soak 1 cup of grain (wheat for wheat bread or rye for “black” bread) for germination, wrap the dishes in a towel, and place in a warm place.
Day 2: If not all of the grain has sprouted, then wash it, wrap it and leave it in a warm place until the evening. In the evening, grind the grain in a blender or food processor (be careful not to burn the motor!), mix with 2 tbsp. rye flour, 1 tsp. sugar or honey, place in a warm place under a lid or towel.
Day 3: the starter can be divided (as in previous recipes), part left in the refrigerator, and the other part used to prepare the dough.
As an option, the grain sourdough can be cooked boiled. Mix the ground grain with flour, sugar and water (if it is a little dry) and place in a saucepan over low heat. Cook for 20 minutes, remove from heat, wrap and place in a warm place. Then proceed as usual - feed, divide, etc.

1 day: Pour 100 g of rice into 150 ml of warm water, add 1 tsp. sugar and leave in a cool place for three days.
Day 3: add 3 tbsp. with a heap of wheat flour and 1 tsp. Sahara.
Day 4: stir the starter and add 100 ml of warm water and 1 heaped tablespoon of flour.
Day 5: strain the starter, add 1 tsp. sugar and 4 tbsp. with a heap of flour.
After a few hours you can prepare the dough. Set aside part of the starter for preparing the dough, put the rest of the starter in the refrigerator. This starter is ideal for pies, buns and pancakes.

1 day: In the evening, pour 1 tbsp into a thermos. dry hop cones with 1 cup of boiling water, close the thermos and leave until morning.
Day 2: strain the resulting infusion into a two-liter jar, add 1 tbsp. sugar or honey, stir well, add rye flour to the consistency of thick sour cream. Place in a warm place, covering the jar with a cloth.
Day 3: the starter will become liquid and foamy, the smell is still unpleasant. Add flour until sour cream thickens, cover and place in a warm place.
Day 4: mix the starter, add warm water (1/2 or 1/3 of the volume of the starter), stir and add flour until sour cream thickens.
Day 5: add water and flour again.
Day 6: Use part of the starter to prepare the dough, put the remaining starter in the refrigerator, adding water and flour until sour cream thickens.
As you can see, nothing incredible; the starter grows with minimal intervention from us. But preparing dough and baking bread requires some skill. But the most important thing is that sourdough bread needs to be prepared in a good mood, otherwise nothing will work. Verified.
Opara
Homemade bread is prepared on sourdough - this allows the live yeast in the starter to gain strength. One glass of starter is approximately equal to 40 g of pressed yeast (or 1.5 tbsp dry). Pour a glass of starter into a wide bowl, add 350-500 ml of warm water, stir and add enough sifted flour to make a batter with the consistency of thick sour cream. Cover with a towel and place in a warm place overnight.
 Dough
Dough
In the morning we knead the dough. The dough should have a good “walk” during the night, rise 2 times and have time to fall. Stir 1 tbsp in ½ cup of warm water. honey and 1 tsp. salt (proportions are approximate, they can be changed), add to the dough, stir well. Then add all kinds of fillers and spices to taste: bran (about half a glass or more), ½ tsp. ground cloves, ground coriander on the tip of a knife, 1 tsp each. ground ginger and nutmeg, 2-3 tbsp unrefined sunflower oil. You can add raisins, seeds, nuts, flax seeds, oatmeal, boiled potatoes, quinoa seeds, pumpkin seeds - in general, for every taste. Mix everything thoroughly and add sifted rye flour - enough so that there is a spoon in the dough, that is, the dough should be quite thick. Then pour wheat flour onto the table, dump out the dough, sprinkle flour on top and begin to knead and fold it. Do not knead, but knead, sprinkling with flour so that your hands do not stick, and fold into an envelope. Then knead again and fold again. Sprinkle with flour so that the dough does not stick to your hands, but do not add too much flour, otherwise the bread will turn out dense and unbaked.
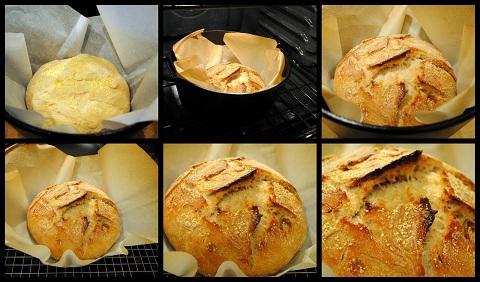
Ideally, the dough should be dry on top and sticky on the inside. Rye dough will always be sticky, so you need to focus on its outer side. As soon as the dough can be held in your hands, knead it, fold the corners, forming a ball. Then take the dough in your hands and smooth the dough ball, shaking off excess flour and tucking the dough inside the ball. Place the prepared dough in a frying pan or cast iron pan, greased with oil, seam side down, and leave in a warm place. The surface of the loaf can be sprinkled with water and sprinkled with sesame or flax seeds. Or you can make cuts or decorate with thin strips of dough. The dough rises for 1-3 hours.
 Baking bread
We bake bread in the oven at a temperature of 220-230ºС, “with steam” - that is, you need to place a bowl of water on the bottom of the oven. Do not open the door for the first 20 minutes! The bread is baked for 40-60 minutes, depending on the size. Wrap the finished bread in a towel and leave for a day - this is a must. Properly baked bread makes a ringing sound when tapped on the crust, and the crumb expands completely when squeezed.
There are many options for homemade bread recipes: you can bake pure rye bread, similar to Borodinsky, you can add pea flour or boiled potatoes, grind pre-soaked grain or add sprouts, increase the amount of wheat flour or even bake white bread - it all depends on your imagination. In any case, sourdough bread, prepared with your own hands and with love, will only bring benefits to your household. Bon appetit!
Larisa Shuftaykina
It is customary to use the sponge method. It is thanks to him that flat cakes of dough turn into airy buns or fluffy porous bread. The baking result depends directly on how correctly the dough is prepared. What is she like?
What is dough?
Dough is a liquid dough that consists of flour, yeast and liquid. In some cases, sugar is also added to it. The purpose of the dough is to start the yeast fermentation process. Without this, the dough will not rise. As a result, the finished product will not become fluffy.
Dough is used to prepare yeast dough, but is done separately and immediately before kneading it. This process has its own characteristics, without taking them into account, it will be difficult to achieve a good result in baking.
There are two types of dough: thick and liquid. They differ in the method of preparation. Thick dough includes up to 70% of the total volume of flour. This cooking option involves the accumulation of more fermentation products in the dough and in the dough, increasing the acidity of the latter. This improves the taste and aroma of the products, they remain fresh longer and do not become stale.
Liquid dough contains half as much flour. Due to high humidity, fermentation processes occur more intensively in it. Under such conditions, yeast cells become more active, and the dough does not peroxidize. However, baked goods prepared on it are not of high quality. They have a less pronounced taste and aroma and go stale faster.
Dough is where the preparation of any yeast dough begins. That is why it is important that all the ingredients for it are of suitable quality.
Yeast for dough
A mandatory ingredient in the dough is yeast. Without them, the fermentation process will not be able to start. To prepare the dough, you can use either pressed dough, that is, live dough. If the shelf life is correct, the dough will work equally well in both cases.

Specific recipes indicate from which yeast the dough for yeast dough is prepared. But the composition of the ingredients can easily be changed to suit existing products. For example, if necessary, they are replaced with dry ones. The ratio between them is 3:1. This means that 3 grams of live yeast equals 1 gram of active dry yeast. Most manufacturers indicate this ratio on their packaging.
Sponge dough method
At bakeries, the dough is prepared according to the classic recipe. To do this, take about half the total amount of flour, two-thirds of the water and all the yeast. The consistency of dough for yeast dough is thinner than that of dough. Her temperature is 28-32 degrees. The duration of fermentation of the dough is from three to four and a half hours. After this, start kneading the dough.
The remaining ingredients are added to the finished dough, namely part of the water and flour, as well as fat and sugar provided for in the recipe. The initial temperature of the dough is 28-30 degrees. The duration of its fermentation ranges from one to two hours.

Preparing dough using the sponge method requires a significant amount of time. But it is the two-stage fermentation process that improves the quality of the dough, resulting in bread that is especially tasty and aromatic.
Preparation of dough for yeast dough: ingredients
Depending on what kind of dough is being prepared, ingredients such as water, milk and even kefir can be used as a liquid component. Each recipe indicates which of the components is needed in a particular case.
Dough for yeast dough for bread (and dough) is prepared from the following ingredients:
- water - 500 ml;
- sugar - 1 ½ teaspoons;
- salt - ½ teaspoon;
- pressed yeast (live) - 10 g;
- vegetable oil - 30 ml;
- flour - 5 glasses (240 ml each).
All components of the recipe must be laid out on the table in advance and only after that proceed directly to the cooking process.
Step-by-step recipe for preparing dough and bread dough
- First of all, you need to prepare the dough. To do this, you will need a comfortable large bowl with high walls. Pour salt, sugar into it, and crumble the yeast. Mix the ingredients well with a spoon until smooth.
- Add warm water to the yeast mass, the temperature of which should not exceed 35 degrees. Stir and add half of the total amount of flour.
- The dough for yeast dough should be quite thick and uneven in consistency. Cover the bowl with cling film and set aside in a warm place.
- After 1.5 hours the dough should ripen. The fact that it is ready is indicated by small bubbles and holes on the surface of this mass. Mix the dough with a spoon. Now the remaining flour and vegetable oil are added. Knead a dense, soft and elastic dough. Let it rise again, after which you can bake delicious homemade bread.

This recipe makes the dough lean. It is suitable not only for baking bread, but also for meatless pies.
Dough for yeast dough
For sweet airy buns, the dough is prepared a little differently. For it you will need 1 glass of water (250 ml), 70 grams of pressed yeast, a tablespoon of sugar and half the total amount of sifted flour (5 glasses). Combine all ingredients together, cover the bowl with cling film and set aside in a warm place to ferment. It is important that the liquid is not hot.
While the dough is rising, other ingredients for the dough are prepared. In half a liter of milk you need to melt 180 grams of margarine. Do not overheat and especially do not bring to a boil. Add 1.5 cups of sugar (more to taste), a teaspoon of salt and vanilla. To stir thoroughly. Try to dissolve all the sugar in the milk-margarine mixture. Beat three eggs separately. Combine all ingredients together with the dough. Add about 5 more cups of flour and knead into a soft dough. Form a ball out of it and send it to a warm place for about an hour and a half, until the mass triples.

The dough for yeast dough is prepared in the same way. If the filling is unsweetened, then the amount of sugar in the recipe needs to be reduced.
Sponge dough for pizza
Pizza dough is prepared with water or milk. In the first case, the dough turns out thinner, in the second it will be softer.
First, prepare the dough for the yeast dough. The recipe suggests that you first need to mix a teaspoon of dry yeast with 50 ml of milk (water), add 2 tablespoons of flour and ½ teaspoon of sugar. Cover and place in a warm place for half an hour.

When the dough is ready, it needs to be added to 200 grams of flour. Add 120 ml of milk, 30 ml of vegetable oil and you can start kneading the dough. This will take about 15 minutes. During this time, the dough will no longer stick to your hands and will become elastic. The specified amount of ingredients is enough for 2 pizzas with a diameter of 30 centimeters.