Draw a portrait of a person with a pencil step by step. How can novice artists learn to draw portraits of people correctly with a pencil? We draw a portrait of a person with a pencil step by step from different angles: full face, profile and turning the head
In order to master a portrait, we need paper, a pencil and, in extreme cases - in very extreme cases - an eraser. We use it only when we understand that we can no longer help the drawing with a pencil. Then we isolate ourselves from society - we ask those around you not to disturb you - and solemnly Let's start learning how to draw a portrait with a pencil.
To make it more convenient to correctly understand and carry out the drawing, it is better to adhere to a peculiar “ instructions for use».
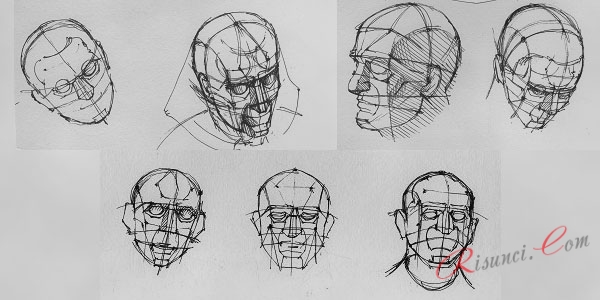
First we need to do a detailed inspection of our subject of drawing - that is. You need to look at everything very carefully and think over the shape... Or better yet, make a couple of sketches to make it easier to see the structural form.
 It would be very good to draw the nature itself in different positions, with different turns and angles. You can also lightly move a pencil over the subject to get a feel for exactly how the shape is structured.
Now an equally important part in the portrait is yours. place of work. It must be selected taking into account a convenient and acceptable view of nature. To begin with, it is better that the nature itself is in a calm state - that is, no strong or unusual angles.
Composition layout
Now you need to compose the entire composition on paper. At this point, ours is working in enhanced mode, because we will need to find places for individual parts of the composition - for heads and torsos.
We recheck the main volumes, detect turns and the main, basic axes of the construction. Now we need to build the shape: first all together, then all in turn and then all together again.
With every change or addition to the drawing, you need to remember about the perspective relationship, the proportionality of the forms and the correspondence of these forms to each other. That is, you need to make sure that everything is harmonious.
Now we need to highlight the eternal opposition - in other words, we need to separate light and shadow. For this, a neat, unhurried approach is used.
Portrait shape modeling
The next step is to model the shape, taking into account what we already have: falling chiaroscuro and spatial vision. In the process of modeling various little things, it is important to remember that this little thing is part of everything, and, therefore, it must fit harmoniously into this “everything”.

As a result, you should get something like this
Like any student, you will make mistakes - don’t doubt it, but don’t get discouraged either. Now let's start analyzing them, and, accordingly, correcting them.
So, one of the most common mistakes, or rather even effects, is that the work is very dark and crossed out. The second effect is the airy forms, they seem like cotton wool, not like real ones. This pattern is also called cast iron. It's all about the violation of proportions. Well, besides, the construction lines can be overly expressed.
The causes of such defects may be artist's problems with chiaroscuro. Or rather, even with chiaroscuro on the volumes. After all, he is trying to correctly convey the volume of the head, but he cannot in any way manage to separate the particular from the general, that is, to apply a shadow not only over the entire drawing, but also over individual parts so that it looks acceptable.
Perhaps the mistake is also that the person who is trying to draw a portrait cannot connect the individual details into an overall picture and the drawing looks... as if torn. The draftsman tries to “erase” this oversight with the help of shading.
In other words, the draftsman should once again work on drawing details.
If the above effects occur in your drawing, then let's move on to methods to avoid this. If, while transferring the shape with shading, you feel that something is wrong, immediately put aside work on the tonality and once again take a closer look at the volume of the head. You can lightly go over the form with a pencil, accurately mark any detail, slopes, turns, indents, etc. Thereby, you will be able to feel the interconnection of all areas with each other.
 Moreover, we turn on our logical thinking - not again, but again - and consider these very details of the head, that is, where it begins and ends, why it is this way and not otherwise. In addition, with the help of this analysis, you can also distribute light and shadow, as well as perspective position (which active object is closer and which is not).
This problem has been resolved. Next, countdown: if you, having started to understand the structural form and volume, suddenly and unexpectedly felt discomfort (sudden urge to sneeze, go to the toilet or drink water does not count), then choose one of the following options.
We try to mentally divide the subject of drawing (the head in our case) with our eyes according to the curves of the shape on the plane. This way it will be easier to simulate the volume.
Drawing details
We are trying to understand the essence of the form: how exactly it is structured. Then we build the volume using any conditional planes or construction lines (if you mix everything, it’s okay).
Again, it should come out no less good than in the picture:
Below is another drawing, which is slightly redrawn, but it is much more convenient to consider, as an example, work on the volume of the head, tone and details.
It is very difficult to place in the holes intended for them - usually they come out either flat or bulging, like a frog.
So, when drawing eyes, you need to remember about their design - that they have a voluminous eyeball, lower and upper eyelids, brow ridges, which tend to cast a shadow on the eyes.
It is also not easy to distribute chiaroscuro on the hair: for example, the upper part of the hair is lightened, while the temporal part is hidden in partial shade. The hair on the temporal line is worked out especially clearly, because this is where the head goes into the back of the head - this is how we show the volume of the hair.
It is very important to successfully search for the proportions of volumes - both overall and individually, parts, the mutual proportionality of these parts. You will understand that proportionality has not been found or is distorted if you cannot recognize your nature in the painted portrait
 I repeat again: therefore, do not hesitate to work on them first. The most important thing is the basic proportions, volume, all sorts of planes and design points.
You can catch the volume of the head of the passerby you are interested in ( or a passerby 😉), your favorite actor or just a man from an advertisement ( no, so what? a good way to turn long minutes of commercial breaks into an interesting and useful activity).
Today we will try to draw a person's face from a photograph. We will partly copy - that is, the background, tonal relationships, perspective - all this is unchanged when you draw from a photograph.
But we still need some knowledge: when we draw a face, we use the same approach as when drawing from life.
So, you will need a sheet of Whatman paper, a tablet, like 3B, on last stages Figure - 5 or 8B.
1 step. Choose a photo from which you will draw a person. It’s better if you know this person well, so you can choose a photo in which this person is captured most expressively, which will help you draw a similar portrait from the photograph.
2 Outline the main provisions of the future drawing. Pay attention to the line of the eyes - the eyes should be located symmetrically, taking into account the angle. The height of the ears is equal to the height of the nose.
3 Beneath the skin and a layer of muscle are the bones of the skull. outline the cheekbones and easily outline the eye sockets: this will allow you to correctly draw the eyebrows and eyes.
Despite the fact that you draw from a photo, if you don’t do this, the picture may move apart, and as a result the drawing will not resemble this person.
4 Constantly clarify the relationships and sizes, as well as angles: look at what angle the neck goes, how much the head narrows in the upper part, at what angle the person’s nose is located in the photo.
Enter tone: shadows draw objects. Softly shade the shadows, separating the light areas from the shadow areas. This will allow you to understand the form. Otherwise your drawing will be flat.
Constantly clarify details, check with the original, especially in tone and angles.
5 If the drawing turns out to be dark, that is, you have lost light areas or made the halftones (middle areas of the drawing) too dark, take a piece of the loaf and crumble the crumb onto the drawing. Rub the pattern with light circular movements with the crumb: it will absorb some of the graphite and the pattern will become noticeably lighter.
6 Our drawing is almost ready. But it looks uniform, and in some places the shading is rough. Now we need to finish all the little things. At this stage there is already a similarity with the original, but there is no completeness.
First, add accents: brighten the lights, thicken the shadows. To do this, use the softest pencil. Draw the eyes and face brighter and more contrasting than the hair and clothes. Blend the background if it takes on too much. make it more uniform. All contrasts should highlight the face. Next to the light areas there are always the darkest ones. In our drawing and photograph, these are, for example, hair and forehead: against the background of a light forehead, the hair is especially contrasting, it emphasizes the oval of the face. At the bottom of the portrait, the hair draws the neck.
A portrait is a universal gift. Beloved and loved one You can please someone by giving them a painted portrait. Such a gift will show that you are ready to try for your loved one, you often think about him. Of course, learning how to draw a portrait is not enough, you also need to practice a lot.
You can give a portrait at any age. Even small children draw their mother in their first drawings and give her this first portrait drawn in their lives. Drawing from life is difficult, but rewarding. However, to do a pleasant surprise, you need to draw from a photo - after all, from life there will be no surprise, the person will know that you are drawing him.
But you can do beautiful photo in the right angle, and then all that remains is to carefully draw an image from it on canvas or paper.
- Category:
- On the entry: Comments to the post How to draw a portrait? disabled
- Publication date: July 1, 2014
In one of the previous lessons we learned to draw. Now I will show you how to draw a portrait of a man with a pencil. We will draw a charismatic Dane named Nikolaj Coster-Waldau. Most likely, you are familiar with this actor for his role as Jaime Lannister in the famous epic “Game of Thrones,” although he also starred in many other films and TV series. In the first season, the actor appears before us as a villain and an extremely unpleasant person. However, we soon begin to sympathize with Jaime rather than condemn his actions. Apparently this is the director's idea.
So, what's the difference? male portrait from a woman? Typically, men have a wider chin. The man's lower jaw has fairly sharp angles. Typically masculine facial features include prominent cheekbones and brow ridges. In women, on the contrary, the lines of the chin and cheekbones are smoother and more rounded. Let's imagine that we are all sculptures made of clay. What techniques would a master use when working with clay so that sculptures of men could be easily distinguished from sculptures of women? He would have sculpted the women's facial features with fine tools and worked more carefully. And the master would have processed the men’s faces more roughly, in a “cutting” manner. However, there are exceptions to all rules.
In this lesson we look at the topic of how to draw a portrait of a person. However, remember that it is very useful for artists to practice sculpture from time to time. When you sculpt the volume of your head with your hands - all the bulges and depressions, be it cheekbones, eye sockets - it becomes much easier for you. Be sure to try creating a sculptural portrait of a person when you have the opportunity. Not everything can be seen with the eyes; touch plays a big role.
In addition, as often as possible I recommend drawing from life, and not from photographs. What is the difference? When we see three-dimensional objects (people) in front of us, and not pictures, we have the opportunity to bypass our nature and choose the angle that seems most interesting. This option is not shown in the photo. , we often encounter difficulties, since we cannot always consider the structure of any elements. In reality, you can get closer to the object and study it in more detail.
Be prepared for the fact that a perfect likeness in a portrait will not appear immediately. You may need to draw 50-100 portraits before you see that the drawing resembles the subject. So don't expect great results right away. Work can be frustrating. But your next drawings will get better and better. Exercise as often as possible and, over time, the results will definitely please you.
How to draw a portrait of a man step by step?
Let's take a closer look at the person we are going to draw. Nikolaj Coster-Waldau has typically masculine facial features - a massive lower jaw, wide cheekbones, a fairly large nose (the actor admitted that he broke it in childhood), and a powerful neck. His face has the shape of an almost regular rectangle, which tapers towards the bottom and forms a sharply defined chin.

Let's start drawing a portrait with an oval face. Be sure to leave enough space around the edges of the sheet for your hair, neck, and shoulders.

Drawing a portrait is an interesting and challenging activity. Not every famous artist knows how to do this. Basically, artists who draw portraits well are self-taught, who have a well-developed sense of beauty, but even they need to study a lot. If you are drawing, for example, a landscape, then it is not at all necessary that it be similar to the area that you wanted to depict, the vision of nature that you have is enough. In the case of a portrait, everything is a little different. After all, anyone can compare a portrait with the original and say whether it is similar or not. And not many portrait artists manage to achieve one hundred percent similarity. The secret is that the main thing is not this at all, but to consider the unique thing in each person that distinguishes him from everyone else and depict it on paper.
Don’t expect to learn how to draw a portrait of a person right away; after about five portraits you will see progress.
Start by taking a close look at the model. Your task is to find a special feature and then transfer it to a piece of paper. If you accurately determine the proportions of the parts of the face, it will already be similar. If you've ever seen caricatures, you'll notice that such an artist only focuses attention on some part of the face, and it turns out very similar.
Start drawing a person with a pencil. Draw facial features as geometric shapes, then use a pencil to highlight the distance between the eyes, between the mouth and nose, chin and mouth, etc. Observe the sizes of the parts of the face relative to each other. When you see that the portrait has begun to emerge, you can begin to add volume and shades.
Algorithm for drawing a portrait
We offer you several rules to teach you how to draw portraits.
- Outline the outline of the face, making sure that it does not occupy the entire sheet. But don’t make it too small, so that it’s more convenient to apply the eyes, nose and lips. To prevent the outline from being too prominent, blend it with your fingers or an eraser.
- Use a mechanical pencil to carefully shade the areas where the hair will be, trying to shade in one direction. When doing shading, be careful with the direction of the hair; this determines what kind of hairstyle you get. If you act consistently, you will achieve similarity. The hair on the head lies in one direction, which means we draw it in one direction. Lengthen the hair lines gradually, shade some areas several times to create a darkening, like a shadow. Try not to leave a single unshaded area in the hair area.
- Now is a very important moment. Take a sheet of white paper and gently blend the entire hairstyle, do not press too hard or go beyond the boundaries. This way the hairstyle will be seamless and look realistic. Blend in the direction of hair growth.
- Don't forget about glare. Take a pointed eraser and draw lines in several places. Please note that the lines should not be strictly parallel, but they should not intersect. They should seem to blend with the pencil lines.
- Now shade the darkest areas on top with a softer pencil.
- It turns out beautifully if you add a few straight lines or a little wavy hair near the oval of the face. They seem to emphasize it. But be careful and do not go to the face while it is not yet drawn.
- Select a few hairs all over your head.
- Let's move on to the eyes, nose and mouth. Remember the distance between parts of the face and the proportions. If a person has big eyes and a small nose, then the portrait should also have eyes more nose. It's the same with the mouth.
- Darken the corners of your eyes and lips. Use a few dark lines to highlight a few eyelashes especially brightly. Do the same with your eyebrows.
- Blend the tip of the nose and its borders; the wings of the nose can be darkened.
- All borders should be shaded.
- Finish the portrait by highlighting the cheekbones.
- It is more convenient to turn the sheet rather than turn it yourself.
The portrait conveys not only external characteristics faces, but also reflects inner world a person, his attitude to reality and emotional state at a certain point in time. In fact, a portrait is like any other conversation piece, is the arrangement of lines, shapes and colors on canvas or paper so that their final combination repeats the shape human face.
Sounds almost like magic? In order to correctly place those same lines, shapes and shades on paper, you must first study the proportions of a person’s face (when drawing a portrait, they must be observed without fail) and their dependence on movements, direction and shape of the head.
What is a portrait?
Regardless of skill level, working on it is intimidating for any artist. The remarkable painter John Singer Sargent gave the portrait two characteristics that every artist would agree with:
- “Every time I paint a portrait, especially a commissioned one, I lose a friend.”
- “A portrait is a painting in which the lips end up looking somehow wrong.”
Portrait is one of the most difficult genres of drawing and painting. The reason is that the artist often works to order, and pressure from outside interferes with creative process. The portrait as envisioned by the customer often differs from what the artist creates. In addition, working on the image of a human face requires special knowledge and a fair amount of patience.
Why study proportions
Proportions are needed in order to understand how objects are located relative to each other in size, plane and intermediate relationships. If even a small amount of realism is important for a portrait, this cannot be achieved without knowing the proportions. On the other hand, abstract portraits have not been canceled.

Knowing proportions helps convey not only facial features, but also human emotions and facial expressions. Knowing the change dependency appearance From the position of the head, the emotional state of the model and lighting, the artist can transfer the character and mood of a person onto the canvas, thereby creating an object of art. But for this you need to know correct proportions faces and be able to build a composition in accordance with the rules.
Ideal proportions
During High Renaissance Raphael created paintings that were considered the standard of perfection. Virtually all of today's perfect proportions originate from the oval faces of Raphael's Madonnas.
If you draw a vertical line in the very center of the face and divide it into three parts - from the hairline to the eyebrows, from the eyebrows to the tip of the nose and from the tip of the nose to the chin, then in an ideal face these parts will be equal. The figure below shows the ideal proportions of a person’s face, a diagram for drawing and constructing an ideal oval face, as well as the relationship between the main features. It is worth considering that the ideal male face characterized by more angular features, but despite this, their basic location corresponds to the presented diagram.

Based on this diagram, the ideal facial proportions when drawing a portrait correspond to the following formula:
- BC = CE = EF.
- AD = DF.
- OR = KL = PK.
Face shape
Correctly constructed proportions of a person’s face when drawing a portrait depend largely on the shape of that face. Raphael created a perfect oval, and nature does not limit perfection to just one geometric shape.
It is probably most convenient to study the construction of proportions and their changes during movement on a perfectly oval face; for this there are many ways and techniques that will be discussed below, but the essence of a portrait is not in creating an ideal, but in depicting a person with all his features and imperfections. That is why it is important to know what the shape of a face can be and how it affects the construction of proportions when drawing portraits.

Rounded face shapes
Long face has rounded hairline and chin shapes. The vertical midline of the face is much longer than the horizontal one. Long faces are usually characterized by a high forehead and long distance between the upper lip and the base of the nose. Typically, the width of the forehead is approximately equal to the width of the cheekbones.
Oval face similar in shape to an egg turned upside down. Its widest part is the cheekbones, followed by a slightly less wide forehead and a relatively narrow jaw. The length of an oval face is slightly greater than its width.
Round face characterized by almost equal midlines of the vertical and horizontal sections of the face. Wide cheekbones are smoothed by a smooth, rounded jawline.

Angular face shapes
Rectangular face characterized by a wide jaw, emphasized by an angular chin and a straight hairline. The midline of the vertical section is much longer than the horizontal one. The width of the forehead of a person with a rectangular face is approximately equal to the width of the cheekbones.
Triangular It differs from the heart-shaped one only in the hair growth line; in the triangular one it is straight. Characteristic this face shape has high cheekbones and very narrow, a pointy chin, while the cheekbones are almost as wide as the forehead. Vertical section line triangular face usually slightly longer than horizontal.
Square shape typical for faces with low, wide cheekbones and an angular chin. The length of a square face is equal to its width.
Trapezoid defined by a wide jaw, low cheekbones and a narrow forehead. Usually on such a face the chin is angular and wide, and the cheekbones are much wider than the forehead.
Diamond shape The face is given a proportionally narrow forehead and chin, the latter usually pointed. High cheekbones are the widest part diamond-shaped face, and its horizontal section is much smaller than the vertical one.
Correct facial structure
Correct construction when drawing a portrait is based on measuring the model's facial features and the distance between them. Each portrait is individual, just as no two faces are absolutely identical, with the exception of twins. Formulas for calculating proportions provide only basic advice, following which you can make the drawing process much easier.

For creating own characters or drawing faces from memory, it is extremely important to know the correct representation of proportions. It is important to remember here that the shape of the head is much more complex than an inverted egg or an oval, and therefore it is worth following rules to avoid eyes on the forehead or a mouth that is too small.
Face outline
First, draw a circle - this will be the wide part of the skull. As you know, the main facial features take place under the circle. To roughly determine their location, we divide the circle in half vertically and continue the line down so that the lower outline of the circle divides it exactly in half. The bottom of the line will be the chin. From the sides of the circle to the “chin” you need to draw lines that will become the preliminary outlines of the cheekbones and cheeks.
If the portrait is drawn from the model’s face or from memory, then you can use a few light lines to correct the shape, determine the approximate width of the chin and hairline. It is worth noting that the hair in the portrait will occupy some part of the circle that was drawn at the very beginning.
Eyes and eyebrows
At the base of the circle we draw a horizontal line, perpendicular to the first. The eyes are located on this line. Exactly on it, not higher, no matter how much you would like! The horizontal line must be divided into five equal parts - each of them is equal to the width of the eye. The central part may be slightly wider. The eyes are located on the sides of it. To further calculate the proportions, it is best to indicate where the pupils will be located.
To determine how high above the eyes your eyebrows should be, you need to divide the circle into four equal parts, from bottom to top. The eyebrows will be located along a horizontal line passing directly above the eyes.
Nose and lips
The vertical line of the lower part of the face should be divided in half. Mark the middle where the base of the nose should be. The width of the nose can be easily determined by drawing parallel lines down from the inner corners of the eyes.
The remaining part - from the nose to the chin - must be divided in half again. The midline coincides with the line of the mouth, that is, it is located directly above it upper lip, and below it is the lower one. The width of the mouth can be calculated by drawing parallel lines down from the middle of the pupils. The width of the chin is usually equal to the width of the nose.
Constructing the proportions of the human face described above is a simplified method and is suitable for ideal faces, of which there are not many in nature.


