The larger the aperture, the better. Choosing the optimal aperture
What is a diaphragm? In photography.
Short definition
The aperture is a structure inside the lens consisting of thin blades. By opening and closing the aperture you can control 1) the amount of light passing through the lens; 2) angle of refraction of light rays (depth of field).
You can see the aperture very well with fast prime lenses, such as, for example. If you want to see the aperture blades of your lens, then turn on your camera, select manual mode, select an aperture value of 14 and click on the depth of field preview button, which is usually located next to the lens. At the same time, if you look through the front lens, you should see the petals move when you press the button. If you don’t yet know how to set up manual mode on your camera, change the aperture, or don’t know where the depth of field preview button is, then you should read the user manual.
1. Aperture and brightness of the photo. Exposition.
The wider the aperture is open, the more light enters the sensor and the brighter the photo turns out. The further the aperture is closed, the less light hits the sensor and the darker the photo turns out. Thus, aperture is one of two ways to influence the brightness of a photograph. The second way is to change the shutter speed, or the amount of time the camera shutter is open and light hits the sensor.
2. Aperture and depth of field.
The size of the aperture opening determines the angle of refraction of light rays. The latter determines the depth of field, one of the most important characteristics in photography. The larger the aperture, the shallower the depth of field in the photograph. The smaller the aperture, the greater the depth of field in the photograph.
When shooting a classic portrait, a large aperture is used. For what? Then, to emphasize the most important thing in the photo - the person’s face, and leave everything else blurry background so as not to distract. Depth of field at portrait photography maybe up to half a centimeter, this is quite enough. Although in this case the tip of the nose and ears are no longer in focus, so you should choose the focusing point very carefully. When you photograph a person, the focal point is always the eyes.
Join our group on the website Facebook
How to set the aperture correctly.
Stops and aperture values. To make it easier for you to shoot.
About what a diaphragm is.
The aperture can be adjusted to suit you. To make it easier to change the aperture hole, you should use special steps for the camera aperture - feet. The concept of stops is also used in conjunction with shutter speed, but we will talk about this next time. Each stop of aperture lets in half as much or half as much light as the next.
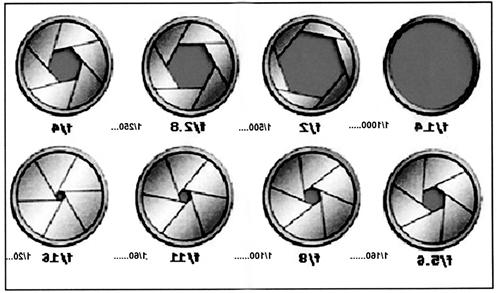
Each stop has its own aperture value. They usually look like this:

The photo above shows the most common aperture stops. There are lenses with larger apertures (f/1.4, f.1.2) and smaller ones (f/27, f/32), but this is rare.
If you try to adjust the aperture on your camera (if you are unsure how to do this, be sure to read the camera manual), then you will of course notice that the aperture changes according to specific values, but the numbers may vary. Between the full stops there are still other numbers. This is because on modern digital cameras the aperture can be adjusted much more precisely than using full stops. Usually in the camera menu you can choose whether you want to adjust the aperture using full stops or not.
| Full feet | f/4.0 | f/5.6 | f/8.0 | f/11 | f/16 | f/22 | ||||||||||
| 1/2 foot | f/4.0 | f/4.5 | f/5.6 | f/6.7 | f/8.0 | f/9.5 | f/11 | f/13 | f/16 | f/19 | f/22 | |||||
| 1/3 foot | f/4.0 | f/4.5 | f/5.0 | f/5.6 | f/6.3 | f/7.1 | f/8.0 | f/9.0 | f/10 | f/11 | f/13 | f/14 | f/16 | f/18 | f/20 | f/22 |
Aperture values can be confusing at first because higher value denotes a small aperture and vice versa. For example, 4.0 means a larger aperture than f/11.
How less value aperture (the larger the aperture itself), the shallower the depth of field.
In addition to light, the camera aperture, or, as it is sometimes called “aperture,” also performs the function of adjusting the depth of field of the imaged space - DOF.
Let's look at two more parameters that are affected by the aperture in the camera.
Firstly, this is the brightness of the image. This may be an obvious fact, but with a large f-number, less light passes through the optics and the image turns out dimmer.
Secondly, this is the image quality. When it comes to photo quality, the aperture is probably the most insidious of all camera parts. When fully open, it can transmit edge rays through the lens, which manifest themselves as aberrations. Also, many cheap and budget lenses with a fully open aperture begin to blur. The second side is that an aperture that is too closed leads to light diffraction.
Both of these undesirable effects reduce the contrast of the image.

To avoid such an unpleasant influence, you should choose a certain middle range. Try not to shoot at the widest possible aperture, but close it down one or two stops. Also try not to shoot at an aperture value greater than f/11. This rule should be followed only for standard shooting, but if your artistic task requires a different aperture value, then you should use it.
In order to better understand what aperture is in a camera, as well as to understand its relationship with depth of field, look at the table below (1 ft = 0.3 m).

The lens, and in particular the aperture, has one more characteristic - the relative opening of the lens. To be honest, at first you won’t really need this parameter. If you don’t understand the ratio of the diameter of the front pupil of an optical system or lens to the rear focal length, then nothing bad will happen. The maximum that can happen is a slight misconception when communicating with an expert.
However, you need to know that thanks to the aperture number you can calculate the illumination of the matrix or film of your camera. Again, extremely in simple language, if your camera has a standard scale for switching steps (f/1.4; f/1.8 ... f/16; f/22; f/32), then when you close the aperture by one value, the light will pass through exactly half as much .
It is also worth remembering and understanding that a larger f/number means a smaller aperture. Example: f/32 corresponds to the smallest aperture and the least amount of light enters the sensor.
Table with scale of integer and fractional f-values

Aperture on the camera and its settings for shooting
The aperture can be selected in several modes during shooting. Among them completely auto mode, two semi-automatic modes (aperture and shutter priority) and manual mode.
Each setting is suitable for a specific genre. But remember that in manual mode, the aperture is set in the (Av) aperture priority mode and in the (M) manual setting mode. Using these modes, the photographer has complete control over the depth of field and lens pattern, which also includes everyone's favorite bokeh.

Bokeh itself is not anything special; it is light spots that are out of focus, some distortion, twisting, and sometimes vignetting. That is, all this is mostly interference, but they have beautiful view and even complement the photo.

Bokeh refers to an element of the lens pattern. You should also know that bokeh and “pattern” depend on the type of lens, the structure of its optical system and other technical factors. And it so happened that what more beautiful drawing lens, the more expensive it costs. However, do not be upset, a similar situation occurs almost everywhere.
However, we digress a little, let's get back to our topic.
Diaphragm structure
The camera aperture consists of six or nine iris petals, which move using a special ring located on the lens frame or an electric drive controlled by the camera. Accordingly, with an open aperture we have a round hole, and with a partially closed aperture we have an isosceles polygon. The shape of this polygon is influenced by the number of aperture blades. If there are more petals, then the figure is more rounded. The same indicator affects the shape of the bokeh.
The lens structure can also be equipped with a “jumping aperture” mechanism. This device abruptly closes the aperture to the aperture number specified on the camera when the shutter button is pressed. Thus, in the viewfinder or on the screen we see images at the maximum open aperture, which allows us to frame the frame more easily and accurately, and in the case of a lens with manual focus, it is easier to focus.
I think there is already plenty of theory, let's summarize briefly:
- Aperture is one of the exposure parameters that affects the depth of field and the quality of the photograph;
- to get maximum bokeh you need to open the aperture as much as possible;
- best values aperture number for portrait photography are f/1.4 – f/2.8;
- the best aperture values for landscapes are f/11 – f/16;
- respectively for studio f/8 – f/9, occasionally f/11.
Experiment with the aperture, try different lenses, see how they differ, this will give the most best result. Understanding comes with practice!
When purchasing a high-quality camera, you should not stop at standard settings. In this article we will explain why a function such as aperture is required and how to use its capabilities.
Physically, the camera diaphragm consists of petals that cover the lens and allow a certain amount of light to pass through. The higher quality the lens, the more petals it has, and the more beautiful the blur effect is achieved. We won’t tell you in words what photos you can get, but we’ll show you everything clearly.
These photos show children, and at first glance the photos are almost identical. But in the first image we clearly see the boy in the background, and in the second the background behind the girl is all blurry. Let us immediately note that this is far from the maximum degree of blur, and it is impossible to achieve the same effect manually (in Photoshop).
Now we will explain how the camera aperture was adjusted in both cases. In the first photo, the aperture is closed, as a result of which we see the entire image clearly. In the second photo the aperture is more open, which is why the boy is not visible. We have looked at this and it is clear to us that with the maximum open aperture we get a blurry background, and with the aperture closed we get a clear one.
In almost all cases, the aperture on the camera is designated as “f/” and a number, which indicates the degree of openness of the gap. At first it will be difficult for you to remember all the values, so it’s enough to know that the lower the number, the more blurred the background, and the higher the number, the better the objects in the background are visible. The following picture shows standard values that are present even in ordinary soap dishes. You can see how the aperture changes depending on the indicators.
Despite the fact that the function is also present on compact cameras, it is impossible to achieve the effect of a blurred background on them. In order to understand the difference, it is enough to try out SLR and professional cameras. Believe me, differences in quality will be noticeable to the naked eye. And the number of functions and settings will pleasantly surprise you. Take your time to master everything at once and first understand each parameter separately, and then select manual mode and arrange them.

In the photo with ladybug it is clearly visible that the diaphragm is fully open. Such a picture can be taken with any professional equipment, regardless of the brand - Nikon, Canon. The camera, most importantly, must be a SLR or professional one.
In conclusion, it is worth saying that the camera’s aperture can focus attention on a specific object, highlighting it and blurring the background. The photo above with a ladybug clearly shows this effect, because you only see the insect, and the rest is not so important. A closed camera aperture is necessary when taking pictures of the street, landscapes, or crowds, where it is required that the entire photo be in focus.
As you can see, not everything is as difficult as it seemed at first, but before moving on to further study of the art of photography, practice well at this stage.
In this article we looked at the main part of any camera - the matrix. In the second, we’ll talk about the equally important parameters of a smartphone’s photo module. Go!
Lens aperture or another designation - aperture ratio. Roughly speaking, this is the hole through which light enters the camera sensor. And the quality of the photograph directly depends on its size. The smaller the aperture number, the larger the hole and the higher the lens aperture. In low light conditions, how much light hits the matrix plays a very important role. The aperture number is indicated Latin letter f and, as a rule, is written in the following form - f/2.0, f/3.5. The number after the slash is the aperture value. Basically, in smartphone cameras this parameter is fixed. If the lens has an optical zoom, then there can be two aperture values - one in normal condition and the other at maximum zoom. To summarize, it must be said that the photomodule must be selected with the lowest aperture number. The manufacturer, as a rule, does not hide this parameter and can be found in the description of the smartphone. For example, at Samsung Galaxy S6 aperture f/1.9, Apple iPhone 6s - f/2.2, Xiaomi Mi Note - f/2.0.
Focal length- the distance between the optical center of the lens and the matrix. The angle of view of the camera depends on this parameter. The shorter the focal length, the larger angle shooting and, accordingly, more objects fall into the frame. If it is large, then all objects will be visually closer and larger.

The focal length is measured in millimeters and can be fixed (in most smartphone cameras) or variable - about such cameras we say that they can zoom, that is, bring objects closer when photographing. This parameter can often be seen on the lens itself. Let me give some examples: Sony Z5 - 23 mm, Huawei P8 - 28 mm, but the Galaxy S4 Zoom - 24-240 mm.
Ideally, different focal lengths are used for different tasks: wide-angle (20-35 mm) - for shooting landscapes, 70-135 mm - good for portraits, telephoto lenses (135 mm and above) - for sports, wildlife. The size of a smartphone imposes limitations in this regard, but all kinds of lens attachments are designed to overcome them.

Other photographic lenses may vary level and nature of optical distortion, for example, there is such a type as “fish-eye”, which allows you to shoot quite interesting panoramas.

Of course, the quality of the lens itself and the materials also have a direct impact on the resulting photos.
Image stabilization. 99 times out of 100, we shoot with a smartphone handheld. In bright light, the camera sets a very short shutter speed and slightly moving the camera does not harm the picture, but if you shoot in the evening or indoors, there is a high risk of getting a blurry shot. To prevent this from happening, modern cameras are equipped with image stabilization. It comes in several types:
- optical - the sensor or lens is stabilized
- digital - the image is stabilized by software methods
- hybrid - when a combination of the two methods described above is used
Digital is virtually always present, this is the norm. Optical stabilization is more expensive, but its quality is incomparably higher. Hybrid is not used in smartphones today (I could be wrong).
Flash. In low light conditions it can be a great help to get a good shot. There are two main types of flashes in smartphones:
- xenon - high luminosity, light close to natural, but high cost, dimensions, energy consumption. And also it cannot be used for constant illumination.
- LED - energy efficient, can be used for video illumination and as a flashlight, but at the same time the luminosity is not as good as xenon
Top smartphones often use dual LED flash, and some models may have two flashes - LED and xenon.
Software part. Responsible for the formation and processing of digital images. Very important part common system photomodule. After all, no matter how large the matrix or how fast the lens, software processing can either ruin any photo or significantly improve it. The result depends on many factors: interaction software camera with firmware, photo processing method, application used for shooting.
When transferring an image from the matrix to the smartphone camera application, it may be subject to color correction, retouching, and noise reduction (sometimes too zealous, which leads to “blurry” of the photo). And the application itself has many functions and options for shooting and processing photos. Their review deserves a separate article.
We've looked at the main characteristics of smartphone cameras, so let's summarize briefly:
- The matrix is exactly the case when size matters. The larger the sensor, the better. But the matrix size can be leveled too much big amount megapixels. There must be a reasonable compromise.
- Aperture number - the lower the value, the higher the aperture of the object. This setting is especially important when shooting in low light conditions.
- Focal Length - Each scene has its own preferred focus. This is not to say that you cannot take a portrait with a wide-format lens. But still it will turn out worse than with a suitable focal length. The most versatile are lenses with variable focus.
- Optical stabilization is designed to smooth out camera shake. But in poor lighting it will not be able to help us, since the camera will shoot at a long shutter speed. In such cases, it is best to use a smartphone stand, for example a monopod.
- A flash is good if there is one, and even better when there are two of them - xenon and LED.
- Software part. Firstly, these are algorithms for processing information received by the camera matrix. Even with not very good hardware, high-quality software can provide good quality pictures and videos. Secondly, the actual shooting utility. It does not affect the result so much, but it does affect the convenience and list of available features. For example, it allows you to shoot in manual mode.
Gone are the days when a camera on a phone was considered a curiosity. Modern smartphones can take pictures at least as well as cheap cameras, shoot excellent video high resolution. Yes, they are far from good cameras, but they have one undeniable advantage - they are always at hand!
When taking your first steps in the field of photography, difficulties often arise not only with building an exposure, but also with understanding the parameters that determine a high-quality image.
Aperture is one of the three main parameters that affect the exposure of a frame. Therefore, without understanding the principle of operation, design and settings of this parameter, it is quite difficult to create high-quality photographs professional level. to use the parameter correctly and switch to right time You need to understand what aperture is in a camera.
Understanding Aperture
In order to simplify the understanding of why an aperture is needed and what it is, it is often also called aperture, relative aperture or aperture ratio; an analogy can be drawn with by the human eye, more precisely the pupil. The more dilated (open) the pupil, the more light the retina can perceive.
To build the exposure of a professional photo, three factors must be taken into account: aperture, ISO and shutter speed. Changing the aperture value controls the flow of light that the matrix or film perceives. This parameter changes depending on the shooting subjects, conditions, lighting, and the desired result. Also different indicators used to achieve special artistic effects.
However, it is important to remember that a maximally open hole allows more light to pass through, while a more closed hole allows less light.
What is aperture and how is it arranged in a camera?
To determine the aperture, a special aperture scale is used. Yes, the camera display shows the F/ indicator, followed by a certain digital designation. This parameter characterizes how wide open aperture. The number is opposite to the opening level of the hole, that is, than less number after the letter, the more open the aperture is. In order not to get confused in this pattern, it is important to understand the principle of operation.
The diaphragm row looks like this:
The transition from one value to another is considered one step. It is worth noting that one step changes the amount of light perceived by the matrix by half. Modern cameras also make it possible to set intermediate values - thirds or half - to obtain greater clarity.
Aperture structure
A modern diaphragm (iris) has the following components:
- Repeater;
- Jumping aperture;
- Iris diaphragm.
Iris - includes several curtains (1), often from six to nine. They are brought into a movable state by a ring (2) located on the lens, or by an electric drive (3).

Diaphragm design
If the diaphragm is completely open, the hole has a round shape, and when closed, it has a polygon shape (4). This shape is influenced by the number of curtains, that is, if there are more of them, then the edges are more rounded, which also determines the shape of the bokeh.

Bokeh shape
Jumping - a symbol that controls the aperture, installed in modern models SLR cameras. It closes it abruptly to the selected aperture value at the moment the shutter clicks. Thanks to which the image is projected before shooting with the hole open, this affects the convenience and quality of focusing.
Repeater – special device, with which you can forcefully close the hole immediately before descending to desired value. Most often used to check depth of field before shooting.
What does the aperture in a camera affect?
- DOF – depth of field of the imaged space;
- The amount of light transmitted by the hole onto the matrix;
- Image brightness and contrast;
- Image quality.
Impact on depth of field
In addition to luminous flux, aperture also affects depth of field. When the F index is small, then the depth of field will be small; if the F index is large, then the sharpness will be large. This is enough important tool to control the point of attention in the photo.
It is important to be able to use it correctly this opportunity To create boring accents, for example, when shooting portraits, you need to focus directly on the person, while leaving the background blurred. Photographers involved in macro photography especially delve into their understanding of depth of field settings; for such shots, a closed aperture is always used and the depth of field increases significantly.

Example of photography with different meanings apertures
Modern cameras allow you to focus on an object even with the aperture as wide open as possible. At the time of shooting, the camera automatically closes the aperture to the required value. To preview the image in pinhole mode, you need to use the aperture repeater. This makes it possible to view in the viewfinder what it will look like after closing the aperture.
Image quality and aperture ratio
Aperture - Controlling the aperture setting is used to achieve a sharper image. Based on practice, maximum image sharpness is achieved when using average aperture ratios. This principle applies to all camera lenses.
If the aperture value is too high, then unwanted artifacts in the form of vignetting or aberrations may appear in the frame, if the aperture is too small, there is a significant decrease in sharpness.
A smaller aperture increases image contrast. The large aperture makes it possible to view using an optical viewfinder. If the F value is below 5.6, then after optical viewfinder Sighting can only be done under good lighting conditions. Larger apertures will make images appear more saturated and vibrant, thanks to smoother transitions from dark to lighter areas.
Effect of aperture on bokeh
Bokeh and aperture are directly related. The best bokeh is achieved with the maximum open hole, the shape of which is as close to round as possible. If the aperture is closed, the hole has the shape of a polyhedron, which is clearly visible in the blurred area. Such polyhedra are usually called washers or nuts.
Budget versions of lenses require a small number of aperture blades, a maximum of six of them, as a result of which figures that resemble the structure of a nut are visible in the out-of-focus zone. At a special price are lenses that can create circles correct form due to large quantity aperture curtains. Modern models do not differ in the large number of curtains, but they are created in a more rounded shape, due to which the hole has the desired shape.
The influence of aperture on exposure
As the diameter of the hole changes, the exposure also changes. When the aperture is wide open, the sensor is exposed more strongly and the image appears brighter. To clearly demonstrate the effect, several pictures were taken at the same settings, but with different apertures.

Aperture F/2

Aperture F/4

Aperture F/8

Aperture F/22
For these frames the following parameters were set: shutter speed 1/400, ISO 200, flash turned off, aperture varied from F/2 to F/22.
How to choose the correct aperture value in a camera?
How the diaphragm works and what it affects is already clear, but how to control this parameter depending on the situation remains to be figured out.
There are no clearly established rules that indicate that it is necessary to use exactly this value and not one step differently. Each photographer individually selects this indicator depending on what he is shooting, why and under what conditions. However, to make it easier to understand at first, you can use some general tips.
If you plan to take photographs in low light conditions, then the f/1.4 aperture is excellent. however, it is worth remembering that with this indicator a rather small depth of field will be established. Ideal for shooting small objects or creating soft focus when needed.
The f/2 hole diameter is used similarly.
Also in low light conditions f/2.8 is used. Well suited for photographing portraits, as the effect of depth is achieved, falling on all faces, without focusing solely on the eyes.
The minimum aperture value at which decent shots of people are obtained is f/4. In this case, a limitation is set on autofocus operation.
If you are going to photograph two objects (people), then it is best to use f/5.6. If you need to take photographs in low light conditions, it is best to use an additional flash.
If you are shooting a large group of people or several objects that must be in focus, then it is optimal to use f/8; this value provides good sharpness.
The vast majority of lenses are sharpest at f/11, making this mode well suited for portrait photography.
When shooting in bright conditions, it is best to use f/16, then a greater depth of field is established.
For landscapes or city photography, f/22 works well. There is no special focus on the foreground when using this value.
Knowing the basic principles of operation and aperture settings, even a novice photographer will be able to correctly set the exposure and get a high-quality photograph with different conditions shooting.


