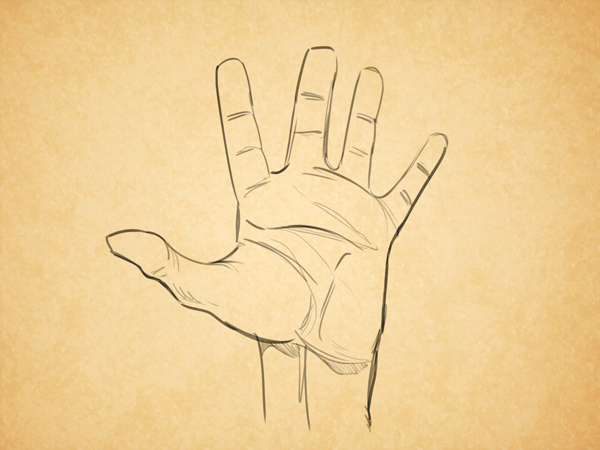
Drawing a hand step by step. Animation Basics: How to Draw Cartoon Hands. Hand in its most simplified form
The human hand seems to be the most difficult to learn to draw, as it can take many shapes and express different emotions. Animation is no exception. You will have to learn to draw hands in different angles so as to show them in dynamics and attract the viewer’s attention to them. Don't underestimate the power of a well-drawn hand in animation - it will save your work from monotony!
What you need to know
In the comments to my courses, I was asked several times how I draw characters in different poses and with different expressions. The point is that with experience you will begin to develop own style drawing. Without other people noticing, you will have your own little tricks. These tricks are the poses and expressions you'll use more often than others, as well as certain hairstyles and clothes you'll be best at drawing. This is quite common and professional artists resort to this secret all the time!
However, this is very difficult to achieve in hand drawings! Let's take the head as an example. The only moving part there is the lower jaw. We can change facial expressions, but the eyes, nose and mouth remain in their places (by at least, V real life!) With the hand everything is different. With any new movement of the brush, everything changes radically. In fact, in a scene with dialogue, the facial expression may barely change, but the hands will move very actively and at different angles.
The goal of this activity is to turn a human hand into a cartoon hand, so let's not waste time learning the names of the bones and muscles of the hand. (On the Tuts+ platform, by the way, you will have extensive opportunities to learn this too). We, in turn, will try to find a simplified way to draw a hand in a way that is practical and effective.
1. The hand in its most simplified form
 "Mom, hi! I'm on the Internet!"
 The hand is made up of a variety of bones, especially in the fingers. This means that all fingers are different sizes and can bend in different ways. different directions. For this reason, it is important that you learn to draw a hand in the most simplified way possible and be able to look at it like a small puzzle with a few key pieces. Let's try to divide it into blocks:
Step 1
Let's start with the back of the hand. Let's draw a simple semicircle:

Step 2
Now let's draw a triangle that is attached to one of its sides. Like this:
 Calm down: we are not drawing a cup of tea!
 Step 3
Above the triangle we will draw something resembling the tip of a knife.

Step 4
It's time to draw the fingers. IN mirror image draw the first shape at the top. "Puzzle from the hand" is ready:

Step 5
Great! All that remains is to fill in the missing details with soft contours:
 The outline of the thumb is the trickiest - it needs to be gently combined with the center of the palm.
 Note that the fingers have different formats due to differences in their sizes.
2. At a glance
You need to know a few more details of the palm. Let's take a look at them:
Step 1
Again we repeat the process above, following the basic pattern:

Step 2
Something new appears - the palm now looks a little more complex, and there are characteristic differences in its shape that need to be taken into account. Fortunately, a few simplified forms are enough to show it.

Step 3
Now we can add outlines to complete the drawing with the necessary details.
 Please note that we end the sketch with soft, rounded lines. Think of the palm of your hand as a delicate sculpture.
 Profile view
When the hand is turned in profile, we can see the prominence of the muscle at the base of the thumb.

The more “childish” your drawing style is, the simpler and smoother your lines will be. Here are my little secrets that helped me understand that hands can be drawn based on simplified shapes. The most important thing is to strive for a style that will reflect personality and dynamics in the drawings at the final stage.
3. More shapes and a 3D hand
Now you can draw flat hand for the rest of your life, right? If you want to draw hands with convincing depth, use the same technique above, just change the camera angle! Play with this technique until you feel confident.

To form your fingers, imagine them as cylinders stacked on top of each other. This technique will help us draw fingers from different angles, because with its help it is easier to “see” the hand in space.
 Hand or robot?
 The shapes into which a human hand can be formed are countless. When the palm is open, the same rules apply; when closed - others! The same thing happens when the hand holds an object, and it must adapt to its shape.
Let's learn how to draw a fist. A slightly different process, but in the end you will see that it all comes down to a simplified drawing of the main geometric shapes.

Step 1
To begin with, we simplify the bend of the little finger, draw something similar to the letter “u”.

Step 2
We kind of “wrap” the little finger around the letter “y”. Don't forget to highlight the curve that goes from the little finger to the wrist.

Step 3
We continue to draw fingers in space. This time we draw only three fingers. I'll explain why later.

Step 4
Lastly, draw the thumb and the protruding muscle at the base of the thumb.

Step 5
Fine! In a few steps we have completed a simplified drawing of a fist on one side. See how the shape of a fist can be roughly depicted using “boxes” of different sizes.
 Notice how you can fit the outline of a fist into three-dimensional rectangular shapes in space.
 Obviously, if we try to simplify each hand position using various techniques, we will get tired quickly. So remember that real secret How to simplify a hand drawing - these are observations from life.
 View from the opposite side: simplified drawing.
 4. The Fab Four
It is common in animation to draw characters' hands with only four fingers. This allows, in addition to enhancing the character’s dynamics, to make the artist’s life easier. This way he doesn't have to worry about too many details.
 Hands with four fingers of different styles and sizes.
 Note: When using this technique, you will need to adapt your knowledge of a five-fingered hand to a four-fingered one. Concepts need to be adapted to achieve suitable and interesting result.
It is worth paying attention to your fingertips. In animation, the more rounded and movable the fingertips are, the more interesting and dynamic they are. When you create characters, think of their hands as if they were separate characters!
 See what this hand has own character?
 Another good reason to draw hands with four fingers: in this case, you have the opportunity to increase the size of the fingers, which means making them more expressive! Whole line famous cartoon characters able to stand out thanks to this technique: The Simpsons, Bugs Bunny, The Flintstones and Mickey Mouse.
The Mystery of the Little Finger
One of the most big secrets The design of such a brush is to make maximum use of the little finger! If you place it at a different angle in relation to the other fingers, you will break up the monotony in the perception of your hand.

 Highlight the position of the little finger in the frame. See how the nature of the action changes with this technique. The viewer's attention is now focused on the main subject in the frame, and the character's personality is given a special twist.
 5. Talk to your hand
When we need to express emotions in an animation drawing, the role of hands is irreplaceable! Look at the images below: the hands visually support and echo the characters' facial expressions and body language.

- "I have an amazing idea!"
- "How do I look, dear?"
- "I can't believe...I'm being awarded an Oscar!"
- “I don’t understand anything... he was just here!”
- "Ahhh! My head is pounding!"
No matter how strange it may seem, hands have their own character! Not only do they maintain facial expressions and body language, they can express their own emotions!
 Do you see the greatness in these gestures above?
 However, you will often find yourself in a situation where your hands should not distract attention. In this case they should be minor character. Characters in action scenes tend to be exaggerated more than characters in quiet scenes.
 Notice that in the dramatic scene there is little movement. There is no room for exaggeration here. Hands must emphasize the feelings of the characters - this is one of the most difficult processes in design.
 6. Knowledge test
I have prepared a short test to test your powers of observation. Analyze the pictures below and try to determine what feeling the best way describes each. Can you guess everything correctly?
 Can you guess what the hand expresses in each of the drawings?
 Raise a hand!
Now you know all the secrets of the art of drawing cartoon hands, congratulations!

Although hands are a very fun part of the body to draw, the ability to create hand designs in different styles is not so simple, and only with the help of hard training can you achieve natural results. Even if your goal is to draw for animation, it doesn't hurt to buy a good anatomical atlas to understand how the muscles and bones in the hands work. There is no need to memorize each one in detail. It is enough to understand how the hand works in motion. Remember that a character's expressions are much more important than what's underneath the skin.
Last tip: When you need to draw hands, place your own hands in front of a mirror, or just watch your hands. One of them will remain stationary while you draw (unless you've learned to draw with both hands at the same time!)

Step 1.
Let me first remind you that we have already had some good practice, started studying, and looked at it in some detail in full height, as well as men with examples and. And now it’s time to pay enough attention to the hands. This is the always missing part of a person's drawing that can ruin everything.
First, start drawing a hand with anatomical tips! Let's try to refresh or expand our knowledge about the structure of the human body. This is very useful because most beginning artists can have a hard time with their hands. Well, let's start with anatomy and you will better understand the drawing of a human hand!

Step 2.
Here is a slightly enlarged view of the anatomy of your fingers so you can see the bones better and remember their main parts. We will always use them for the basis of the hand drawing.

Step 3.
It may not seem important, but when you are drawing hands in larger sizes you will need help choosing the type of nails. You can choose the best ones for your character in the drawing!

Step 4.
And here additional help in the picture so that you can clearly see and compare the differences for your character's age and gender!

Step 5.
Here are some hand sketches to give you an idea of the style of drawing realistic hands! You should start in any style based on their actual appearance.

Step 6.
And now options for hands from comics or fairy tale characters. These are just a few examples. You won't notice too much difference between realistic and comic book or fantasy style.

Step 7
IN cartoon style there are more noticeable differences from realism. It's always helpful if you look closely at that particular detail in the cartoons you're watching, and then you can pick a style you like and start creating your own for that part of the drawing.

Step 8
If you have animal characters, these examples will come in handy! Basically, when your animal character walks on two legs, his/her front arms or paws look more like real arms and hands, so you should draw them like human hands, just with some animal specificity and style.

Step 9
And now, the last part of preparation for drawing the hand. These are the possible options, angles and positions of the hands and fingers. First, let's look at simpler options and understand the basic principle for the joints and proportions of the fingers and palms. For female hand You can increase flexibility, and for men, increase angularity.

Step 10
Now the drawings are a little more difficult, from a different point of view and angle! This is an expression of emotions, gestures accompanying words and actions.

Step 11
This part of the preparation will be really difficult, but not impossible! When you start drawing hands more difficult than these, you will remember with a smile. We're just looking at the tip of the iceberg in terms of the base and shapes, and will start to build up to shading, shading, and color grading and editing. And now we are still just warming up!

Step 12
let's start draw hands! Start drawing basic shapes and lines. This is useful so that you can maintain the shape of the hand and the proportions of the joints.

Step 13
First, let's draw along the base line the upper and visible end of the forearm at the level of the wrist!

Step 14
Now draw the basic shape of the index finger!

Step 15
And now, along the base of the thumb, the lines and shape of it. The hand took shape quite quickly.

Step 16
And now we draw the shape of the middle finger!

Step 17
The next step is unnamed. The fingers are becoming less and less visible. But the joints line up and the proportion and beauty of the lines are noticeable.

Step 18
And now your last finger in the basic shape is a drawing for the small finger - the little finger! And you did everything quickly on the basic shape of the hand from the first step!

Step 19
Now draw your fingernails as you can see them on yourself or in photographs.

Step 20.
Draw small details of kinks in the joints and folds of the skin. They are on both sides. A hand in a relaxed state tends to clench.

Step 21
Here are some small details that you also need to draw to make the drawing more realistic/

Step 22
You did it! Now you have to apply the shadows and highlights yourself. In the following lessons we will pay more attention to this when drawing with pencils first. I hope you liked the lesson and leave it for me positive feedback and a comment at the bottom of the lesson. Good luck to you!

Not everyone can paint like great artists. But you can learn to draw if you put in the effort.
His hands can tell a lot about a person. It is very difficult to depict them on paper. But the problem of how to draw a hand can be solved with work and diligence.
Anatomy to help
A complex system is the human body. The hands alone consist of several dozen elements. And in order to draw them correctly, you need to know the structure of the hands. Conventionally, hands can be divided into three main parts: wrist, metacarpus and fingers.
- The wrist is the part closest to the forearm. It is responsible for the movement of the hand, but all its elements work as a single whole.
- The metacarpus is the widest part of the hand - the palm.
- The fingers are mobile due to the phalanges. Four fingers (index, middle, ring and little fingers) have 3 phalanges, but the thumb consists of only two phalanges.
Knowledge of the basics of anatomy will allow you to correctly draw the hands step by step so that they turn out to be “talking”.
It will be easier to draw if, while sketching a sketch, you decide what the subject of the image looks like - something simple, even primitive. Do you agree that the human hand is similar to a shovel not only in appearance, but also in functionality? You can start a sketch with this - draw a contour similar to a shovel: the wrist is the handle of the shovel, and the contour of the palm with fingers is its canvas. It’s difficult to immediately decide how to draw a hand with a pencil step by step, which is why it’s worth starting with a basic sketch.

The main thing is proportions
In order to correctly and beautifully draw any object or detail, it is necessary to maintain proportions - the relationship of different parts to each other. This rule also applies to the image of a person.
So, how to draw a hand? We start by determining the correct proportions. The ratio of the length of the metacarpus and fingers is on average 1:1. Naturally, this ratio different people will vary a little, because some people have long fingers and some don’t. But on average the proportions will be equal.
Depending on the length of the fingers, the outline of the palm will be either more elongated or square. Using thin lines (even before drawing the hand), draw the outline of the hand according to the proportions. Thumb does not fit into the overall silhouette, it is always somewhat apart from the other four “brothers”.

Drawing fingers
The fingers are mobile and flexible due to their articular structure, each of three or two phalanges, if we're talking about about the thumb, attached to each other using joints and tendons. The bones of the phalanges, located one after the other, become shorter and thinner, so the fingers gradually become thinner.
Ideally, each phalanx is 2/3 the length of the previous one. These proportions are called the golden ratio - it is perceived by the eye as the most perfect.
Again, when drawing details, you need to make allowances for individual characteristics- not every person’s hands have harmonious proportions. It should also be remembered that the fingers are not the same in length: the most long finger- middle, index and approximately the same and shorter than the middle finger, the smallest are the little finger and thumb. Although the big one is rather the thickest. Its length corresponds to the length of the little finger.

Lines are the basis of authenticity
Before drawing a human hand, analyze again what parts the hand consists of. Remember that the contours of the palm and fingers, taking on specific shapes in the drawing, become more and more rounded. For example, the line connecting the fingers and palm is shaped like an arc, as is the outline of the hand itself - different lengths of the fingers allow you to create a semicircle when drawing fingers pressed together. The thumb is slightly turned in relation to the rest of the palm; its contour will not be straight, but somewhat rounded.

Small details matter
We have sketched out the outline of the palm, then we begin to work on the details. So, how to draw a hand authentically? This is impossible without drawing small parts- folds, thickenings, fold lines, the contour of the nail plate on each finger. These seemingly insignificant touches will make the drawing more realistic.
Let's start with the fold lines on the fingers. As already mentioned, the wrist, palm and fingers consist of many elements. They allow the fingers to perform the functionality for which they are given to a person. How to draw a hand so that it looks as natural as possible? By drawing all the nuances. In places where the bones are connected by joints, there will definitely be folds on both the inside and outside of the palm. If the hand is drawn from the inside, it is necessary to draw the so-called “life lines” - fairly deep grooves in the places where the joints of the palm work.
Each finger at the end is protected by a nail - a hard plate that must be drawn for a realistic image. The nail plate is another important element in solving the problem of how to draw a hand. Nails may have different shapes- from elongated almond-shaped to almost square.
Fingers indicate a person's age. Children's fingers are rounded, with uniform thinning along the entire length. How older man becomes, the more clearly the traces of time appear on the hands. For example, in older people, the thickness of the fingers will be uneven - the joints become increasingly swollen with age, which is affected by many years of work and illness. Also, joints are very visible in thin people.

How to draw a hand in different positions?
Hands not only gradually participate in the conversation, but also often serve as a “language” themselves, for example, when communicating in sign language. Palms and fingers will clearly tell what a person is thinking about this moment time, what his mood is, what he does. How to draw a hand so that it truthfully reveals all the secrets?
When depicting the human body, it is always necessary to rely on the basics of anatomy. Hands are no exception. The size of the fist, for example, is determined by the length of the fingers. And the rule of the golden ratio will be important in any position of the fingers, even clenched into a fist. When drawing an open palm, you need to pay special attention to drawing the lines of the metacarpus and slightly bent fingers.
How to draw a hand from the side? In this case, it will be important to draw the viewer’s attention to the fact that on the back side the palm and fingers will be drawn in almost straight lines, but on the inside, both the fingers and the palm itself have pads, which must be drawn with rounded, smooth lines.

Step-by-step drawing of human hands, with a systematic transition from a sketch to drawing small details, however, like any other object, will allow you to get a realistic drawing.

How to draw hands with a pencil?
Hands are a personal and unique part of the body. They can often tell a story about a person's life through their shape and size. Long years people study their lines and structure, trying to read the future from the lines. Today we will learn draw hands with a simple pencil
by using step by step lesson. We will pay special attention to their construction and the application of shadows so that the drawing comes out as realistic as possible.
Tools and materials:
- White sheet of paper;
- Eraser;
- Hard simple pencil;
- Two soft simple pencils.
Stages of work:
Photo 1. The picture will show two hands. One lies on top of the other. Let's start with the hand that will be on top. For construction we use a hard pencil. Let us denote the shape of the first hand with simple lines:

Photo 2. Place the second hand on the bottom left. She will be turned sideways. We are in no hurry to draw the fingers. Let's just outline the wrist and hand:

Photo 3. On the left hand we will draw the fingers and folds on the bends. We don’t put pressure on the pencil in a stylish way; the pressure should be weak at the first stage. Otherwise, later the contours will not stand out naturally. The fingers are spaced slightly unevenly so that they peek out from behind each other. The small finger has the most folds because it is the most bent:

Photo 4. Now let's move on to the right hand. She lies on the top left. Let's add fingers and two parallel lines at the level of the bones, at the level of the bends. Thanks to this, it will be easier to navigate when building:


Photo 6. We continue to shade gradually adding more volume. Let's outline the outline a little and work it out right hand. Little finger and ring finger are on a bend, so we add more shadow to them than to the others:

Photo 7. Add folds and contour to the bends. Let's draw the details of the upper hand, and at the same time create volume on the lower one:

Photo 8. Let's add more shadow, but try not to over-dark it. The strokes are applied gradually. This trick helps make hands look realistic:

Photo 9. Let's add more contrast. We continue adding shadow:

Photo 10. Let's refine the outline again, it will highlight the foreground. We leave the remaining places untouched.


