How to draw snow in a winter landscape. Let's choose the right color! Winter drawing with children, selection
First snow. Drawing step by step.
Drawing on the topic: depiction of animals in grades 1 - 3, for extracurricular activities and activities with parents
Drawing a bunny with gouache. Master class with step by step photos.
Target: mastering the techniques and techniques of gouache painting, familiarization with the basics of color science.
Tasks:
educational:
- learning to draw a hare, gouache painting techniques, familiarization with the concept of “color scheme”;
developing:
- develop creative thinking, imagination and visual memory, the ability to work with gouache paints, the ability to select and combine colors;
educational:
- cultivate courage and accuracy when working, the ability to analyze your drawing.
Tools and materials:
A-3 paper, pencil, eraser, gouache, palette (white plate), round brushes No. 3.6, flat brushes No. 5, napkins, water.

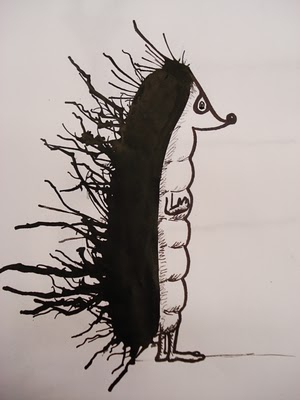
This spring the Hare gave birth to little bunnies. At first she fed them, raised them, trained them independent life In the woods. The bunnies were very smart and cheerful. They learned a lot over the summer. Autumn came, the bunnies grew up and became completely independent, they could take care of themselves and help each other. The weather became colder and, surprisingly, the rabbits' fur coats began to change. The fur became denser, longer, but... white! The bunnies were happy that they were so elegant! But Mother Hare said that it was dangerous. Such bright hares are clearly visible on the autumn grass and you need to hide until it snows. The bunnies learned a new word - snow! And they began to wait for him. One morning, when it became especially cooler, a large cloud arrived and soft fluffy snowflakes flew out of it. It was the first snow of this winter and the first snow in the rabbits' lives.
Step by step drawing process
1. Using a pencil, outline the shape of the bunny: an oval is the head, a larger oval is the body, large ears, small front and large hind legs.

2. Using a pencil, carefully draw the figure of the animal - eye, nose, mouth, tail, toes.

3. Draw - “scatter” leaves on the format. We select color scheme withered autumn grass - ocher, green, brown, yellow.

4. Using bold strokes, we create the background of the composition - autumn grass.

5. Select the color for the hare’s coat on the palette - white, blue, black. Mark the shadows with a dark color.

6. Using small strokes, we begin to add fluffiness to the skin. We convey the volume of the figure - from dark to light. Add pink to the ears.

7. Color the bright small leaves...

8. ...accents indicate large leaves.

9. We write veins and twigs on the leaves.

10. We complete the “dried out” bunny: paint a shiny eye, leave a highlight; We emphasize the shadows and the whiteness of the fur coat.

11. We complete the composition with swirling small and large snowflakes.

The story of the rabbits is quite within the capabilities of first-graders.

The topic “what color is snow” is another kindergarten, In my opinion. By at least, I remember that I conducted such a lesson for children. And they confidently answered me that the color of snow is NOT white.
However, in the works of adults, I now and again come across extremely non-picturesque solutions using pure white and gray monochrome colors from a mixture of white and black.
So how to paint snow in a landscape? What color is snow if not white?
Let's leave aside jokes about yellow snow and the sadness of ecologists about black snow, let's turn to basic knowledge of physics and optics. And let's see how artists solve this problem, choosing the color of snow for a painting.
But first I’ll give a disclaimer -
In what case can snow be depicted as pure white?
If we talk about painting, i.e. drawing with opaque paints and materials: oil, gouache, acrylic, pastel, and if you mean exactly realistic painting(not decorative, where pure white is acceptable), then pure White color from the tube should be used with extreme caution.
In paints the tonal range is much smaller than in nature. That's why mistaken for pure white or bright glare or, if we take Krymov’s teaching, a white wall illuminated by the bright sun.
Snow has a slightly different structure from a wall (I’ll talk about this below), so you shouldn’t paint it with pure white. At the very least, such areas in the picture must be justified in some way.
A. Savrasov "Village in winter", 1880-1890
And here's where let's say pure white, this is in watercolor.
Or rather, we are not talking about the use of white paint here, but about areas of unpainted paper that takes on the role of pure white.
IN in this case watercolor acts as a graphic material, and in graphics this is quite acceptable.
Having made this reservation, let's return to painting.
WHAT COLOR TO PAINT SNOW IN REALISTIC PAINTING
Let's look at the pictures famous artists to understand what colors they used to paint white snow.
For clarity, I measured the required areas in Photoshop and displayed them separately:

A. Savrasov "Winter Road"
In this painting by Savrasov we see that the snow is painted in different shades of gray. They are almost achromatic, i.e. contain a minimum of pure spectral color, more white and black.
However pure color is still necessarily present in the mixture of these shades, without it, gray would seem foreign, dead.
So, in this picture, gray has admixtures of pink, orange, ocher, and violet. (I can’t tell you what paints Savrasov mixed; technically, you can use different variants, I'm talking about the presence of color tone).
How do you know what pure spectral color is used in a gray shade?
Warm shades in the color of snow, as in this painting by Savrasov, are found in “old” snow, i.e. compacted, dense.
If the snow is fresh, then even in the bright sun it will be more likely to be bluish.

Paul Gauguin "Breton village in the snow"
Why bluish?
Because we know that bright sunlight- warm, and the shadows are cold. And white objects in the sun will have a warm tint.
However, snow is a slightly different matter. It consists of many crystals of frozen water. And a crystal, as we know, has edges that reflect light.

A. Kuindzhi "Winter"
So, a ray of light, hitting the edges of these crystals, is reflected multiple times. And the fresher the snow, the more loose and airy it is, the stronger the light wave is lost in the depths of this snow cover and returns reflected, having lost some of the color waves.
This is why fresh snow differs in color from more mature, compacted snow, which will be closer in properties to ordinary surfaces.

I. Levitan "March"
If we talk about the color of shadows on the snow, then they will acquire an even more powerful cold sound.
On a bright sunny day, even a person with poorly developed color perception sees that the shadows have a blue tint.

B. Kustodiev "Skiers"

How incredible it is to wake up in the morning and see snow-covered trees, bushes, and earth outside the window. The first snow always brings people joy and a feeling of a fairy tale. And what extraordinary feelings the first snow brings to children. Lesson on visual arts“First Snow” will help children experience the process of magic and imagine how the first snow falls.
Topic: First snow
Program content: continue to teach children to create a winter landscape using non-traditional drawing techniques (drawing with stick sticks). Strengthen children's knowledge about the parts of the day. Teach children to independently perform drawings in a certain sequence, develop Creative skills, enrich children's vocabulary with figurative expressions and words, consolidate the ability to draw with a brush. Develop aesthetic assessments and judgments. Foster a love of nature, neatness, and independence.
Material for the lesson: paintings with winter landscapes, brushes, poke sticks, tinted paper blue color with a painted tree, white gouache for each child, a jar of water.
Preliminary work : looking at illustrations of a winter landscape, observing while walking, learning poems and songs about winter.
Progress of the lesson:
(Children stand in a semicircle)
Educator: Children, remember yesterday, was there snow? (No). Today? Yes, it snowed today. And when did this happen? (At night). Why didn't you see the snow fall? (The children were sleeping). And what comes after the night? (Morning). What do we do in the morning? (Children remember what they can do at different parts of the day).
Educator: And it snowed tonight.
I’ll now read you a poem about snow, and you try to remember what the snow covered.
I. Surikov
White snow fluffy
Spinning in the air
And the ground is quiet
Falls, lies down.
And in the morning snow
The field turned white
Like a veil
Everything dressed him.
Dark forest with a cap
Covered up as weird
And fell asleep under her
Strong, unstoppable.
Educator: What did the snow cover? (Children's answers)
Educator: Let's remember what kind of snow there is? (white, wet, fluffy, squeaky, cold, sparkling)
Educator: Now let's all go to the chairs (Children sit on the chairs). Now each of you will try to be a wizard and draw the first snow. What is drawn on the sheets of paper that lie in front of you? (Tree). This tree we will cover with snow. For this we need a brush and paint. What colour? (White) And a jar of water. Look, there are also poke sticks in front of you. Why do you think we need them? (Children's answers). Using these sticks we will draw snow that is falling.
The teacher shows the sequence of work; children draw snow on the branches of a tree, on the ground with a brush, and falling snow with sticks.
If necessary, physical education is provided.
We are not afraid of powder
We catch snow, clap our hands.
Hands to the sides, at the seams
Enough snow for us and you.

The teacher analyzes the drawings (the teacher lays out all the drawings on the table and asks the children to come up, asks who liked whose work. With the help of the children, the teacher evaluates the work.
Educator: Children, our lesson is over. When your drawings are dry, we will place them on display.
Found it on the Internet interesting selection. (the most interesting, for me, is at the end))
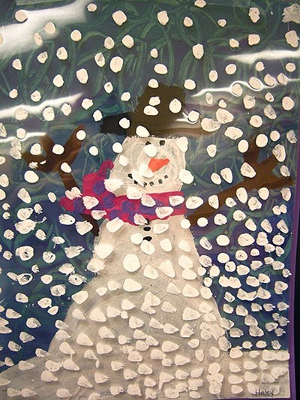
1. Winter drawings. "Volume snow paint"
If you mix equal amounts of PVA glue and shaving foam, you will get wonderful airy snow paint. She can draw snowflakes, snowmen, polar bears or winter landscapes. For beauty, you can add glitter to the paint. When drawing with such paint, it is better to first outline the contours of the drawing with a simple pencil, and then paint it with paint. After some time, the paint will harden, and you will get a voluminous winter picture.


2. Winter drawings of children. Using electrical tape in children's creativity
If there is snow outside the window, you can depict it using a cotton swab.
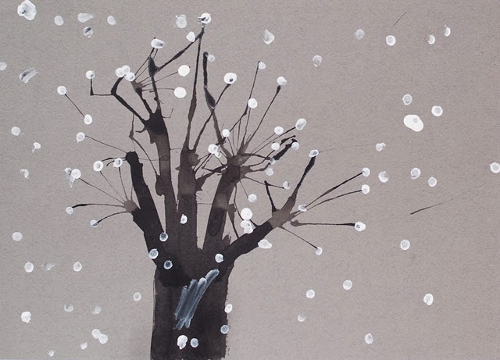

Or use a brush to put snow on each branch.

11. Winter drawings. Drawings on the theme of winter
An interesting idea on the topic of children's winter drawings was suggested by the author of the blog Homeschool Creations. She used putty to paint snow on the transparent film. Now it can be applied to any winter pattern or appliqué, simulating falling snow. They put the film on the picture - it started snowing, they removed the film - the snow stopped.
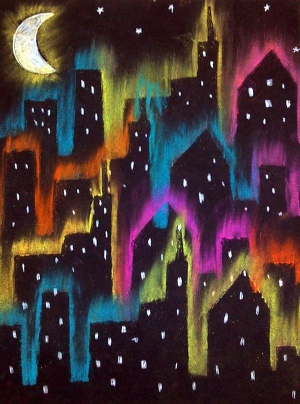
12. Winter drawings. "New Year's lights" We would like to tell you about one interesting unconventional technology drawing. To draw New Year's garland as in the photo, you will need a sheet of thick paper of a dark color (blue, purple or black). You will also need regular chalk (the kind you use to draw on asphalt or a blackboard) and a light bulb stencil cut out of cardboard.
On a piece of paper, use a thin felt-tip pen to draw wires and light bulb sockets. Now apply the light bulb stencil to each socket in turn and outline it boldly with chalk. Then, without removing the stencil, smear the chalk on the paper using a piece of cotton wool or directly with your finger to create rays of light. You can replace chalk with colored pencil graphite chips.

It is not necessary to use a stencil. You can simply paint over the light bulbs with chalk, and then gently rub the chalk into different sides to make rays.

Using this technique you can draw more winter city, for example, or the northern lights.
13. Drawings winter's tale. Winter forest drawings
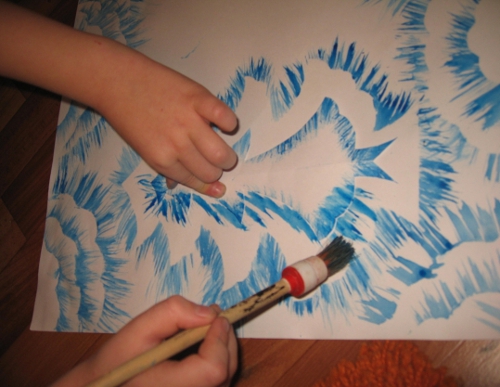
On the site already mentioned above Maam.ru you will find interesting master drawing class winter landscapes using templates. You will only need one base color - blue, a coarse bristle brush and a white drawing sheet. When cutting out templates, use the cutting method from paper folded in half. Look how great the drawing is winter forest turned out to be the author of the picture. A real winter fairy tale!

14. Winter drawings. Drawings on the theme of winter
You are probably very eager to find out how the wonderful “marble” Christmas tree in the photo below was painted? Let's tell you everything in order...To draw this original drawing for the winter theme you will need:
Shaving cream (foam)
- watercolor paints or green food colorings
- flat plate for mixing shaving foam and paints
- paper
- scraper

1. Apply shaving foam to a plate in an even, thick layer.
2. Mix paints or food coloring different shades green color with a small amount of water to make a saturated solution.
3. Using a brush or pipette, drip paint onto the surface of the foam in a random order.
4. Now, using the same brush or stick, beautifully smear the paint over the surface so that it forms fancy zigzags, wavy lines, etc. This is the most creative stage all the work that will bring pleasure to the children.
5. Now take a sheet of paper and carefully apply it to the surface of the resulting patterned foam.
6. Place the sheet on the table. All you have to do is scrape off all the foam from the sheet of paper. For these purposes, you can use a piece of cardboard.
Simply amazing! Underneath the shaving foam you'll find stunning marble patterns. The paint has time to quickly absorb into the paper; you just need to let it dry for a few hours.
15. How to draw winter. How to paint winter with paints
Concluding our review article on winter drawings for children, we want to tell you about one more in an interesting way, how you can paint winter with paints together with your child. To work, you will need any small balls and a plastic cup (or any other cylindrical object with a lid).

Place a piece of colored paper inside the glass. Dip the balls in white paint. Now put them in a glass, close the lid on top and shake well. As a result, you will end up with colored paper with white streaks. Do the same colored paper with white streaks of other colors. From these blanks, cut out the details of the applique on a winter theme.


Material prepared by: Anna Ponomarenko
This lesson will be useful to you more than once in your life, and not only for art lessons. Info sotka. I'll show you how to draw snow with just one a simple pencil. The difficulty is that when trying to depict falling snow, beginners depict snowflakes flying down. The result is, or an invasion, but not snow. Below I will show you what the secret is. Let's depict this landscape.
How to draw snow with a pencil step by step
Step one. I draw a horizon line. There is nothing in the foreground, everything is covered with snow. In the middle ground you need to show the tops of the house and trees. And in the back.  Step two. You should always start drawing with those objects that are closer to the observer. I'll make a sketch of the Christmas trees and add them.
  Step three. Now I draw in detail wooden house and I’ll add a window to the second house. Or is it a barn, I don’t know, it’s not very important. I draw mountains.
  Step four. This is the most important point. Add shadows on the trees, house, and mountains in places where there is no snow. This is the whole secret: to draw snow with a pencil, you need to draw in those places where there is no snow, and leave the rest of the space untouched. Look:
  I have made many more lessons about winter for you, here are the best of them.


