How to draw a village in winter with a pencil step by step. Learn to draw a winter landscape in gouache for children. Drawing a distant forest
Winter is a “magical” time, which children and adults associate with fairy tales, gifts, holidays and fun. Drawing winter is not only easy, but also fun. Each time, depicting a new one storyline(a snow-covered house in the forest, a squirrel on a Christmas tree or falling snowflakes), you are immersed in the world of your drawing and partially dissolve in it.
You can draw a winter landscape with anything: pencils, crayons, paints. The simplest tool is, of course, a pencil. Choose colored or simple pencils, as well as thick landscape or craft paper.
IMPORTANT: Drawing a winter landscape on colored craft paper is much more pleasant and interesting, since this material already has a certain color shade, on which white color fits easily and contrastingly.
Before drawing, plan in advance what exactly you will depict: a hut, a snow-covered city, snowy forest or a children's playground. First, sketch out your landscape (mountains, houses, figures) and only then start detailing, depicting lumps of snow on every surface.
You can draw snow in waves (imagine that there is a small cloud on each branch or roof), or dotted. For this you should use white pencil, with which you will make many dot prints in a selected location.
IMPORTANT: When working, always use a good quality eraser, which will help remove unnecessary lines and sketches and make the drawing neat and “clean”.
How to draw a winter landscape and the beauty of Russian winter with pencil, paints, and gouache?
“The beauty of the Russian winter” is snow-covered fields and forests, warm, cozy huts with “snow caps” on the roofs, children playing with snowballs in the yard, kind forest animals and only happy faces. Drawings depicting Russian winter should radiate warmth and only positive emotions.
When depicting the “Russian winter”, remember everything that you associate with the “good old winter's tale": sleds, grandma's rolls, fluffy Christmas tree, Santa Claus, red-cheeked children, skates and much more. You should draw the entire sketch with a pencil and only then color it bright colors, not sparing flowers.
Russian winter, drawing ideas:
Russian winter: simple template  Russian winter: drawing template
  Russian winter and winter fun: drawing template
  Russian winter, hut: template for drawing
  Russian snowy winter: drawing template
  Hut in the forest, Russian winter: template for drawing
“Russian Winter”, finished drawings:
Russian winter, children's fun: drawing
 Russian winter in the village: drawing
  Russian winter, Santa Claus: drawing
  Russian winter, Christmas time: drawing
  Russian winter, morning: drawing Russian winter, huts: drawing
 How to draw the beginning of winter with a pencil?
The beginning of winter means not snowdrifts and snowmen, but roofs of houses and tree branches slightly covered with a white veil. There is a special magic in the first days of the “fairy tale time” and therefore you can try to capture it in pictures and drawings.
You can choose any subject for drawing: nature, city, village. The main thing is to try to convey the coldness of the frosty air and the mood. The sky deserves special attention. To depict it, use heavy blue paints so that the ground looks contrasting, and the first snow stands out especially.
IMPORTANT: It wouldn’t hurt to also depict the wind and the first snowflakes descending to the ground. They can be large or small, detailed or just white dots.
The beginning of winter, how to draw:
 The picture clearly shows the gold of recent autumn and the first snow that fell
  You can depict “bare” trees and yellow fields, just covered with the first snow
 The first snow is often associated with the joy of children
 You can depict the beginning of winter not necessarily through a landscape, but also as a view from a window
  The beginning of winter is often associated with bare trees, wet puddles and fallen leaves.
  Simple children's drawing the first snow is very simple, but conveys all the energy of real winter
  You can depict a winter landscape, both rural and urban.
  First snow: gouache drawing
 How to draw a winter forest with pencil and gouache?
The winter forest becomes especially charming and beautiful when the first snow comes. You can depict any trees, complement them with fir trees, bushes and clearings. The main thing is to cover all the branches and crowns in the forest with a white shroud and snow “caps”.
Depending on what exactly you want to depict, you can complement the picture with snow-capped mountains, forest animals, a village with glowing windows in the distance, a bright moon, stars or a month. If you draw with a pencil, choose dark paper, on which a white pencil will look more contrasting.
IMPORTANT: Drawing a winter landscape with gouache is much easier. To do this, apply paint layer by layer: first the background, then the forest, and only when everything dries - white snow.
Drawing a winter forest with gouache:
Winter forest gouache on white paper Winter forest gouache on blue paper
  Winter forest gouache, multi-layer drawing
  Winter forest with a simple pencil, winter
  Winter forest with colored pencils: children's drawing
  Winter forest, hut: paints, pencil
 How to draw a winter village with pencil and gouache?
The images of a winter Russian village, dusted with snow, where light and comfort glow in every house, are truly mesmerizing. It is best to draw such images on dark paper or with a dark background so that the snow looks especially contrasting.
IMPORTANT: The drawing where you depict evening or early morning will turn out bright and effective. In the evening or at night it is good to draw the stars and the moon, in the morning - a bright red sunrise and sparkling snow.
Ideas for drawings:
 Night, winter village: paints
  Winter in the countryside: colors Winter morning in the village: paints
  Early morning in a village in winter: colors
  Winter in the countryside: a simple pencil
  Country winter: pencil
  Winter, village: pencil
 Ideas for drawings on the theme of winter for sketching
If you do not have special drawing skills, templates for sketching will always help you. With the help of templates you can depict any landscape and picture in your head. You can sketch by observing every detail of the image, or by attaching the drawing to the glass (now everything is much simpler in the era of computers and a sheet of paper can simply be placed on the computer monitor to trace the outline with a pencil).
 Template for drawing No. 1
  Template for drawing No. 2
  Template for drawing No. 3
  Template for drawing No. 4
  Template for drawing No. 5
 Everyone can draw a simple New Year's landscape. The main thing is to apply a little imagination and everything will work out!
You will need
- -Paper
- -Plain pencil
- -Eraser
- -Materials for coloring
Instructions
Draw the outline of the earth. Since this is a winter landscape, the ground will be covered with snow, you don't have to paint it.
Draw the outlines of the mountains. Just add a curved line at the top above the first one. Do not press too hard on the pencil so that you can easily correct it.
Draw some trees. If you notice, they look like triangles with jagged edges. It is not necessary to make them straight.
Add a Christmas star in the sky. Also place a star at the top of the trees. Don't forget to put some snow on the trees.
Now all you have to do is colorize your drawing. Use your imagination, because this is a New Year's landscape.

How to draw winter with a pencil:
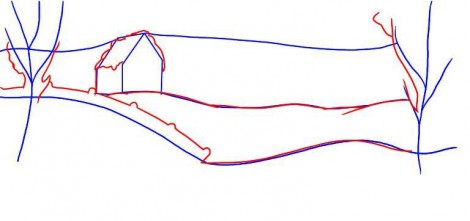
Step one. Let's define two lines of the earth's surface on the sheet: we start from a hillock, go down into a small ravine where a river will flow, rise a little higher and draw the surface to the edge of our drawing.
A little higher, on the hill, there will be a house, so let’s immediately draw its outline. Let's draw a contour of the earth's surface from the house.
From above we will show the border between the sky and the trees, it is smooth, but not very smooth. The trees are approximately the same size, but still differ from each other. Along the edges of the landscape we will draw the outline of two trees, as if limiting our drawing with them.  Step two. Let's draw a snowball on the roof of the house. The winter is snowy this year and everything is dusty. On the left above the tubercle we will draw the outline of the fence. Let's mark the snow and branches on the trees.
 Step three. First, we finish drawing the trees that we placed along the edges of our drawing. Then we draw the house: the windows, the door, and the pipe. Surely someone lives in it (maybe Father Frost and the Snow Maiden?), and lights the stove on such a frosty day, which means a column of smoke comes out of the chimney. And now, between the level of the sky and the top line of the earth, we draw a Christmas tree, one, two, three... and so we fill the entire background. We have already talked about how to draw a Christmas tree.
 Step four. We finish drawing the fence, make the trunk of the trees more winding, draw snowdrifts, large and small. A small branch of a tree sticks out from one of the snowdrifts, which will turn green in the spring. On the left, right above the river there will be a small cliff. Let's imagine a little and try to carefully draw it, approximately as shown in the picture.
 Step five. Let's draw a river. First, its upper border, and then the shimmering water itself and, in some places, ice, and even large ice floes. From the house we draw footprints to the river, because we remember that someone lives there and, probably, goes out for a walk.
 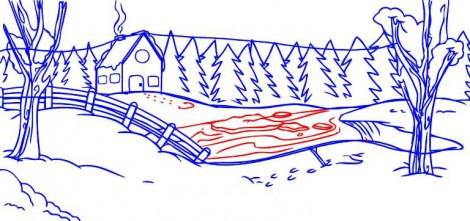 Step six. And the most colorful. Take colored pencils or markers in your hands and use your black and white drawings- cheerful and bright! May it lift your spirits!
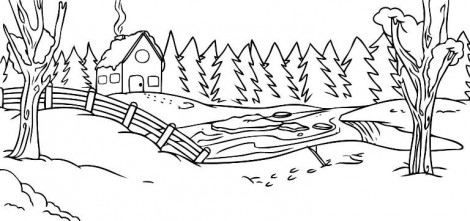
Step-by-step work on painting a winter landscape. Artist - Oleg Chuvashev. Canvas, oil.


Evening beautiful landscape
How to draw a landscape? It is important to choose the right color scheme and mood. This landscape is evening. Winter evening. Not too cold. There is frost on the trees. Birch branches fall down. Not all trees may have branches that droop, but birch and willow can.
The branches are frosty and snow-white. But the main thing in this landscape is the lake. The lake is especially mysterious in winter. And at dusk, the evening landscape with a lake creates a mystical mood.
Let's draw a landscape with a pencil. This is just a sketch that will help us a lot not to make a mistake with the location of the trees, lake, and other parts of the landscape. Drawing a landscape is not very easy. To begin with, as we have already said, let's outline it and draw it with a pencil. Then we'll choose a gamma. This is twilight, which means the gamma is cold. If you draw from your own photograph or from nature, then you can stick to the palette that is in the photograph. However, something can be changed. You can even paint a landscape in one or two colors, and it will look like full color. Especially considering that at dusk a person ceases to distinguish colors.
So, we chose the gamma. We have blue, pink, lilac, brown and white on our palette. There is also golden ocher. The main range, as you see in the picture, is like this.
Let's start drawing. Laying out the shadows. Let's draw a lake. Since this winter evening If it were a summer landscape, then we paint it in a restrained palette; if it were summer, then at that time there would be sunset, and there would be many more flowers in the landscape. In winter, white snow, dark or light objects.
The winter landscape is more ascetic, and perhaps therefore a little easier to draw. It makes it possible to understand the tone, rather than chasing color nuances. In addition, if you have ever painted a sunset in the evening, or a summer landscape not with a pencil, but with paints, then you probably know how quickly the picture changes. One moment the sun was yellow or orange - and now it is scarlet, and five minutes later it is crimson, and is about to disappear behind the horizon. And the water is sometimes blue, sometimes lilac, sometimes red in the rays of the setting sun. In general, the winter landscape is a little simpler in this regard. It will allow you to concentrate on drawing details - tree branches, snow-covered bushes, reflections in water. However, the winter landscape is very beautiful. Even the cold doesn’t stop you from enjoying winter. So our landscape should, first of all, be beautiful.
First we draw the darker places, and then we draw white branches on top. If it is gouache, then you will paint over the paint with white. However, still leave large white areas unpainted, since it is not always possible to cover light paint darker, and you need a lot of layers of white. White snow just mark it a little with white and blue or lilac paint. Don't be afraid to mix paints; gouache will be more beautiful if the color is composite. However, a picture can be painted not only with gouache, but also with tempera or acrylic. This picture is painted with acrylic on paper. Acrylic, it seems to us, is not as opaque as tempera, so not all colors are easily repainted. Try not to draw overly bright and dark objects if you are not sure of their necessity.
We continue to draw the landscape. We draw a Christmas tree and its reflection in the water. Landscape with a lake - very interesting and beautiful picture. The most important thing here is to draw the water correctly. The water should be like real water. Therefore, we draw water and reflections in it. In our forest lake the trees are reflected, the reflection of the Christmas tree is especially clearly visible. Christmas trees also look beautiful in paintings.
Draw the details of the landscape: thin branches covered with snow. IN last moment we changed the line of the lake - it somehow stood out too much, it was unnatural. Now the landscape is more peaceful and harmonious, and looks more beautiful.
So we drew another landscape, this time we learned to draw an evening and winter landscape. As soon as spring comes, the landscapes will become more and more saturated, sparkling with colors and colors. Green grass will grow, flowers will appear. But the winter landscape has its own beauty, and it was loved and appreciated by many great artists.
1. Using light lines we outline the main elements of the composition in the background, middle and foreground.
2. Attention is concentrated on the objects in the middle ground - from them we begin the detailed drawing. The direction and strength of the stroke depend on the texture of the object: mountain road, snow-covered fir trees, log houses.
3. How to draw a winter landscape: When working out and detailing the entire drawing at the final stage, remember that the mountains in the background should be barely visible.
Palette for this landscape:
burnt umber, burnt sienna, yellow ocher, raspberry kraplak, Prussian blue, ceruleum, ultramarine, cadmium orange, light cadmium yellow, white.
The color of the sky determines all the other colors in your painting. Before getting into details, make a general sketch.

For warm wood colors, use burnt umber and burnt sienna (muted with ceruleum). Try not to detail the texture, but only gently indicate large shapes with color.

The key colors for purple shades are crimson and two shades of blue. To get the color of an orchid, use more speck, for purple, more blue. Apply them loosely.

The shapes of the snowdrifts follow the features of the earth's surface, but the snow hides and softens its unevenness. Make sure your strokes are smooth and not angular.

The warm tone and hard texture of the old barn against the backdrop of fluffy cold snow creates the necessary contrast. In a picture that is mostly in cold colors, you should add a little warm shades on which the eye could rest. The opposite rule is true for paintings in warm colors. To depict an old barn, use only burnt umber, and then layer lighter colors over the wet paint to define the boards. Leave small gaps between strokes to create shadow stripes between the boards.

Winter is for real magical time of the year. White snow crackling underfoot, patterns on the windows, warm hats with pompoms, snowball fights, new year holidays- this is still far from full list all the wonders of winter. And if you want to keep a little of this magic for yourself, then learning how to draw a winter landscape is what you need.
 Landscape with mountains and river |
 Twilight in the forest |
 Simple drawing |
Drawing a rural winter landscape

Although winter can fill even large cities with the atmosphere of a fairy tale, it is the rural views that acquire a special charm and comfort at this time of year. We will demonstrate all the beauty of snow-covered village houses when we learn how to draw a winter landscape step by step.
First, with a pencil, we outline the outlines of one Christmas tree and one house. The Christmas tree will be wide and spreading.

And then - two more houses and another Christmas tree. The houses will have triangular roofs, characteristic of many villages.

Let's add more Christmas trees and a picket fence. This fence, of course, is quite conventional - in the villages people know each other and do not build high fences.

Now, based on the sketch, we will draw with paints. The Christmas trees will be a lush green hue, the houses will have the warm shade of unpainted wood, and the snow will have a slightly blue tint. To make the picture look alive, we will place three birds on the fence.
That's it, the drawing is finished.
Hills and snowfall - drawing a winter landscape

Let's continue the theme of rural beauties. This time we will depict the very outskirts of the village - the forest will be visible in the background. And the snowfall will be in full swing. Don't worry, it's not difficult at all - this example is a great way to practice and draw a winter landscape for beginners.
First, let's outline the largest forms - in our case, these are hills.

Then we will draw three spruce trees in the foreground, and in the background we will make a house, a snowman and the sharp tops of smaller fir trees. Don't forget about the path leading to the house.

Let's draw all the contours well. We will also “give” the snowman a top hat and depict snowflakes falling from the sky.

Let's color the drawing. Our landscape will be at night, so we’ll make the sky dark, grayish (it will be overcast). And, of course, you can’t do without a chic full moon. The house will be made in warm colors: the walls will be yellow, the roof will be red, the doors will be brown.
Let's wrap this up - we did a great job.
Magical winter night

Despite the fact that untouched snow, smoke from the chimneys of rural houses and the pointed tops of Christmas trees look fabulous even during the day, the true magic lies in the winter nights. This is exactly what we will show when we figure out how to draw a winter landscape in gouache.
We will not immediately take up gouache - first we need to complete a pencil sketch. Let's start with the general outline of a hilly area, a house and three trees near it.

Then we’ll draw another smaller house, a path leading to it and add more trees, coniferous and deciduous. In the very foreground there will be a birch tree with thin branches hanging down.

After that we will start working with paints. First of all, use dark tones to depict the sky and forest in the background. You can also grab three spruce trees near big house. Don’t forget to make a month in the sky - it will still be very thin and young.

Now the foreground. Let's make the snow a little bluish, the Christmas trees green, and the walls of the houses light brown.

Small details remain - the light in the windows, the smoke pouring out of the chimneys, the snow on the legs of the fir trees, the trunk and branches of the birch tree. And many stars in the night sky.
Now we can safely say that the drawing is finished.
Winter landscape with mountains and river
Winter in the mountains is amazing. The forest has become harsh and dark, clean rivers, the thickness of the snow - all this looks so pristine, clean, untouched that you can admire this beauty for hours. But you also need to add a touch of coziness - a small, but solid and neat village house is perfect for this purpose. So we will learn how to draw a beautiful winter landscape.
First, let's take a look at the first plan - there will be two trees with thin branches there.


On the right side of the picture we will depict a house of a peculiar shape and the tops of Christmas trees in the background.

Now you can take up pencils or paints. On background Let's make the mountains - they will be completely covered with snow. The house will be made of wood, and the bridge will be made of brick. You also need to draw transverse stripes on the nearby trees - these are birch trees. Pay special attention to the windows - they should glow, because this sure sign that someone lives there.
That's it, we've finished the picture.
Twilight in the winter forest
Besides the night most interesting time days in winter forest is twilight. The stunning shade of the sky and the falling nature merge into a marvelous ensemble. Using the example of such a miracle, we will learn how to paint a winter landscape.
First, let's work on the sky and the overall tone of the snow. For this we will use watercolor or gouache to create beautiful stains. You need to wet the paper, and then apply paint with big amount water and tilt the sheet. The paint will flow down, forming these beautiful patterns:

Then we will draw a tree in the foreground. try to make the branches thin enough. Moreover, the brush must be guided from the base of the branch to its tip.

Using the same principle, we will draw three small bushes.

Then - two Christmas trees. They should be painted with thick, rich strokes of a dark green hue.

Let's cover the trees and bushes with snow. We’ll also decorate the front bush with juicy red berries.
Now the picture is complete.
A colorful house, a bunny and snowflakes - a fun winter
Winter is a time for fairy tales, which is why it is often depicted in cartoons. In this section we will also work in a cartoon style - at the same time we will learn how to draw a winter landscape with a pencil.
First, let's outline the house and the bunny looking through the window. All outlines will be very smooth, rounded, without sharp edges.

Then we’ll draw the Christmas trees (they will be just as smooth and round) and the snow falling from the sky.

And now let's color everything in the most bright colors. But the snow, of course, needs to be made blue. And the Christmas trees are green.
That's it, the fun house is ready.
Being a parent is not an easy task. Moms and dads need to take care not only of the physical health of their children, but also pay due attention to their intellectual development.
Children are inquisitive and enthusiastic people (another thing is that all hobbies, as a rule, quickly fade away), so in different period Your child may be interested in gluing airplane models, making crafts from plasticine or clay, doing wood burning, or drawing all sorts of pictures.
And you and I have to urgently master all these arts: drawing, modeling, origami. How often do moms or dads have to make crafts for kindergarten or school with their children?
In our article today, we will reveal to you some secrets that will help you master drawing a winter landscape with gouache and teach this simple art to children.
This skill will definitely come in handy. Firstly, in school and preschool educational institutions very often people are asked to draw landscapes.
Not every child can cope with such a task (what a child, not every adult can depict a landscape: this requires certain skills and imagination), so your help will be useful to the child.
Well, secondly, inquisitive fidgets themselves often ask their parents to draw something for them. In this case, you will not only please the child beautiful view landscape, but you can also explain to him how to correctly draw such pictures step by step.
Tools
Of course, we will paint the landscape with paints - pencils and felt-tip pens are not suitable for this purpose. Usually watercolor or gouache is used. It’s up to you to decide which paint to choose, but we strongly recommend using gouache. This material has several main advantages over watercolor:
- the density of the applied layer is easily adjusted with water;
- You can not erase the pencil sketch, but draw directly on top of it, which is very important for a painting, the drawing of which takes place in stages (a significant saving of time and effort);
- the paint has virtually no odor.
However, it is not without its drawbacks: if a very thick layer of gouache is applied to paper, the paint may crack and crumble.
In addition to paint, we will need brushes (one hard and thick, for large strokes, and one thin, for drawing small parts and outline symbols), palette and water container. To mix paints, you can use regular school plastic palettes or a flat plate. It’s better to take several jars of water so you don’t have to run around later.
What gouache should I use? You can purchase standard “children's” paint or artistic gouache. The latter is more durable, which is reflected in its cost.
The instrument is ready - it's time to decide on the plot. We decided to depict a landscape, but what will be its basis? We invite you to master step by step drawing winter landscape.
Of course, a lawn with spring flowers or a sandy beach is no worse, but it is the winter plot that has an inexplicable charm and a fairy-tale atmosphere.
In addition, such a task is very common in school curriculum, so you will kill two birds with one stone: you will get aesthetic pleasure and help your child prepare the task.
Winter drawings are attractive because they are created using a minimum of colors. Winter evening, in the distance there is a dark forest, in the foreground there is a snow-covered spruce and a house.
It splashes from its windows warm light, and it becomes clear that inside there is a cozy room hidden in the middle of which there is an oak table laden with cups of aromatic tea.
Let's start creating
Idyllic pictures will not leave anyone indifferent. So let's go through all the steps and master the step-by-step drawing of such a masterpiece.
Stage 1
Draw a sketch. The drawing should be approximate, the contours of objects should be barely guessable. Do not press hard on the pencil: paint will flow into the grooves left by the lead, causing the sketch to turn out uneven. It is also better not to draw dark thick lines: they will appear through the gouache layer.
Stage 2
Prepare jars of gouache. The contents of the jars should be thick enough. If the paint is old and cracked, add a little water and thin it to the desired consistency.
We will paint over the sketch step by step, and will start with the sky (after all, it takes up a considerable part of the sheet). The evening winter sky should be light blue at the horizon and inky at the top.
You will need black, blue and white paint. Start painting the sky from above with a mixture of black and blue gouache (the desired shade can be obtained by mixing colors on the palette), gradually move to blue, and add a little white closer to the horizon.

Stage 3
Now let's start decorating the house. Your task is to convey the texture of the wood as accurately as possible. Therefore, we draw using several colors.
The main one is ocher (something between yellow and brown; usually it is not included in sets, so you will have to mix paints). So, paint the log with the resulting ocher shade. Add a few strokes below Brown, and on top of them - a little black. This will create the illusion of volume.

Stage 4
Paint all the other logs in the same way. We draw attic boards in the usual way brown using vertical strokes. It's the window's turn.
Since it is a winter evening outside, it is very important that the gloomy landscape is diluted with warm light. Paint the middle of the window yellow, apply brown along the edges (note: you want the colors to smoothly flow into each other, without clearly defined boundaries). Add a little white to the center.
Using a thin brush, paint a brown frame. To create a blurred effect, do not connect the crossbars of the slats. You can paint the shutters with any pattern.

Stage 5
No landscape is complete without a forest. Mix black and white colors(you want a shade slightly darker than the background), dip a thicker brush into the puddle of gouache and paint a few light vertical strokes into the background. The forest is far away, its contours are blurred, so we will not draw the details.
Those trees that are closer need to be shaded with dark blue gouache, giving them a more intense color. Color the lake. This is not difficult, the process is very similar to drawing the sky, only all actions are performed in reverse order. Give volume to the snowdrifts on the roof of the house and around it, playing on the contrast of shadow and white snow.

Stage 6
In the foreground we will draw a shaggy spruce. It will be covered with snow, so there is no need to add much detail to the tree.

There are only a few details left: cover the spruce with white snow, draw a chimney pipe (use a mixture of black, white and brown paint) with curling smoke and several birch trees right behind the house (birch trees should be marked with a thin brush), depict a snow coating on the ice of the lake.
Now you know how to draw a landscape in gouache step by step and make your children happy. Similar winter drawings you can add other details: a fence, a kennel, a snowman. Ask the children what they would like to see in the picture, because children's imagination has no boundaries.
Winter is the most magical time of the year, shrouded in an atmosphere of fairy tales and goodness. Such a positive mood can also be conveyed through a landscape, which any novice artist can draw, regardless of his age.
Before you start drawing, prepare everything you need:
Colour pencils;
- eraser;
- a simple pencil;
- a sheet of white paper.

Now you can get started:
1. Use light lines to mark the snowdrifts. Then draw the outlines of the oak trunk and its branches;

2. Sketch a snowman next to the tree;

3. Draw the snowman in more detail;

4. On the lower branch of the tree, draw a feeder and birds;

5. Next to the snowman, draw a triangle that will represent a Christmas tree;

6. Draw branches of a Christmas tree;

7. Draw Christmas trees in the background;


9. Color the Christmas tree using pine needles green color, and for snow – blue;

10. Erase the pencil lines and color the snow blue and blue, and the outlines of the tree are brown;

11. Paint the trees in the background blue-green, and the oak tree various shades brown;

12. Mark the oak bark with curved lines using a dark brown pencil;

13. Color in the sky with a dark blue pencil. Deepen the shadows on the snowdrifts and on the snowman using blue, lilac and purple tones.

Now the drawing is completely ready. It can be a wonderful story for a good greeting card intended for close friends or relatives.


