How to draw a rooster with a pencil step by step for children. How to draw a rooster with a pencil and paints step by step for beginners and children? How to draw a rooster's head with pencil and paints? Representing a poultry
So, the first thing I did was draw a line drawing of a rooster using an HB pencil:
Then I lightened all the lines with nag and started drawing the rooster with colored pencils. I decided to start with the tail, so as not to accidentally overwrite what had already been drawn with my hand. And first of all, I used a black pencil, then starting from the darkest tone.

As we moved from left to right, the design of the rooster's tail began to take on more realistic shapes. To convey the shine of the feathers, I used several shades of blue and green. I won’t list them, it’s easier to say that the entire drawing of the rooster took more than half a box of pencils.

The general approach to drawing feathers was the same - first the darkest areas were drawn, then a certain color was introduced (or rather several shades at once) and finally polished. I used exactly the same approach in drawing the yellow feathers:

As you can see, there were quite a lot of yellow feathers on the rooster. If you don’t fall into excessive realism or hyperrealism, then it’s enough to understand general principle how the feathers are arranged and what shadows and shades they provide. And then it is no longer possible to thoroughly copy every smallest feather, but to recreate a more general picture, where exactly the character of these feathers will be conveyed, i.e. they may even be located in slightly different places or there may be fewer of them than in the original, but this will not make them lose their realism.

In general, there are quite a lot of roosters in the drawing complex elements, especially for beginners. These include numerous feathers, shadows, shimmer, and a rooster’s comb with an interesting pimply texture. Therefore, do not rush to complete the entire drawing at once, in one sitting. When drawing the rooster's comb, I used several shades of red, as well as cool purple colors in shady areas. I went over it with a little white gel pen, imitating the pimpled surface of the comb. I really didn’t want to get too bogged down in copying here, so I allowed myself to heartily poke with my pen in a chaotic manner. It turned out quite plausible in my opinion :)

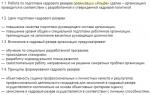
At the end I also worked on the rooster's legs. Here I had to study a little other photo references to understand how the legs of a rooster are arranged, because... in the main photo the paws were not shown as we would like. Be sure to add a small falling scattered shadow so that the rooster does not hang in the air. And now the drawing of the rooster is ready:

Of course, it is absolutely impossible to fully describe such a process in an article, because the work lasted over 8 hours and used most of the techniques applicable to colored pencils. But I hope that I have given you at least some idea of such drawings. As you can see, even with children's pencils you can achieve good results in realism.
Finally, I suggest you watch the accelerated video of the process of creating a drawing of a rooster with colored pencils:
If you liked the video and article, be sure to share them with your friends, and as usual, write comments) Good luck!
Hello! Today we have prepared for you a new simple drawing lesson that even a beginning artist should be able to handle. The topic of the lesson is how to draw a rooster.
In general, this is not the first bird on our site, because quite recently we drew a chicken (by the way, it was also very simple), but today our guest is a male chicken. Yes, this sounds very funny, but this is exactly the definition of the word “rooster” given in Wikipedia.
The rooster is a fairly popular bird - for example, this feathered creature is the symbol of France (football fans will probably recognize the logo with a Gallic rooster in the center). In Russian folklore, the rooster represents light - remember, it was his cry that drove away all evil spirits, and even made you feel uneasy. Probably in modern conditions, the crow of a rooster could even drive away. Let's start getting acquainted with the lesson and find out how to draw a Rooster!
Step 1
Let's start drawing with such a photo of a rounded figure. It is difficult to compare it with anything in order to give guidelines for drawing. The only thing this figure resembles is an upside-down chicken leg. Probably, the author of these lines has described too many bird drawing lessons lately.

Step 2
Let's draw a scallop at the very top of the resulting figure. A little lower, inside the figure, draw a large eye and an open beak - it looks a little like the Nike logo. Pay attention to the lower half of the beak - the inner part is visible there.

Step 3
Now let's draw a small figure in the form of a semicircle just below and to the left of the eye. Let's delimit the narrow part of the body from the wide part with a jagged pattern, as in our sample.

Step 4
Let's draw a folded wing. It should diverge into four large tips on one side and smoothly round off on the other. The wing is located directly under the jagged pattern, its position is slightly inclined.

Step 5
In this step we will work on main pride rooster - lush tail feathers. By the way, we have another drawing lesson dedicated to birds, in which we talk about...

Step 6
Actually, in the penultimate stage we will draw the paws - at first they taper very smoothly, and then sharply turn into ordinary thin straight lines.

Step 7
Erase the extra guide lines and fill in the eye with a soft, simple pencil.
Drawing lesson the artists of the site drawingforall have prepared for you, all the best and don’t forget to visit our VK page - we find small interesting news and repost them directly there. See you again!
Home " Bike selection » Beautiful rooster draw step by step. How to draw a chicken and a rooster
Exploring the world Small child gradually learns to remember colors and shapes, fruits and vegetables, animals and birds. Every day he, like a sponge, absorbs more and more knowledge. It would seem that just yesterday he could do almost nothing, but today, listening to fairy tales, with a satisfied smile he shows where in the book the cow, the dog, and where the chicken are. He also knows who the Golden Scallop Cockerel is, and will be happy to try to draw this character together with his mother.
It will be especially interesting for your child to color the picture, because he likes rich colors, and this bird has such a bright comb and feathers on its tail! Show the rooster and then help decorate it. You'll see, this activity will bring joy not only to the baby, but also to you. We will explain in detail how to draw a rooster step by step. So, let's get started without delay!
Representing a poultry
Of course, for the first time it is better to draw a rooster with a pencil, so that if something happens, the wrong outline can be easily corrected. First you need to outline the body of the bird. It will consist of three figures.
Draw a circle approximately in the middle of the album sheet. WITH right side“attach” another slightly elongated circle of the same size to it upwards, and draw close to the left isosceles triangle with the sharp end pointing upward. Now about how to draw a rooster in more detail.
IN top corner triangle, draw a small circle - the head. An oval extends down from it - the so-called rooster “earrings”. Then, at the bottom of the body circle drawn very first, add two oval shapes close to each other, similar to chicken eggs. This will be the base for the legs. Next, outline the rooster, carefully drawing out the smooth curves of the neck, the line of the fluffy tail, and the convex chest. The initial marks will no longer be needed; they can be wiped off with an eraser. The bird model is ready!
Next stage
Get down to the nitty-gritty. To understand how to draw a rooster that looks like a real one, look carefully at the picture. A high carved comb should be depicted on the head, and “earrings” on the chin. Between them draw a sharp thin beak, highlight a light area for the eye.

Draw a small oval eye there and a pupil in it. Going down, separate the neck from the rest of the body in a zigzag. Then draw a wing, and again zigzag, this time separating the body and tail. Carefully draw the “legs” from which thin legs emerge, with three toes each. There are small claws on the fingertips. Draw a cascade of feathers on the tail using frequent curved lines.

When completing the drawing, clearly draw the main contours with a pencil, and to make the picture more believable, complete it with small strokes and dashes scattered throughout the body. They will represent small feathers. Voila! The bird is ready!
Conclusion
From now on you know exactly how to draw a rooster, and if necessary, repeat it easily and quickly. Now give your child some markers and let him complete the portrait of the bird with his own hands.
Today we will try to draw a rooster step by step. To find a suitable image of this proud bird, you can use the Internet image search. Choose the cockerel you like or use the example from this lesson and let's start drawing.
We will need:
Sheet of white paper
Pencil
Drawing a rooster step by step

1. Let's mark the head of the cockerel with a rounded line going down. At the beginning of the line, draw a ridge with sharp peaks. Let's draw a second rounded line, depicting a partially drawn oval. We should now have a sketch of the cockerel's head and neck.

2. Draw a sharp beak on the head, eyes, earrings, ear. Just below we’ll draw a collar on the bird’s chest.

3. From the neck down and to the right, draw a line, indicating the chest and belly of the rooster.
We designate short line back. Draw an oval wing.

4. Finish the wing with sharp feathers at the end. We continue the line from the belly, indicating the hips and paws of the bird.

5. From the line of the back deflection, draw a fluffy tail, ending it under the wing.
Well, our cockerel is ready! All that remains is to color the handsome man and arrange it in the form of a postcard or picture.
I hope you enjoyed this drawing lesson. Success in creative work!

Agree, the rooster is very beautiful bird? Roosters with colorful long tail feathers are in no way inferior in beauty even to the peacock. And what an important and proud look the rooster has... True, draw a rooster live if you live in the city is quite problematic. But on the Internet you can find many pictures depicting this bird. And if you need a drawing of a rooster, you can simply copy it from a photograph.
As always, we will draw a rooster step by step with a pencil. At the last step, you can color the drawing with colored pencils or paints.
1. Draw simple outlines of the rooster

First, it is important to select three areas in which you need to draw the neck, torso and tail. Contour lines can be of any shape, the main thing is to try to accurately draw their dimensions, since the proportions of the future drawing of the rooster will depend on this.
2. How to draw a rooster, second stage

The cockerel has a comb on its head and “earrings” below its beak. I don’t know why he needs them, but he needs to draw them. Draw an oval for the head, and just below the outline for the “earrings”. After this, I think it won’t be difficult for you to draw two contours for the paws.
3. General outline of the shape of the body and tail

Take a closer look at my drawing and try to circle it exactly the same way. general outline rooster Immediately after this, you can remove the extra lines from the drawing. In addition, at this step, you also need to start drawing two bird legs.
4. Drawing of a rooster in detail

This step is simple, but the most time-consuming. Start drawing what you find easier. It seems to me that the paws draw a rooster easiest way. Then you can separate the tail from the body of the rooster with a zigzag and draw the outline of the longest and outermost feather. Next element The drawing is a wing, you can draw it arbitrarily. And now you can start drawing the head of the rooster. Draw the beak and correct the outline of the “earrings”. Select the area in which you will later draw the eye. And finally draw initial outline rooster comb.
5. How to draw plumage

At this stage, the drawing of the rooster will be completely completed. Outline the tail feathers with curved lines, add another zigzag line on the neck and draw an eye. See what other details I left out and add them as you see fit. For example, I forgot to draw spurs on the paws. But every rooster is sure to have them. If you paint a drawing of a rooster, make barely noticeable outlines for the different colors.
6. How to draw a rooster. Final step

Black and white drawing of a rooster It doesn't "look" at all. It is advisable, of course, to color it. Just keep in mind that if you don’t know how to use paints, it’s easy to ruin the picture. It’s better to take colored pencils or felt-tip pens and color the picture with them. If you need to draw with a simple pencil, then make shadows based on my drawing. As always, I advise you to draw at least a simple landscape on background, for example, a wooden village fence.
In this lesson you will be able to draw a beautiful Macaw parrot step by step.
It may seem that drawing a sparrow is not difficult, because we see this bird all the time in the yard. In fact, drawing a sparrow is difficult; it is much easier to draw a large bird, such as a rooster.
If the rooster is a very beautiful bird with bright and colorful plumage, then the swan is perhaps the most elegant bird. That is why you need to draw a swan very carefully so that it does not turn into a goose.
The stork and the rooster have become unique and rare birds for city residents. But if a rooster can sometimes be found in the city, then a stork can only live outside the city, away from the city noise.
The eagle is such a powerful and predatory bird that it poses a threat even to an adult hen and rooster, not to mention chickens. However, proud and beautiful view This bird makes us forget that it is the largest and most dangerous flying predator.
If you were able to draw a rooster correctly, then drawing a crow will not be difficult for you. a lot of work, especially since a crow can be drawn from life, just look out the window.
We draw a rooster step by step with pencil and paints, for children and adults.
Do you want to learn how to draw, but don’t have time to attend specialized classes? It's never too late to start! In this article we have collected many lessons for self-study drawing. The topic of this lesson: drawing a rooster using different techniques.
Of course, you can put a piece of paper on the screen and redraw this luxurious bird, but this is a quick and, one might say, useless task. After all, drawing lessons not only teach you to draw beautifully, but also develop both hemispheres of the brain, calm you down and make you happy.
For drawing, take two simple pencils. T-hard and TM - hard-soft.
We take a hard pencil in our hands. Draw the contours of the rooster. The clarity of the lines is not important here, it is important to draw them barely noticeable. But the proportions should be maintained as accurately as possible. For convenience, divide the sheet into equal sections.
The next step is the contours of small parts - the head, “earrings”, paws.

Take a closer look at the drawing and use a hard pencil to draw the general outline of the rooster as shown. Then we take a hard-soft pencil in our hands.


The next step is to draw the details of the rooster. Start with what seems easiest (or what you want to draw first). We can recommend drawing the legs, tail, wing first, and then the head. Try to make it as “live” and pleasant as possible. It depends on the location and size of the eyes and the angle of the beak. At the end draw the comb and “earrings”.


The outline of the rooster is completely completed. If you plan to draw a rooster with pencils, felt-tip pens, or paints, then at this stage you should move on to them. But we will show in this lesson how to completely color the rooster with a pencil.

Using curved lines we highlight the tail and breast as in the picture. Draw the eye inside. Look at your rooster, at the picture. See if you've missed anything. Add as desired. For example, spurs on the legs or other detail.

Now we make bolder strokes in different directions(look at the picture) and different forms and sizes. If necessary, blend the pencil with your finger or an eraser to create shadows.
The cockerel is ready! How do you like our lesson? Did you like it? So, let’s continue to study the following techniques!
Both children and adults like to draw by cells. After all, it is much simpler and also convenient to do in notebooks, notepads and notebooks. Please note that drawing by squares gives a lot of inspiration to children that they can draw great! But it depends on inspiration whether a child will take drawing seriously.


For a child, it is best to number the cells on the sample and on the creativity sheet in advance. After this, select the highest/lowest point as desired and draw from it.

For variety, the cells in the picture can be filled with various characters, thereby creating a unique picture.


This drawing is of a more complex level, but we are sure that both beginners and more will enjoy it. experienced artists. Using a hard pencil, outline the outline where the rooster will be located.

We outline the contours and details of the rooster with a pencil (an example can be taken in the first lesson). Check the correct proportions and correct the drawing if necessary.


We finish drawing the rooster schematically. Don't get attached to small details, because now all that matters is big picture and proportionality.


Now we erase the excess (many lines), if they were drawn thinly and without pressure, then the lines will be erased easily, but if you pressed hard on a sheet of paper, then it is better to put another sheet and trace.

The result is such an excellent detailed outline of the rooster. Please note that watercolor is one of the most difficult paints to apply, so watercolor pencils may be useful for beginners.
Have you chosen watercolor? Let's start with the background. Apply with a brush or foam sponge, darkening towards the middle and lightening towards the edges. Try not to touch the rooster, as it can be difficult for beginners to lighten the right areas.


Now we gradually decorate the rooster. We recommend starting with one section and gradually moving to the right or left.


Detailing the feathers on the wing. Carefully draw each feather, combine several colors in one stroke. Don't be afraid to experiment.


The next step is to draw the neck. The feathers on it are smaller and denser. Highlight as needed with a clean brush and water.


Draw the ridge. It should turn out bright and red.


We detail each feather on the tail with a separate color. The colors will overlap a little, don't worry watercolor drawings That’s why they’re so good, the colors merge with each other at transitions, forming a unique watercolor style.


The comb has dried and you can darken the ends (as in the picture), thereby giving it volume. Draw the eyes. Paint a highlight with white paint.


Let's return to the tail. The top of the tail has already dried and you can draw the middle and bottom.
At the very end, we draw the legs and add the necessary highlights and shadows to give the rooster volume and liveliness.

The rooster is ready, all you have to do is buy a frame!
How to draw a rooster's head with pencil and paints?
In that step by step wizard In class, we propose to draw in detail both the head of the rooster and the rest of its body. We will not, as in previous lessons, dwell on the description of what pencils and paints to draw, but we will give maximum amount step-by-step illustrations for drawing a rooster in different styles.
Drawing a cheerful rooster Drawings of a rooster for children with a pencil for sketching 
In conclusion, let us add that drawing is, first and foremost, creativity. It cannot be instilled by force, but it is possible to discourage the desire to draw and sow self-doubt in an instant. Give your child pencils and paints only when he has good mood, and there is a desire to create!
Video: Simple drawings #376 Drawing a Rooster / 2017