It's easiest to draw. How to learn to draw well with a pencil. Drawing - copying skill
How to use acrylic paints correctly? This is a simple science, but it has many significant nuances. Learn them correct application There is practically no need for the selected base - acrylic painting does not require any special techniques. Quite the contrary - with these paints you can work in any style and on any surface. Acrylic is perfect for working with both a palette knife and regular art brushes. The structure of the paints allows you to draw thin graceful lines and broad strokes in the picture with equal success.
Today we will look at what is best to paint on with acrylic paints.
Canvas - this is an ideal base for acrylic, because on it opens up best qualities this paint. Among them are:
- water resistance - acrylic, in essence , this is liquid plastic, which is why after drying it is completely waterproof, and it is at least very difficult to damage it in conditions of high humidity;
- The transparency of the paint can vary depending on your wishes. This is very simple to do - just dilute it with water (however, no more than 20%);
- mixing. In order to get the desired shade, darken or slightly lighten the tone of acrylic, simply mix several of the desired colors.
Thus, to the question: “Is it possible to engage acrylic painting?”, the answer will be unequivocal - of course, yes. Moreover, you can work in absolutely any technique, since acrylic is ready for any challenge.
If you paint with acrylic paints on canvas, then you need to adhere to the following rules:
- Before you start painting, make sure your paints are in good condition. Keep in mind that acrylic dries quickly, and the drier it is, the more difficult it is to work with. Therefore, do not forget to periodically wet the palette with water.
- Start with drawing large details, change large brushes to thinner ones. Think about it: you might be more comfortable large areas paint over it in a more transparent tone, and make the details bright.
- Periodically dry your brushes with a clean cloth.
- Don't be afraid to mix it up different colors and mix the paint with water correct proportion(no more than 20 percent water).
How to paint with acrylic paints on nails?
The water resistance and vapor permeability of acrylic attracted the attention of manicurists. They didn’t even doubt whether it was possible to paint with this paint on their nails, because it significantly expanded their capabilities. One tube of this wonderful decorative material could simultaneously serve as a base layer, translucent toner and modeling paste. It also has another very attractive property - it can be mixed with different solid particles, such as glitter and modulators. There are a lot of master classes on the Internet that will help you learn step by step how to make elegant drawings with acrylic paints on gel polish.
Of course, discussions about whether it is possible to paint with acrylic on nails coated with gel polish do not subside, because many still consider this material too toxic for such close contact. However, we hasten to reassure you - high-quality artistic paint does not pose any threat to health.
Is it possible to use this paint to paint paper sheets, and what paper is best to do this on? This is enough frequently asked question for those who use acrylic for the first time. And this is not surprising, because for this coloring material the right basis very important. The fairly dense structure of the paints and some features of their use do not allow working with thin and smooth leaves. Therefore, if you want them to fit correctly on the base, opt for thick embossed paper or cardboard. This rule will answer you one more very important question: Is it possible to paint with acrylic on wallpaper? This technique artistic painting on walls is often used in designer renovations. And all because a small drawing made by a master’s hand can completely transform a room.
What wallpaper can you draw on? The answer to this is not so simple. On the one side, chemical characteristics acrylic makes it absolutely compatible with any material, on the other hand, painting embossed textured wallpaper is quite difficult (but at the same time realistic). Thus, when deciding on painting finishing materials, first of all focus on the complexity of the design and your level of skill.

How to paint with acrylic paints on fabric?
As mentioned earlier, acrylic is absolutely compatible with any base material, so the answer to the question of whether it can be used to paint on silk or any other fabric is clear. Of course you can. However, before you start working on clothing, pay attention to the material it is made of. Natural fabric dyed with synthetic dye is more resistant to frequent washing and constant mechanical stress than synthetic fabric. Therefore, it is the composition of the material that will primarily determine whether something can be drawn on clothes, and what kind of thing it is better to do it on.
To apply an acrylic design to fabric, use step-by-step painting or ready-made stencils (this will not particularly affect the overall result). If you are working with such dyes for the first time, then it makes sense to first practice on an old T-shirt. This way you will accurately determine the brush number you need, as well as the desired paint thickness.
What can you paint on with acrylic paints?
As you already understand, the number of materials that acrylic is compatible with is truly amazing. You can use it to draw on almost any surface without any fear. possible consequences. The only question that is in doubt is: is it possible to make drawings on the face? There is no doubt about the excellent quality of the drawing, but will you be able to wash it off later? , this is in question. However, the Internet is replete with ideas for painting with acrylic on leather (or rather, products made from it).
A lot can be said about the versatility of acrylic paints - they can be used to paint on felt boots, on ceramics and on a concrete wall with equal success. They are used even on an industrial scale, making drawings on factory dishes or painting jewelry.
When painting on wood, it is worth remembering that this material should not be painted without a primer - the material will absorb too much paint, and the drawing will turn out uneven. This rule applies exclusively to natural unpainted wood. When applying a pattern to an already painted surface, no primer is needed. However, when drawing It is still worth applying an adhesive layer on plywood - it will ensure reliable adhesion of the decorating material and the smooth base.

We paint flowers with acrylic paints
The technique of drawing a rose or tulip step by step with acrylic is no different from that used when working with oil paints, watercolor or gouache. This is often used when restoring furniture, accessories and jewelry. New material will be able to replace other types of dyes, and besides, it is also much stronger than them.
Acrylic coloring pigments are widely used in restoring toys. With their help, you can correct or re-draw the doll's eyes and lips, or even completely redraw her face.
You can also paint with acrylic abstract paintings, use abstraction to decorate a vintage box or transfer it to an old T-shirt. To be honest, it doesn’t really matter what you paint with this material. , no (winter, clouds, and a Christmas tree turn out equally well).
There are no special secrets to learning how to paint with acrylic from scratch. However, it is worth knowing some tricks of working with acrylic.
First, you need to make sure that the paint is always wet - acrylic dries very quickly.
Secondly, always work in overalls - then it will be almost impossible to wash off the coloring pigment.
Thirdly, monitor the quality of the paint. The thing is that unscrupulous manufacturers often use harmful and toxic ingredients. This is why it is so difficult to answer the question of whether pregnant women and small children can paint with such paints. This can be done if you completely trust the manufacturer and use well-ventilated areas for work.
there are answers to all these questions. Here are the basics of where to start painting. Follow these tips, do the exercises and you will no longer be afraid clean slate. You will receive the necessary knowledge and basic skills. Painting will become closer, clearer and will bring a lot of pleasure.
Part 1. Preparatory
1. Find an inspiring subject to draw
It happens that you have already prepared everything, but you cannot find an object that would inspire you. This should be taken care of in advance. Something interesting is probably lying around in cabinets and desk drawers. Look for items at estate sales, consignment stores and grocery stores. Study paintings by your favorite artists.
The selection should include items that are pleasant to look at: this is important for creating successful work.
An interest in color and shape will motivate you as you work on your painting. There is a connection between feelings for an object and the ability to reveal your abilities. You can do more than you think.
For the first picture, a simple one-color symmetrical vessel, such as a regular coffee cup, will do. Illustration from the book
2. Get to know brushes and paints
Take a soft round brush and a bristle brush in your hands and compare their bristles. Squeeze a little onto the palette acrylic paint from a tube. Try applying undiluted paint with different brushes to canvas or watercolor paper. The strokes should be bright and bold. Feel the differences in strokes with different brushes. Add a little water and apply the strokes again. Medium consistency paint has the same color intensity as undiluted paint, but its texture is smoothed out. And do this exercise again with a weak paint solution. Notice how quickly the paints dry the first, second, and third times.


Illustration from the book
Try applying paint with different brushes - soft oval, synthetic thin, bristly flat. Try each brush until you are confident that you know which brush to use to achieve the design you have in mind.

Illustration from the book
3. Useful techniques for working with the palette
The colors in the paintings we see are usually obtained through mixing: the pure color from the tube is usually too intense. These techniques will make it easier for you to get the color you want.
- 1 Squeeze the paint from the tube onto the edge of the palette, leaving space between the colors. Use the center of the palette for mixing. Make batches farther apart to prevent unwanted mixing.
- Apply pure color to the brush from the edge of the palette, and not from above or from the middle of the squeezed out “sausage”.
- Intense dark colors such as black (although it is not scientifically considered a color) should be added with caution; even a small amount can significantly change the color being mixed.
- You need to mix the colors together until the mixture becomes completely homogeneous.
- Don't skimp on the paint. Squeeze out as much as you need - usually this is a circle the size of a ruble coin (for whitewash - the size of a five-ruble coin). Paint consumption is an integral part of the painting process. If you save too much, you will never learn how to use paint.
4. Learn to get neutral colors
In any picture there are neutral colors - “visually gray”. Due to their low intensity, they are invisible at first glance, but they are the most useful tool for creating a harmonious color composition. Let's see how to achieve this.
Mix blue and orange in any proportion. Now let's try to change the color temperature by proportionally warm and cool colors in the mixture. If the result is more purple, try making a rusty color by adding more orange paint and then whitewash for a lighter peach color. If the first step produces a rusty color, add blue to create a cool color, close to purple, and then white to create a light violet-gray.
Repeat previous steps for another pair additional colors- yellow and purple, red and green.

Pairs of complementary colors are connected by short vertical strokes. The colors of each pair are mixed with each other to create two neutral colors, each of which was dominated by one of the parent colors - these are located to the right of the corresponding parent. Illustration from the book
5. Primary, secondary and tertiary colors
Draw a circle, then divide it into three equal sectors. Paint the upper sector with cadmium yellow medium, the lower right one with ultramarine blue, and then mix the main red from naphthol crimson and cadmium red light and paint the lower left sector with it.
On the color wheel of the primary colors, draw semicircles with centers at the intersection of the sector boundaries with the outer contour color wheel. Color in these semicircles secondary colors, positioned above the “parents”: cadmium red light above the border between red and yellow, dioxazine violet above the border between red and blue. Add yellow to the green FC and fill in the green semicircle above the border between yellow and blue.
The primary color, when mixed with the adjacent secondary color, produces a tertiary color. Add one triangle on each side of the semicircle, making a total of six. Color in each triangle based on the labels.

Primary, secondary and tertiary colors. Illustration from the book
Part 2. Drawing
6. Start with abstractions
Abstraction is an interesting and simple way to prepare for working on a realistic piece. It is important to choose 3-4 colors that you like in order to feel an emotional connection with the painting. Draw over the entire surface of the sheet with a simple pencil a continuous angular or rounded line. It may intersect several times.
Paint the shapes in the drawing with the colors and shades, paint consistency and brush that you like. Listen to your inner voice. The main task is to do it the way you like, forgetting about everything else.

Illustration from the book
7. Smear pattern
Beginners are often unsure how to apply strokes. The arrows in the figure show the direction that will help to achieve good depth in the depicted space using the example of a mug.


Smear diagram and result. Illustration from the book
8. How to apply eye shadow
Shadows play a key role in creating a three-dimensional image: first of all, you need to learn to see and write them. There are four types of shadows:
- Own shadows located on objects. These are areas of dark tone that contrast with the illuminated parts of the depicted form. They usually have a sharp edge at the outer edge and a smooth transition at the edge of the light-colored areas of the subject. They own the main role in creating volume.
- Halftone areas- narrow, with a soft contour, located on the border between its own shadow and the illuminated area of the object. These shadows are the middle tone between the contrasting dark and light tones of the subject.
- Falling shadows- silhouettes of an object, “fallen” or thrown by it onto any surface other than itself. They give the impression that the object is on some surface.
- T Eni at the point of contact- the darkest area of the falling shadow, lying next to the object. They are responsible for the “stability” and mass of the object. These shadows are also called the accent - the darkest area among the dark tones. An accent is the dark counterpart of a highlight, the lightest area among the highlights.
To paint a shadow, apply black paint or paint of a darker color than the base color. And in the second step, cover this darkened area with the main color. The halftone black should show through under the new coat of paint, creating a colored shadow. If you want to make the shadow darker, apply more black from the clear edge of the shadow and mix with the color in the midtone.

Shadow using the example of a cylinder. Illustration from the book
9. How to apply highlights
To create a realistic highlight, use a dry brush with white paint to paint the lightest area on the subject as many times as necessary to achieve sufficient brightness. In the middle of the highlight, place a small dab of thick paint for extra brightness.


Two examples of highlight overlay. Illustration from the book
10. Paint pictures in your imagination
While going about your daily activities, paint pictures in your imagination. Mentally look for correspondence between the surfaces and textures you see around you and the way you work with a brush and apply paint.

Often, being in the grip of stereotypes, we are not even aware of our talents, including artistic ones. Of course, only a select few become masters. But everyone can learn to draw. If you have decided, the question arises: what is the best way to draw?
At the beginning of the journey
Any drawing technique cannot be called simple. But it’s better to start with pencils, since they are not required Additional materials(brushes, palettes, etc.).
Which pencil is better to draw? Pencil translated from Turkic means “black stone”. It is a rod inserted into a frame (wooden or plastic): made of graphite - a simple pencil, charcoal - charcoal, dry paints - colored.
Simple pencils are used for drawing, drawing, and sketching. The mark left by graphite can be erased with an eraser. This is what attracts beginners learning to draw.
Colour pencils
Everyone starts in childhood with colored pencils. But this technique has a number of features.
Colored pencils are best used for small drawings. Large format images don't look very good. Due to the transparency of color, it can be difficult to achieve rich shades. But by applying several colors you can achieve complex color solutions.
Colored pencil is difficult to erase with an eraser, so it is better to make simple sketches. You should start working with light shades, gradually achieving color saturation.
Gouache
The French word "gouache" comes from the Italian guazzo - "water paint". Gouache refers to both paints and the technique of painting with them.
To the question, what colors are best to paint? – many will answer: gouache. These paints are inexpensive and easy to use. They dry quickly and dilute well with water. Due to their matte finish and density, they allow you to correct mistakes, which is especially appreciated by beginners.
When working with gouache, do not apply thick layers, as the paint will crack. Gouache is interesting because you can paint with it on paper, as well as on canvas, plywood, fabric, and cardboard.
Watercolor
Watercolor drawings are distinguished by transparency, lightness, and combine the advantages of both graphics and painting due to the richness of shades. Watercolor paints There are school and professional ones.
Translated from French, this word means “watery”, because it requires dilution with water. Watercolors can be written on pre-moistened paper. Then you get special blurry strokes. Or you can do it on a dry sheet, drying the previous layers.
Oil painting
Oil paintings are the basis of any museum collection. Oil painting Well preserved due to the durability of the colors. They are made from pigments and oil, usually linseed. Oil painting can be done on primed canvas, cardboard, or wood. You can buy primed canvas or make it yourself using PVA glue.
Learning how to paint in oils is difficult because there are many techniques for applying strokes. And it costs more: in addition to paints and canvas, you will need different brushes, palette, solvent, sponges, varnish to cover the work.
Drawing in computer programs
For those who are intimidated by the complexity of working with paints, we can suggest trying their hand at computer painting. Many programs have now been developed.
Which program is better to draw in? For beginners, it is better to start with the simplest Paint program. Even children can master it. For the little ones there is Tux Paint. Also popular are Photoshop, Creature House Expression, Art weaver, Art Rage, Corel Draw, Adobe Illustrator, etc.
They all have their own specifics, but the main advantage of computer drawing is that you can use all the techniques of graphics, painting, and various tools without leaving the monitor.
Knowing about the features different types creativity, it is much easier to choose which is best for you to draw.
The craft of a good draftsman is based on 2 basic things: the ability to control your hand and correct vision. If you want to create or design websites, then without special training there's no way around it.
The next 6 sections of the article are essentially the first step in in this direction— you will learn how to learn to draw and where to start. Immediately after this, proceed to the second part of the topic and go through some more.
This is a translation of a note from Medium by Ralph Ammer (all the graphics are his).
Advice. For the next 6 tasks, use one type of pen and one type of paper (for example, A5).
Dexterity of hands - two trainings
The first two techniques are about controlling your hand. You should train your hand, and also learn to coordinate the vigilance of the eye and the movement of the hand. Mechanical practices are great for beginners. You can use them later to try out new tools. They also allow you to relax and take a break from mental or physical work. So, how to start drawing correctly.
1. Many, many circles
Fill a sheet of paper with circles of different sizes. Try not to let the circles intersect.

Learning to draw circles is not as easy as you might think. Note that the more circles there are on the paper, the more difficult it is to add the next one. Draw them in two directions and as many as possible.
Advice. Shake your hand when it starts to cramp, do this after each approach.

2. Hatching - creating a structure
Fill a piece of paper with parallel lines.

Diagonal lines are the easiest for us, as they correspond to the movement of our wrist. Note that a left-hander prefers the opposite direction of strokes than a right-hander. Take a look at your favorite artist (in my case, Leonardo da Vinci) and try to guess which hand he wrote with?

Try different stroke directions. Enjoy the shading process. Combine different strokes and enjoy how the paper is covered with different shadow spots.
Advice. Do not rotate the paper. It is very important to train your hand in different directions.
So, after we trained our arms, we need to do some exercises for our eyes!
Perception - learning to see
Drawing is primarily about vision and understanding what you see. People often assume that everyone sees the same thing, but this is actually not the case. You can always improve and improve the quality of your vision. The more you draw, the more you see. The following four techniques will force you to expand your view of familiar objects. This is exactly where they start learning to draw in different courses.
3. Outline - show me your hands!
Do you see these different fascinating contours of your hand? Draw them on a piece of paper. Don't try to recreate everything, just pick a few of the most interesting ones.

Whether you're drawing a person, a plant, or your favorite animal, you're creating an outline of what you see. Contours define a body or object and make it possible to recognize a pattern. The goal is not to immediately display all existing distinctive features, but to learn to see them!
Even if you know the shape of an object, it's still worth taking a closer look and re-examining it.
4. Chiaroscuro - adding light and shadow
Draw a piece of fabric. Start with outlines, and then use your shading skills to find the light and shade transitions.

This exercise will help you learn how to convey light and shadow on paper. I must admit that this is not the easiest way for beginners. Keep in mind that you don't have to make perfect light and shade transitions. The fabric provides a playing field to practice the skills learned in previous lessons. Plus, you'll also understand how to learn how to paint chiaroscuro using only your hand.
Advice. You can do curved shading to create shape and cross shading to achieve deeper shadows that resemble fabric texture.

Advice. Close your eyes slightly when looking at the fabric. You will see a blurred image of the fabric and increased contrast between light and shadow.
5. Perspective - cubes in three-dimensional space
Let's draw some cubes! Follow simple steps.

Perspective drawing is a projection of a 3D object into 2D space (your sheet of paper).
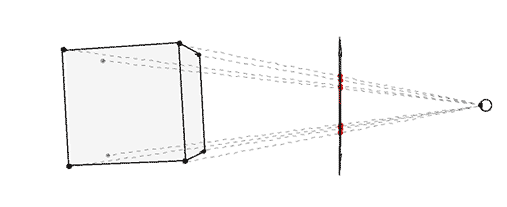
Building a perspective is a separate science that cannot be fully considered in one article. However, we can have a little fun within the confines of a simple technique that gives us an intuitive sense of the magic of drawing in perspective.
Step 1: Draw a horizontal line. This will be the horizon.

Step 2. Place two points on the edges of the line - two invisible vanishing points.

Step 3. Draw a vertical line anywhere.

Step 4: Connect the ends of the vertical line to the vanishing points.

Step 5: Add two more vertical lines as shown below.

Step 6: Connect them to the vanishing points.

Step 7: Now use a black pencil or pen to trace the cube.

Repeat steps 3 to 7 as many times as desired. Enjoy the build! Have fun drawing, then you will succeed. You can shade the sides of the cube.

Advice. When you draw cross lines, it is better to slightly overlap one line over the other, this will make the shape easier to see.

Mastering perspective drawings will help you create the illusion of depth. And most importantly, you will teach your brain to see and recognize three dimensional space. This is a great practice on how to start drawing from scratch without any skills.
Even if you decide to ignore the rules of perspective and make “flat drawings,” this knowledge will never be superfluous, but on the contrary, it will help expand your horizons and sharpen your visual receptor.
6. Construction of the composition - why here?
Make 5 different designs one object. Position the item differently each time.
As you create various options placement of your subject on paper, try to trace how this changes its connotation - meaning.

The author Ralph Ammer has several other interesting articles, but this is the one you should watch first in order to understand where to start drawing with a pencil and more. In the comments I would like to see your opinion on the pros and cons of the presented methodology. Which exercises really gave you pleasure and which ones didn't? What else do you want to know on the topic or perhaps you have your own ideas on how to learn to draw from scratch - write it all below.
P.S. Free and complete SEO analysis of a website page - sitechecker.pro. In promotion it is important not only external factors, but the web project itself must be good.
If you want to learn something new interesting activity and learn to draw with a pencil from scratch, there are special methods for beginners. They make the process of creating an image easier. Even if you have never gone to an art studio or art school, with desire, patience and perseverance, it is quite possible to master this technique.
Choosing the main tool
If you decide to learn how to draw with a pencil from scratch, first of all, you will need leads of varying hardness. Most often, HB or TM in the Russian version is used, but it is also necessary to have H (T), B (M), 2B (M). The marking indicates softness, and the number corresponds to its degree. The number is 2H (2T) the hardest that is usually used. It leaves a very thin, barely noticeable line. If you press hard with a well-sharpened pencil, it may even leave a scratch on the paper. The designation HB corresponds to medium hard-soft. The larger the number of the marking B (M), the darker and wider the line on the sheet will be.

To learn, three different styluses are enough. It is worth noting that graphite can be sold both in a wooden frame and in the form of rods for mechanical tool. They also produce sticks with a diameter of regular pencil, which are covered on the outside with a special non-staining layer. In this case it is convenient to use lateral surface sharpened part for shading large surfaces. They are often purchased for quick sketches. You can choose any option.
What else is needed?
If you're trying to learn how to draw with a pencil from scratch, be sure to have a good eraser. It should be soft so as not to further injure the layer of paper.

For the same purpose, draw contours with thin lines. Keep in mind that pencils should always be kept sharp. It is permissible for a beginner to use a sharpener, but professionals only use a knife. This is due to the resulting shape of the pointed part. For execution correct shading It is recommended to sharpen the tool hollowly, that is, the lead is freed from the wood by one or even two centimeters, making a gradual transition of the cut to the sides of the pencil cylinder. A beginner should know this only for general information. Do what is easier and more convenient for you.
Possible execution techniques
The easiest way to learn how to draw with a pencil from scratch is linear. easier to do than with tonal elaboration.

Sometimes an inexperienced artist thinks that he has made a portrait very similar to the original, but during the shading process his opinion changes. For training, you can perform several works exactly linearly, applying only light shadows in some places. It will give the impression of a quick sketch. After all, you don’t have to tell everyone that you just don’t have enough experience yet.
As you practice, your hand will gain confidence, and you will be able to move on to working out the form in light and shadow. In the manuals “How to learn to draw with a pencil for beginners,” they often suggest using shading. It involves rubbing graphite over a sheet.

In this option, you will not see individual lines, and the transitions between tones will be very smooth. Hatching is more difficult to master. Each individual element must be located very tightly next to the neighboring one, otherwise the integrity of the object will not be obtained, but there will be an impression of stripes, hairiness - anything but a single shape.
So, at the first stage, use shading. You can rub the pencil mark with a soft piece of paper or even your finger, but it is worth remembering that professionals do not do this. If you are planning to study at art school, you will have to forget about this method of drawing. If you have serious intentions, it is better to immediately master the technique of shading, gradually developing your hand. This will come in handy in the future.
How to do shading correctly?
If you decide to take action professional method, it is better to practice first on regular sheets.

Try pencils of different softness in action. Try to make tonal transitions using the same lead. The main thing is to try to ensure that the strokes fit tightly to each other, do not use lines crossed at right angles. It is better to apply them according to the shape, that is, if you have a cube in front of you, then the shading should be done either in a vertical direction or parallel to the lines of the edges. Do more exercise. Remember, mastery comes with experience.
How to fix errors?
If during work you are not satisfied with the quality of something, the pencil is easily erased.

However, in order not to remove excess, it makes sense to make a cut on the eraser with a knife, forming a thin edge. If you start to actively erase the shading, you can smear too much of the work done or seriously injure the paper. A new layer of graphite does not fit well on a damaged surface. For removing large quantity shading or partial weakening of the tone, if the object is too dark, use a special erasing mass. It resembles plasticine or is called a nag in professional slang. It easily absorbs excess graphite. A lump of ordinary bread crumb has the same property. So, even if you overdid something in your first experience, mistakes can always be corrected. The main thing is to try not to repeat them next time.
What is better to draw for beginners?
If you are interested in how to learn to draw with a pencil step by step, everything is simple - the work should always be done from simple to complex and from general to detail.

Whatever plot you choose, the sequence of steps will be similar. Of course, it is better for beginners not to use too complex motifs with big amount constituent elements. This can only be done by having a clear visual step by step instructions. For independent drawing, choose simple objects and compositions from them, for example, a still life of household items, fruits, vegetables lying on a table or in a basket.
It's worth being patient if you decide to learn how to learn how to draw portraits with a pencil.

This is one of the most difficult tasks even for a professional. It is very difficult for a beginner to master it. Of course, everyone has objects that, regardless of skill level and experience, they want to depict. Choose your favorite subjects, just try to find and study as many tips and tricks for drawing them as possible. It's about about such complex objects as animals, flowers, architecture, cars, motorcycles, boats, people.
How to learn to draw cars with a pencil? You can copy them from a photograph (for example, by cells; the technique is described in more detail in the next section). It will be easiest for novice artists to depict a car from the side.

pencil?
Making a person's face is one of the most difficult tasks. A beginner can be offered a method of creating an image using cells from a photograph.

It allows you to more accurately convey proportions. To do this, take the following steps:
1. Draw a cellular structure on a transparent film.
2. Place it on the photo and secure it so that it does not accidentally move.
3. On your sheet of paper prepared for the portrait, also make an auxiliary construction in the form of cells.
4. Compare how the lines on the original intersect the cells, try to repeat them as accurately as possible with a pencil.
So, you have learned how to learn to draw with a pencil. It's quite easy step by step. The most important thing is to follow the sequence of work from general to detail, and also try to choose first simple objects for execution.


