Photo album from scrap materials. DIY family photo album. How to make children's and wedding albums with photos using scrapbooking technique
Some are ready to take selfies at every step, others agree to be photographed only on rare occasions, but everyone, without exception, cherishes pleasant memories. True, a stack of scattered photographs somewhere in a closet drawer or several folders on a computer can hardly be compared with an original photo album made by yourself. You won’t be ashamed to show off such a thing to your relatives, friends or colleagues. The only question is how to make a photo album so that it not only looks beautiful, but also carries a certain idea.
DIY photo album: design ideas
The success of any idea depends on its implementation. It is best to implement your ideas using already formed styles and techniques. Also, do not forget about such basic things as composition and plot. Especially if it is a homemade gift. Let's look at everything in order.
Plot
This element of idea implementation, as a rule, comes first. The design of a photo album depends on the plot or theme. Albums dedicated to family, the birth of a child, wedding, travel and other significant life events can be considered classic. You can also make a photo album as a gift for a loved one or for an anniversary for a colleague. Some options will be discussed in more detail below.
Example “For Myself” Example “Rest”
Composition
Making a photo album with your own hands is not just about choosing photos and decorations. It is much more important to achieve visual unity. It is best to follow these rules:
- determine the semantic center of the page
- make bright accents
- make sure that the photos, inscriptions and decor are in harmony in shades
- balance the proportions
- choose jewelry in accordance with the meaning of the photo
- draw a triangle “photo-title-description”
Style
Fans of minimalism should pay attention to the style with a telling name « clean and simple". It involves a minimum of decorations. A minimal amount of decor is also characteristic of the “European” style. Its highlight is unusual shapes photographs that are cropped to resemble a specific subject. If you like to immerse yourself in the past, then the ideal option is “vintage”. “Shabby chic” involves the presence of ribbons, lace and scuffs. The “American” style is even more saturated with decor. Before you design a photo album with your own hands, you should look for a style that will represent you or your family from the best side.
Technique
Stamping involves the use of various applicator stamps. Decoupage requires the use of drawings, pictures, and ornaments. Cropping is based on working directly with photographs. They are trimmed so that only the key elements remain. Photos, supplemented with original descriptions, are journaling. Distress is the aging of paper. You can find at least a hundred more original techniques online.

How to make a photo album with your own hands: step-by-step scrapbooking
Step 1. Selection of material and tools for work
To work you will need:
- scrap paper
- cardboard with a density of 300 g/m²
- adhesive fabric
- cover fabric
- padding polyester
- ribbon
- notebook
- breadboard knife
- needle
- pencil
- ruler
Step 2: Planning the Album
To ensure that the result does not disappoint, you must clearly understand what you want to get in the end. Even before you make a photo album with your own hands, work on a template. To create a template for a future photo album, you can use a notebook of the appropriate size. In it you can sketch the name of the pages, draw the approximate location of the photo and decor.
Step 3: Album Binding
We take the prepared cardboard, cut 3 strips 24 cm high and proportionally increasing in width. Fold the sheets in half so that proportionally increasing roots are formed. The dimensions of the spines can be drawn in advance, as indicated in the photo. The result should be a notebook with a spine. All parts are glued along the spine line. The resulting binding can be stitched with waxed cord, then you will get a durable photo album with your own hands. Scrapbooking, a master class for which is not difficult to find, will provide many options for decorating such a cord.
Step 4. Page design
Using a set of scrap paper, we create a rough design for the pages. Double-sided tape will help you attach additional elements. The resulting backgrounds are glued to the finished binding. They can be supplemented with clamshells or photo mats. As additional decor, you can use a variety of elements: cut-outs, appliqués, beads, ribbons, etc. It is important that the volumetric decor is evenly distributed and does not deform the album sheets. A previously created DIY photo album template will help you do everything right. Step by step with a photo you can easily bring the work to the desired result.
Step 5: Album Cover
The cover must be made based on the size of the binding. 2mm woven cardboard will do.
- It is necessary to prepare 2 blanks for covers and a spine from cardboard.
- Next, we cut out the corresponding pieces from one-sided adhesive fabric.
- We place the spine between the cover blanks, retreating 0.3 cm.
- We fasten everything with adhesive fabric.
- Then we cut a piece of padding polyester the size of the workpiece and attach it to the top.
- We apply the finished soft blank to the fabric chosen as decoration.
- We should leave 2.5 cm of fabric on the sides. They are attached to the workpiece using 2-sided tape. Where there is no tape, we fix it with glue.

Step 6. Assembling a photo album
On last stage With your own hands, you need to alternately attach double sheets of prepared binding. The first sheet is attached directly to the cover. You can proceed to flashing the album only after the structure has completely dried. Having opened the album in the middle, we mark the places for the holes. Next, we punch them with an awl and stitch the album with tape. You can secure the corners using special corners. Additional cover decor would also be useful.
DIY photo album for a newborn

A photo album for a newborn has long ceased to be a rarity, but the same cannot be said about the originality of its design. But this is exactly the thing that is important to do with your soul. To begin with, it is worth selecting the most characteristic photos that reflect the important points from the life of a child. The scrapbooking album must include photos of the first ultrasound, discharge from the maternity hospital, meeting loved ones, first smile, first steps, etc.
As decorations, you can use booties and ribbons, which used to be elements of the baby’s clothing. Don't forget to add your own children's photo album short descriptions events depicted in the photo. Over time, you can add drawings of your child to such a photo album, as well as evidence of his victories - certificates and trophies.
DIY family photo album

One of the variations of such an album could be a family chronicle or a do-it-yourself photo book. In addition to photographs, you can add postcards, newspaper clippings and other memorabilia that are somehow related to the family history. The cover of such a photo album should be supplemented with an inscription symbolizing something important for the whole family. You should not spare time and effort to make such a photo album with your own hands. The master class above will make the process easier.
DIY wedding photo album
Creating a DIY wedding photo album step by step with photos is much easier than it might seem. The process itself will bring pleasure, and perhaps revive old feelings. The main thing is not to forget that each page of the album is a story that conveys the mood that reigned during the holiday.
Master class video
Finally, here is a video that will make the process of creating a photo album with your own hands easier:
If you find an error, please highlight a piece of text and click Ctrl+Enter.
The scrapbooking technique is very exciting and original in its execution. When working with this design technology, original drawings, newspaper clippings, colorful paper sheets, and much more are used. A photo album decorated with your own hands using the scrapbooking technique will be a wonderful addition to your interior or serve as a an original gift for loved ones, for grandmother, mother or godparents.
Using scrapbooking materials, you can make a photographic album in absolutely any style: retro style, nautical style or children's.
There are several main types of photo albums in the modern world. One of the first types of photo storage can be called a classic photo album. Such albums have several types of sheets filling them:
- thick sheets of cardboard, on top of which printed photographs are glued;
- sheets with magnetic photo holders;
- sheets with pockets made of plastic files into which printed photographs are placed.
Of course, the simplest and most convenient to use is the idea of a photo album with plastic compartments for photos. In them, you simply distribute your printed materials and enjoy the result. However, such albums cannot be called original and creative at all. Guests who will look at such a photo album may be completely uninterested in doing so.

Photo albums with thick cardboard sheets are less practical, but you can design them in an original and unusual way. You can place photographs of a variety of sizes on a thick sheet of paper for a boy or a newborn. You can also add decorative elements to the album page or an original signature. 
Photo albums with “magnetic” sheets also allow you to use a creative approach, and you don’t have to struggle with glue or adhesive corners - you can place photos of different formats on the sheets, and subsequently change their location. However, after a certain period of time, the magnetic sheet turns yellow and gets scratched, and the photos begin to peel off.

It is best to design several thematic albums for individual events. Wedding photos, memories from summer holidays or children's photos are best placed in different albums. For a colleague, lover or girlfriend, you can show exactly the photos you want.
Be especially careful when choosing the cover for your photo album. The choice of covers in modern stores is very diverse: oilskin covers, made of various fabrics, with decorative elements, fur, artificial and natural leather. Covers with flowers, kittens and dogs are no longer in fashion, choose more stylish solutions. In addition, there are special thematic albums dedicated to a particular event - pay attention to them.
 We analyze ideas for designing a wedding album using the scrapbooking technique
We offer several design ideas and a master class on making a wedding photo album with your own hands. Any couple in love wants to preserve wedding memories and moments. That is why it will be important to do original album for photos from this significant event.
The cover of the wedding album can be decorated with kanzashi flowers, the petals of which are folded from white satin ribbons. Graceful hearts can be cut out of felt.

Also, between some pages of the album you can place various cute little mementos, reminiscent of bright wedding moments. For example, a fragment of a pillow from wedding rings, lace, bows and other accessories of the bride, several dried flowers from a wedding bouquet.
You can arrange the pages of your album into thematic departments and sections. Also, an original solution would be to add several pages with congratulations from your guests and relatives.

It is advisable to design all pages in the same style. For example, pages made in vintage style or decorated in an antique style look very beautiful.
To design a wedding album, you just need to use your creativity and imagination.
A selection of videos on the topic of the article
We invite you to watch several thematic videos on the topic of the article. In them you can see in more detail the process of decorating and creating photo albums with your own hands.
· 08/29/2015
Article text updated: 08/30/2018
In December 2013, I published an article with recommendations on what to give to someone who is interested in photography. One of the gift ideas is a photo book made up of photographs of the person to whom we are giving it. But, in general, this is a universal solution that can be presented to newlyweds at a wedding and to their parents, print a photo album from a matinee in kindergarten or High school prom At school. In today’s article we will discuss how you can use a photo book design program yourself, what nuances to consider when creating an album, and how to place an order for printing online.
1. What is a photo book
The first time I saw a photo book was in 2012, when my colleague showed photos from her vacation, designed like an ordinary book: with binding, a beautiful hard cover, with photographs in frames and interesting captions to them. A photobook is a type of POD (print on demand) when you can order only one copy of a publication from a printing house.
It seemed to me that creating a book to order was insanely expensive. However, to my surprise, I was wrong: the price of a photo book made of good paper, with a hard cover, will be about 2,000 rubles for 40 sheets. Inexpensive, in today's times, for a gift.
Also, I was sure that to create a photo book you need to master the skills of photo editing in Photoshop, layout programs, or order the services of a designer. Also a misconception! Of course, if you have artistic taste, if you can improve the quality of the photos before sending them for printing, that will be a plus. But even an ordinary person today can create an absolutely stunning album with his own hands: you just need to go to the printing house’s website and download a program for a photo book containing page layouts, backgrounds and decoration modules.
I also recommend watching a video with a lesson on how to arrange your albums, recorded by professional photographer Sergei Rozhnov. He specializes in wedding photography. I think you will also find useful tips in this video.
My first photo book was a birthday present. I have been racking my brain for a long time about what to give to the person who has everything. And then I remembered this option. On my computer hard drive I had photographs from my brother’s trip with his wife. I spent half a day on the design, sent the print order to the printing house online, and five days later came to pick up the result. You should have seen how delighted my gift was!
2. How to create a photo book yourself
You can find on the Internet a large number of printing houses offering to print your order online. Personally, I used the services of Fotokniga-Ural. My friends ordered their photo books in Moscow, from the Printbook company, which has on its website big choice templates
1) So, go to the Fotokniga-Ural website in the “Program” section and select “Download photobook editor”. They have 2 versions: basic and advanced, which includes all the decorations: frames, masks, clip art.
2) Install the editor on your computer, selecting “New order” and begin creating a photo book. First we define the type. For example, I chose a format of 20*29 cm, a printed cover (sometimes, for example, leather).
3) At the next stage, we show the program where the photos are located, select the layout of the photos and the background. Next, the editor fills the template with images automatically. The resolution of the images will be degraded when creating a photo book, but don’t worry - this is only during the design process, so as not to slow down the computer, everything will be fine when printed.
4) Now we create the cover. For this purpose, I chose two photographs and arranged them together, placing text with the title.
If you have a little knowledge of Photoshop, you can search Google Images for the phrase “photo book cover” for samples and find plenty for yourself. interesting ideas. Complete it in advance and upload it to the editor along with other photos.
Well, I'm not a very creative designer, but... a quick fix To illustrate today's guide, I created this cover for a proposed photo book.
5) Next we move on to page design. The work is painstaking, but creative. You can enlarge or reduce blocks, place them at your discretion, align them, insert signatures, decide for yourself how many pictures to place on each page, whether they will have frames, and the like.
The program for creating a photo book with your own hands has a “Masks” tab. Using this tool you can add various effects to your design. For example, make the edges of photographs feathered.
You can also use clipart templates built into the editor or found on the Internet.
As I said, you are free to use your own decorations and textures. For example, enter the search query “travel scrapbooking png” into Google Images and you will see thousands of photo album designs. Here “png” is the image format when they have a transparent part. Well, that is, let’s say, the background in JPEG will be white, and in PNG it will be transparent. You need to check: perhaps the program for creating a photo book allows you to use vector images - they do not lose quality when scaled, unlike raster ones.
For the background, you can use your own photographs (as I did when designing the cover), or, for example, textures downloaded from various sources.
Please note: a red exclamation point has appeared in the lower right corner. If you click on it, we will read the editor’s hint that the image resolution is not enough for high-quality printing (300 dpi is needed).
In conclusion, I note that from the printing house you can order not only a photo book with your images, but also calendars, business cards and brochures. The program we installed allows you to layout a layout and prepare it for printing via the Internet. Next, I present to your attention the recommendations of experienced designers.
Over the past few years, the activity of creating and printing photo books has become very popular. Today, in a couple of clicks, we can order our own copy from a printing house, and this type of photo album for storing our best works very common among photographers. The arrangement of photographs on the pages of our first photo book has hundreds of variations and can stun anyone. Hopefully, the tips presented in this article will help you make decisions as you prepare your own book.
Step 1 – Theme
You need to first decide why you decided to put your photos together, as this will influence all subsequent steps in creating your DIY photo book. Will it feature the products you produce? Are you planning to sell it? Are you going to send it to potential publishers or exhibition galleries? Or are you just going to show the photo to your friends and family?
Next, it is important to decide which book layout editor you will work with. You can find a huge number of programs online for creating photo books yourself. Don’t rush to use the first one you come across: try several, presented by different printing houses.
Step 2 – What type of photo book are you choosing?
Once you've decided on the basic idea and chosen a program, it's time to think about what type of book you want to create. This decision is also partly influenced by the purpose for which you are creating it, the content and the available budget.
Traditionally, photo books come in hardcover with a smooth cover, but you can let your imagination run wild. It is your book. You can wish for whatever you want, as long as you have enough money. For example, you decide to publish it in A3 or A5 format. Take a close look at the photos selected for printing: are they suitable for placing one large photo on a spread or do you want to place several photos on one page.
Step 3 – Topic and Content
The best photo book is characterized by integrity, i.e. it is not just “a collection of good photographs by a certain photographer.” If main part books are connected by a certain general theme, it will be better perceived by the viewer. You can use snapshots taken at a specific time, for example, “a snapshot of one day in my life.” It is very important that the photos selected for a given topic strictly correspond to it and are located in chronological order.
Step 4 – Selecting Photos
Selecting the right photos is vital when creating a photo book. You need to choose the most best photos to create a product highest quality, but we need to remember: we are making a book, which means it must have a rhythm and completeness that will tell the whole story from beginning to end.
If you just paste your the best photos, most likely, much will remain behind the scenes. No need to print anything, anywhere. The right approach is to be selective and critical of your choices.
Step 5 – Photo Order – Telling a Story
When you have chosen photos for your first photo book, you need to decide in what order they will be presented. As stated earlier, a book needs to tell a story, so you need to think about the “story flow” that the images tell. You don't just want to throw all the landscapes at the beginning and all the macro photos in the middle—you want to create a balance of photos that will inform and delight the reader and engage them.
The first approach is to arrange the pictures in chronological order as they were taken. This will give a natural feel, although you may find that some of the photos could be swapped around to better tell the story of the events.
Step 6 - Template
So, you have selected photos and arranged them in a certain order. Now it's time to decide how to present them on the page. You'll be surprised at how many layout options photo book software offers. You will have to spend time trying to choose the most suitable ones.
First, decide whether the photos will be posted with or without frames. If - without, then make sure that the edges of the image extend beyond the cropping boundaries when printing, so that there is no white stripe left later. If you decide to publish photographs in frames, you need to decide on the thickness and shape.
Next you need to decide what the layout of the spread will be. Typically, the image is placed on the right page, and space is left on the left for a short description, if required. But you are not required to strictly follow this rule. You might want to print photos on every page of your photo book. But whatever you decide, keep it simple and be consistent.
Step 7 – To include text or not to include text?
There is no need to post captions for photos. Text is necessary if you think it will bring something that a photograph cannot say. For example, this could be a description of the shooting location, name, date, or some other details related to the event depicted in the photo. Do not repeat what is already clear from the photograph. If you decide to add captions to your photos, make sure they fit the style of the photo book and not that you just slap them on anywhere. You need to use a font that matches the layout.
Step 8 – Cover Photo
The image chosen to be placed on the cover of the book is the first contact with the viewer. It should be a stunning photo that invites the viewer to read it. If you can choose a photo that best describes the content of the book, be sure to include it.
Step 9 – Should I convert the photo book into an electronic version?
The first and main purpose of a photo book is to be printed so that it can be held in hands, given to friends and family, and photography lovers. But these days a book can be converted into electronic view, to put on display on the Internet, for example.
If there is no money to print a photo book in a printing house, then the electronic version is a good solution: it does not require the cost of paper and, potentially, will allow you to familiarize large quantity readers with content. However, your photos deserve to be printed on paper.
Step 10 – Try it!
Well, the simple guide to creating a photo book is over. It may seem like a lot of work, but when you pick up your first copy, you'll be truly delighted. If you have any other tips for creating a book, please share them in the comments and maybe you can help someone create their own masterpiece!
4. Before sending your order for a photo book to the printing house, check whether you have taken into account the design recommendations
Before clicking the “Order a photo book online” button, make sure that you check the quality of the pictures using the following questionnaire below!
- Uniformity of design– Experienced designers advise using no more than 1 or 2 fonts to design a book. Review your layout and make sure you have used no more than 2 fonts in 2 sizes. Typically, one font is used for body text and another for headings. If the program allows, simply copy one text block and paste it into Right place. This saves all text settings on all pages of the photo book. Some editors allow you to set font parameters on all pages at once - it’s very convenient, you don’t have to worry that the uniform style will go astray on some sheets.
- Alignment– have you checked that the photo blocks and decorative elements are aligned as needed? Many programs for creating photo books have a function that allows you to align several objects horizontally and vertically at once. Typically, you hold down the SHIFT key and select all the blocks on the page, then click on the corresponding item in the menu or on the desired “shortcut key”.
- Indentations– is a photo, frame or decoration too close to the edge? Most photo book editors will point out the layout error. Everything inside these boundaries will be printed, everything beyond them will be trimmed during printing and binding. Sometimes this safe zone wide, however, the printing press requires a reserve.
- Space between pages (binding)– “remember the spacing” – similar to rule number 3. Make sure nothing important is located along the center line. This especially applies to text and faces in portraits. Well, you only need not worry if you are using a photo book layout that does not have a binder.
- Reviewing and checking for errors– if possible, use programs that check your grammar. When the photo book editor does not have such a function, copy the text and paste it into Microsoft Word to double check the content for errors. Note!!! If you just copied text into Word or from Outlook, chances are there will be some formatting codes pasted that will be "invisible" to you and won't show errors when you preview, but will show up when you print the book. If possible, ask someone you know to check your text and photo captions. With an open eye you can see missing words, for example, or minor typos.
- Photo quality– most programs for creating online photo books are equipped with an indicator indicating that your photo does not have sufficient resolution (usually a density of 300 dpi is required). But keep in mind that the editor will not tell you that the photo is too bright or dark, that the person has red eyes, for example. Therefore, double-check the quality of the pictures. Sometimes you can't tell that this photo is slightly underexposed (dark) until you put it next to other photos. Often you have to return to photo editing after previewing the finished, assembled photo book.
Some printers integrate photo editing tools directly into the book creation program. But these photo editors are limited in their capabilities. Therefore, it is better to process images in specialized programs such as Photoshop or ACDSee.
In general, once again: before sending an order to print a photo book to a printing house, view it in the “Preview” mode, keeping in mind the recommendations listed above, and minor mistakes will not darken your joy from the result.
5. How to design a wedding photo book
You invited a professional, talented photographer to wedding photo shoot and Love Story, received gorgeous photos, the only thing left is to take the last step: create a stunning photo album. They say that an album with photographs from a wedding is like a wedding dress: it should be so beautiful that you can’t take your eyes off it. And you need to understand that not only does there exist an art of taking amazing pictures, there is also the talent to create a dream album from a set of photos...
1. Choose the most incredible photos
Consider a photo book as a means of preserving emotions, and not just an album for photographs. Choose only those pictures that you cannot live without. The best book contains only gorgeous photos. And these don’t always have to be standard shots. Sometimes this can be an image of a veil lifted by a breeze or the expression on the face of one of the guests.
2. Let the photos speak for themselves
In the digital age, you can implement many tricks when creating an album. Sometimes there is visual noise. When creating a wedding photo book, photographers advise not to place more than 1 or 2 photographs per spread. Tip: Place a vertical photo on one page, and on the next spread - one horizontal photo, spanning two pages.
3. Think chronologically
It is clear that photographs from the registry office must precede photographs from the restaurant. Although there may be exceptions. No one can stop you from inserting the most interesting photo taken later at the beginning.
4. On one spread, place pictures taken in the same period of time
This concerns the harmony of the photo book. Even more important than the way photos are posted has a “flow” to them. Like in a magazine: a photo album consists of double-page spreads. Think of each of them (2 pages) as one whole. Pages should be related to each other in meaning or style.
5. Use more color if your wedding was colored (and vice versa)
There is no rule when to print a color photo book and when to print a black and white one. It all depends on the wedding: if there was a lot of color, then most of the pictures will be colorful. If at the wedding all the guests were dressed in classic formal clothes, then the book can be printed in black and white.
6. Have photos of the most important moments of the wedding ceremony
Key points: the bride and groom walking down the aisle, the exchange of rings, the first kiss - naturally, should be included in the book.
7. The size of the photo album should correspond to the duration of the wedding
The number of pages in the photo book should be compared with the duration of the celebration. You need to understand that if you had a modest wedding dinner in a restaurant with friends, then there will be fewer photographs than when the “wedding sang and danced” for three days. Don't fill the book with weak photographs. There may be fewer of them, but they will be impressive.
In the review article Nikon camera D5300 we discussed how to shoot video. It was noted there that in order to create an artistic picture, it is important to include in the reportage (and a wedding is reportage photography) different plans in the images: close-up, medium, general, and so on. If we look closely at the examples above, we see that the pages with diverse images make the greatest impression. Therefore, not only wedding photographer must be able to make a high-quality photo report, but then when arranging the layout of a photo book, you need to arrange the resulting photographs correctly.
I would like to thank my friends Anastasia and Lev, Pavel and Nastya for agreeing to show their books in this article. I hope that today some site guests have found the answer to the questions: “What to give for a wedding? For a birthday? On the anniversary of another memorable event? How to beautifully design an album after a vacation trip to distant lands? May you all have only bright photo books and emotions from them!
How to learn to create professional-looking photo books yourself
In conclusion, I want to say that the tips posted in this article give only a general idea of the principles of creating a photo album from your photographs. By following the recommendations, you can create a good photo book. But to get a truly professional publication, try to make money by arranging and selling albums to clients, you will have to dive much deeper into the nuances of design.
I suggest you familiarize yourself with the contents of the video course “Secrets of creating chic photo books 2.0”, from which you can get simply invaluable advice. It provides recommendations on which programs can be used to make the layout, provides a detailed overview of the functions of the book editor, and examines in detail the nuances of creating an album from travel, children's and wedding photos albums.
Well, those who want to create their own photo book using the PRINTBOOK.ru editor can go to the official website and find out the current conditions and prices. In 2018, the company was renamed netPrint.ru.
If you were looking for information on how to create a photo book yourself in the sense of assembling it from separate sheets of paper, then watch the following video from the workshop. It seems to me that it won’t work out neatly the first, second, or even third time. You also need to spend money on a special machine.
Click Class
Tell VK
We live in a time when any product can be found in a store, it will be of different price categories, different quality, but acquiring what you want, in general, is not a problem. Therefore, more and more often I want to give a gift to loved ones on significant dates and give something unusual, not typical. Such a gift evokes more emotions and is more memorable. During my childhood, on the contrary, after the shortage, plastic photo albums seemed like a novelty - they were so smooth and bright. But over time, they began to lack some kind of peculiarity, life. Such a gift thirty years ago would have been a joy, but now it will merit a nod out of politeness. But this does not mean that no one prints out photographs and indulges in memories; you can also give photo albums. But only those in which part of the human presence is invested. For example, for the birth of my daughter, my sister gave me a wonderful gift - a photo album created with her own hands. She used the scrapbooking technique, but there are many more ideas and techniques that can help you create great designs.
How to make a photo album with your own hands
When we see the finished result, it seems impossible to repeat this. And there is no need to repeat, the main thing is to harmoniously combine all the elements and colors. This is what we will talk about.
The easiest way to create an album with your own hands is to go to a store for needlewomen (and there is one specifically for scrapbooking) and buy a ready-made set. Usually, it includes sheets with prints of the quantity you need, frames, and stickers. You can buy additional cardboard that does not have ugly stiffening ribs. And at home, using your imagination, you can simply put together a little album. But this is more expensive than making such beauty from improvised means.
For example, a set of 6 sheets with decor will cost you from 400 rubles. The more content in the set, the more expensive it will be.

But, not everyone likes bright and colorful designs, so for a beginning craftswoman, you can just take colored thick paper or print the drawing yourself on a printer, if your apartment is equipped with such equipment.
Before starting work, a needlewoman needs to understand what she will need and choose a place where there is a flat, wide surface.
The paper on the front side can be replaced with fabric. Before work, all sections must be carefully ironed - this will help to carefully and evenly cut the required sizes and maintain a beautiful appearance.
You will need an adhesive component: double-sided tape and Moment glue.
Also, it is beautiful and convenient when the photo album is on rings or with free-standing pages. This can be done beautifully with the help of a grommet installer, which is sold in hardware stores for 150 rubles.
Another tip for choosing a color scheme: where there is a lot of decor, choose a background that is as uncluttered and non-colorful as possible. Otherwise, the result will be a bad taste effect and the decor will be lost in diversity. Most often, this rule applies to the front cover. All colors must be combined, they can be supported by a pattern, tones in one color scheme or be flowers - companions. This can help.

The craftswoman is also trying to make the inside very complete. They also use pockets and envelopes with closing elements for small photos or details dear to the heart. Anything is suitable for decoration: wooden shavings and saw cuts, twine, buttons and lace, ribbons, napkins, beads, twigs, artificial flowers and pom-poms. In general, everything you have in your sewing box, in the kitchen, or in the children's room.

Glue a backing in place of the intended photograph; this will add originality and zest to each spread.
It’s not a problem now to print different tags and places for notes. Print it out in a regular copy center and stick it in a photo album.
We’ve figured out a little where to get materials and what can be used, now let’s move on to a step-by-step master class on creating a photo album with your own hands.
Making a photo album with your own hands step by step with photos, detailed master class
I think that now this information is read mostly by beginners who are just developing their own technique and style of performance. Therefore, we will analyze a simple version of the album. By the way, have you noticed that the craftswomen who make such albums to order always have their own style? Some use unusual natural materials, some specific composition in decoration. Even, at first glance, similar albums made using the same technique will be very different in design and decor.
We will need:
- Two cardboard blanks for the cover
- Two small cardboard blanks for the end
- Glue Moment
- Double sided tape
- Beautiful fabric, preferably linen or cotton
- Eyelet installer, ruler, scissors and decor
You can vary the sizes as you need. But these dimensions must fit all blanks.
If you don’t want to spend money on your first photo album, you can replace store-bought cardboard with cardboard from a shoe box.
Before work, you need to cut all the workpieces to size. So the cover should be a little bigger internal pages, usually 0.5 -1 cm.
- We glue double-sided tape around the perimeter of the cardboard blank, iron the fabric for the cover and place it face down.

- Glue the cardboard blank to the fabric so that there are 1.5 cm allowances on the sides.

- We glue the small element at a distance of 4 ml from the main part - this will be the end of the album.

- We glue double-sided tape around the perimeter of the cardboard, capturing the small part.

- We cut off the fabric corners, but leave 1.2 mm so that the cardboard does not stick out.

- Glue the fabric allowances onto tape.

- The fabric corners can not be cut, but bent into a triangle and glued, as in the photo. Do what seems simpler.

- We do the same with the second part of the back cover.
- Glue the decor

- We coat the workpiece on the wrong side with glue and decorate it with cardboard.

- In the place where the spine should bend, you need to push (not tear) the cardboard and bend it.

- Now you need to make even cuts in the spine; to do this, mark 1.5 cm at the top and bottom.

- We take the grommet installer and make a hole. We install a grommet in it.

- We make holes on all pages.

- You need to make an even fold on all the leaves in the direction in which they will be leafed.

- We connect all the parts with a cord.

When decorating the inside of the cover, the glue can be smoothed with paper so that there are no waves.
Start decorating the pages using decorative elements. You can also close it with an elastic band or tie it with a ribbon.
The simplest photo album using scrapbooking technique is ready.

As an example, I’ll give you a few already decorated pages, but you can also leave empty colored leaves, which is also beautiful.

Variants of inscriptions are below in the photo.

I really like it when they design the first page as a title page.

Below is an option for designing a page with an envelope.

More ideas for using design, pockets on the page.

I invite you to view another idea for making a beautiful photo album.
Ideas for decorating a photo album with your own hands (family, wedding, for a newborn)
Products made using the scrapbooking technique continue to win the love of the audience with their delicacy and abundance of details. There is a lot of volumetric design, which not everyone likes and is not always convenient. Having scoured the Internet, I found some very interesting ideas using a different type of material. For example, the technique of burning, embroidery, wood carving, metal elements, etc. is used. I’ll give you a few works that really resonated with me.
Scrapbooking is more suitable for gentle girls, young mothers and children. This technique allows you to create beautiful photo albums for newborns and weddings.

For a baby, you can create such beauty in the photo, the highlight here is that all the elements are sewn on. Imagine that you can even use technology, which will also add uniqueness to the product.

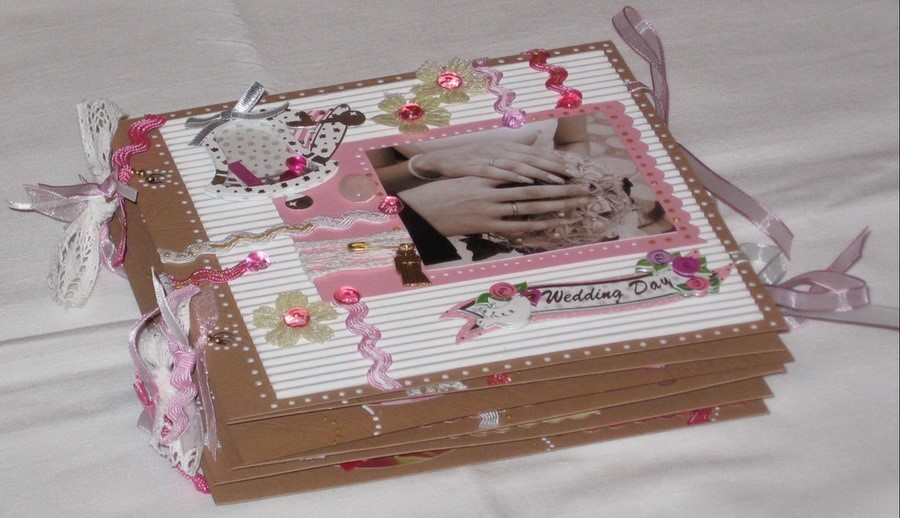
Still very nice option cover design using lace and ribbons. Notice how harmoniously all the shades and background for the decor are chosen. This is what we need to strive for. This beauty can be given to any family for any occasion.

Another option for a family album. Two colors are used, one main calm color, the other saturated, but in smaller quantities. They also put padding polyester on the base of the cover to give it appearance volume and texture.

But I think that for people of a more serious age, for an anniversary, as well as for people who value natural charm, products with elements of wood and leather are suitable. Look what wonderful and colorful products you get.

Another very interesting option.

Using the burning technique, you can make ornaments and designs. There are also a lot of materials for adding color and bringing out the wood texture, everything will come in handy here!


An interesting option for using rough wood texture and lace.


There is a maritime theme here.

Another version of a family album in aged technology using belts.

Look how interesting the faux leather background looks on the product.

The use of embroidery really distinguishes the craftswoman from the whole variety of hand-made albums. Do you agree? Very unusual, and not at all difficult.

A playful background is more suitable for children.

Or here's another children's option.

For those who like to celebrate brightly and collect such moments, there is another option for designing a cover with embroidery.

See how all the shades and design details come together. The boys should like it.

Another gentle album for a child or a young mother. I think it will be nice to pick him up and look at him, and then read the inscription on the newborn’s tags and look at the first photos.

Well, another very laconic, but self-sufficient option. A little decor, but it creates a feeling of completeness.

I really liked the ideas; you never cease to be amazed at how much imagination and creativity people have.
What's your opinion?
Tweet
Tell VK
Who said that with the advent of digital photos, the days of paper photo albums are gone? My friends are convinced that printing digital photos is an unnecessary waste of money. “Of course,” I agree. But only if the printed photos then lie in an unsorted pile in a desk drawer. And it’s a completely different matter if you put in a little effort and imagination and make a photo album. A thoughtful photo album from the most interesting photos It’s much more pleasant to show to friends and relatives, who in turn won’t have to look through hundreds and even thousands of not always interesting photos on your computer.
I invite MirSovetov readers to consider what modern photo albums are like.
Classic photo album
I consider three types of classic photo albums:- with cardboard sheets on which photographs are pasted;
- with magnetic sheets;
- with plastic pockets where photographs are inserted.
 The situation is completely opposite with the less practical cardboard album, which you can design to your heart's content. Well, at least with the size of the photos and their location on the page.
 Albums with “magnetic” sheets also allow you to use a creative approach and you don’t have to struggle with glue or adhesive corners - you can place photos of different formats on the sheets, and subsequently change their location. But over time, the magnetic sheet turns yellow and gets scratched, and the photos begin to peel off.
I offer the readers of MirSovetov several rules, adhering to which when filling out a classic photo album, you can achieve excellent results.
Each event has its own album.
It is better to dedicate a separate album to each significant event in your life: “My baby” (for the first year of a child’s life), “Our wedding”, “Kindergarten”, “Trip to the sea”, etc. If you are keeping a photo chronicle of your family, dedicate one album to a specific period - a year or 5 years.
Choose your cover carefully. The choice of covers is now very diverse: oilcloth, from various fabrics, with decorative elements, from fur, from artificial and natural leather, etc. Assorted covers with flowers, kittens and dogs are no longer in fashion; choose more stylish solutions. In addition, there are special thematic albums dedicated to a particular event - pay attention to them. In my opinion, a very interesting option is if the entire family photo archive is placed in several numbered albums in the same style, a kind of “collected works.”
 Connecting sheets in an album. Paper sheets, for example, can be joined using glue or book method, and the second is much stronger and more convenient. Both plastic and paper sheets can be connected using a spring (easy to view) or a ring (you can swap pages, remove excess, add).
  Place the photo in the album immediately after printing. Otherwise, unsorted photos will accumulate and accumulate, frightening you with their quantity.
 Observe the time principle. Place photos in the album according to the chronology of events. It’s strange if at the beginning of the album your child is 5 years old, in the middle he is a year old, and at the end he is depicted as seven years old.
Choose only the most interesting photos for the album.
Those that represent aesthetic value or simply very dear to your heart. Avoid similar photos! If you have 300 wedding photos on your computer, they don't all have to go into a photo album.
Elementary computer photo processing. For example, some photos could use cropping or adjusting the contrast (Microsoft Office Picture Manager and other more complex image manipulation programs can do this).
Agree, visible from right side Appliances This photo doesn't look good.

 Create in photo editors. Working in Photoshop requires serious skills, but even in basic photo editors you can do a lot of interesting things. For example, turn a photo into a pencil drawing or add an interesting texture.
  It is also interesting to insert some photographs into a frame - and send it to print along with it. Both Photoshop and online resources allow you to insert a photo into a frame.
 In my opinion, this photo greatly benefited from a well-chosen frame.

 Create compositions. This recommendation is for photo albums with magnetic and cardboard sheets. Of course, you can just post a photo, or you can use some invention and combine them according to some principle. For example, in a children's album, one page can be devoted to baby photos of all the child's closest relatives. It will certainly be clear what traits the baby inherited and from whom. And for the men's album - how the main character goes in for sports (with a barbell, with a kettlebell, jogging, in the pool).
 This is what I came up with when I was preparing small posters for my husband’s birthday.


Ready-made thematic photo albums
These albums are most often sold in bookstores and are a cross between a book and a photo album. Usually such albums are dedicated to a specific event (“I was born”, “For the first time in first grade”, etc.). Those. The book contains empty spaces for pasting your photos and signatures. These albums have undoubted merits. Firstly, this is an excellent workmanship: typographic printing, durable book covers. Secondly, everything has already been thought up for you. Thirdly, this is more than a photo album, it allows you to make various notes, for example, about when the baby cut his teeth or what kind of juice he likes. But the disadvantages often outweigh the advantages, here are just a few of them:
  So, when purchasing such a photo album, do not be too lazy to carefully study all its contents right in the store. And for children's albums, do not forget to fill it out as the event occurs - mothers very quickly forget when their baby began to hold his head up or sat down confidently.
 Scrapbooking
Albums in the scrapbooking style are now gaining great popularity.So, scrapbooking (“scrap” is a cutting, “book” is a book) is handicraft, the production and design of photo albums from a variety of materials. Not only photo albums are made in the scrapbooking style, but also postcards, invitations, diaries, etc.
In such a photo album, along with photos, you can put whatever you want - memorabilia, magazine clippings, signatures (handwritten or printed) and even voluminous ones (buttons, beads, braid, etc.).

 You can find ready-made scrapbooks on sale, but fans of this hobby prefer to do everything with their own hands - even making the album itself. For this purpose, you can find special blanks made from chipboard (thick cardboard), acrylic, or any cardstock (painted cardboard) will do. In principle, any classic album with cardboard sheets can be used for scrapbooking.
 Scrapbooking is perhaps becoming a whole science; entire styles and individual techniques have emerged. Scrapbookers use many special materials, tools and decorative elements. For a novice scrapbooker, this variety can even be intimidating. I will list just some of the materials that may be needed when working on a scrapbook.
1. Paper.
You can already find them on sale even in regular office supply stores. special paper for scrapbooking. You will be amazed by its variety: it can be one-sided (with a pattern on one side) and double-sided, regular and embossed, with sparkles and iridescence, with certain designs for thematic albums. But you can also use watercolor paper and colored paper for pastels.
2. Tools:
In my opinion, skillful hands can create a scrapbook from anything, having only scissors, glue and a pencil in their arsenal. However, so that the flight of fancy is not limited by anything, it would be nice to have the following devices:
- mock-up rug (it spreads on the table);
- rulers, pencils (simple, preferably mechanical);
- regular scissors of different sizes and a set of curly scissors;
- breadboard knife and roller cutter;
- tweezers;
- devices for corrugating paper;
- figured hole punchers, corner and edge punchers;
- different kinds glue, tape, glue gun;
- various paints and brushes;
- crop pipe (for installing eyelets);
- stamps, etc.
- contour and volumetric stickers;
- buttons, rhinestones, beads;
- anchors, eyelets;
- ribbons and braid, waxed cord;
- felt figures;
- chipboard decorations (blanks made of thick cardboard in the shape of various figures, frames);
- carnations;
- flowers, leaves, etc.
Scrap albums, in my opinion, have two significant drawbacks - their creation requires a decent amount of money and time. The financial issue, by the way, can be resolved quite easily. To create and design your first albums, you can easily make do with improvised means; in any home there will be some stickers, old beads, unnecessary magazines, felt-tip pens, paints, sheets of cardboard, and scissors. But, of course, special materials for scrapbooking are much more aesthetically pleasing, and also more practical (they have archival quality - they do not oxidize the photo, and do not fade on their own).
Here is an example of a scrapbook postcard that did not cost me any money. I made it many years ago, without even realizing that I used the scrapbooking style.
 The advantages of such photo albums are obvious. This is no longer just a collection of photographs - it is an expression of your creative self. Scrapbooks are real works of art, they are unique, individual, and also very informative, because here you can make notes about events, insert poems, songs, etc.
 Thanks to the Internet, everyone is interested in scrapbooking. more people. There are special sites dedicated to scrapbooking, many useful information can be found on forums of sites for mommies, there are even master classes and online scrapbooking schools - free and paid. And, of course, online stores, domestic and foreign, where you can buy everything you need for this handicraft (it can be difficult to find what you need in regular stores).
It is also worth noting that the hobby of scrapbooking can develop into an income-generating activity; hand-made is in demand today.
Photobooks
And finally, the last type of photo albums that I want to talk about are photo books. They come in two types – Photobook and Printbook.Photos for Photobook are printed in a single spread, then they are glued onto a plastic or cardboard base. The choice of covers for such photobooks is very large (laminated with any image, leather, fabric), and the Photobook itself can be of various sizes. These photo albums are not very popular because... extremely expensive, and I advise making them only for special occasions important events or to emphasize your status.
Photobooks of the Printbook type are printed on printing equipment, their pages are sewn into a spine like a real book. On the Internet you can find special services offering to create such photo books; any amateur photographer can understand them. These photo editors contain templates for photo books of various formats and various topics(“Amor... Amor...”, “Our baby,” “ Christmas story", "Soldier of Fortune", etc.).


 Printbooks can also come in different formats, with soft or hard cover. Laminated, leather, fabric covers and even dust jackets are used.
 You can take a ready-made template, for example, on the theme “First-graders,” and just insert your photos. Or you can create by designing each page yourself from the proposed elements (choose your own background, frames, decorations, signatures, etc.). In addition, you can add your own elements downloaded from the Internet to Printbook. In this way, working with Printbook turns into real electronic scrapbooking. This area of scrapbooking is also very popular now, and the most suitable program for it is Photoshop. Just like for classic scrapbooking, on the Internet you will find many lessons and recommendations for creating electronic scrapbooks, and you can also download or purchase numerous clip-arts, frames, brushes and Quick Pages.
The main advantage of Printbook is that it is affordable, unique and allows you to express your creative potential and create an interesting chronicle of your family. Ordering a Printbook is very easy, you simply send your layout via the Internet, and in a few days the finished photo book will be delivered to your home by courier or regular mail.
I hope my story inspired MirSovetov readers to create their own photo album. I wish you beautiful photographs and original photo albums!


