Draw a portrait with a simple pencil. Drawing a woman's portrait with a pencil step by step from a photo
Irina Khursulova
. Portrait painting is one of the most complex and significant genres visual arts. This is not just a reproduction of the features of a particular person, and understanding it inner world, the essence of his character, the uniqueness of his appearance; the artist’s expression of his attitude towards the depicted. No other genre of painting reveals man so how it does portrait.
How teach your child to draw a portrait correctly? Each teacher has his own methodology drawing a portrait. I teach children first draw a person's face step by step, with a simple pencil.
Using simple rules, draw human Almost everyone can do a face, even child. Perhaps not the first time, but if you really want to, you will definitely be able to teach your child to draw a real portrait of a person.
Before you start working on portrait, it is recommended to prepare everything necessary:
Paper;
A simple pencil.
1. First, draw an oval face with thin lines.
2. For relief drawing exactly in the center draw a vertical line dividing portrait into two parts and two horizontal lines dividing it into 3 parts: forehead, eyebrows; eyes, nose; mouth, chin.
3. On the top line we draw arc-eyebrows.
4. Below are the eyes. The shape of the eyes consists of arched lines. The iris and pupil are drawn in the middle. Do not forget draw eyelashes, on the upper eyelid they are longer than on the lower.
5. Drawing nose - nose in the middle, beginning at the eyebrows. It is drawn with a smooth arc-shaped line. The crown of the nose is rounded and from the side are drawn wings of the nose and nostrils.
4. The mouth is below the nose. Draw the line of the mouth, the upper lip on top - two arched lines, below underlip- large arcuate line.
We erase the extra lines with an eraser.
5. Draw ears on the sides at the level of the nose, finishing drawing the shoulders.
6. Then hair: short or long, straight or curly, wavy, with bangs or not, color.
Talent is given to everyone a person by nature, just develop any abilities you need to start with early childhood. By helping children learn to formulate images into images, you, teachers, are helping them great service. Drawing Using a pencil step by step is not only interesting, but also very useful for young children. Good luck to you!


Publications on the topic:
“I started drawing a gift for my mother, The sun came out and called me for a walk. The sun, the sun, don’t be angry, It’s better to sit next to me. It’s Mom’s holiday.
I bring to your attention the lesson “In the Family Circle: Mother’s Portrait” The purpose of this lesson: to continue acquaintance with the image of a person in.
Master class for parents “We can draw unusual things ourselves.” Goal: to increase the motivation of parents of preschool children to use unconventional techniques drawing in development creativity children,.
Venue: gym. Introduction: Dear educators! We will talk about one sports equipment, which one you will find out by guessing.
Good afternoon, Dear colleagues, I want to offer you my master class on the topic “How we draw a portrait.” International Women's Day is coming soon.
Master class “How to draw a picture if you don’t know how to draw” Very often we, music directors and educators have to do it themselves.
As you know, depicting people is one of the most difficult areas in art. In order to beautifully draw the figure of a man, woman or child, a novice artist needs to have not only certain professional skills, but also knowledge of anatomy, and also be able to maintain proportions. A portrait created with a simple pencil is one of the most romantic gifts you can make with your own hands. Surely each of us, at least in our dreams, thought about how to draw a portrait from a photograph. Don’t be ashamed of your inexperience; try to draw with a pencil, because even those portrait painters who are taking their first steps in creativity can do it.
Beginning of work
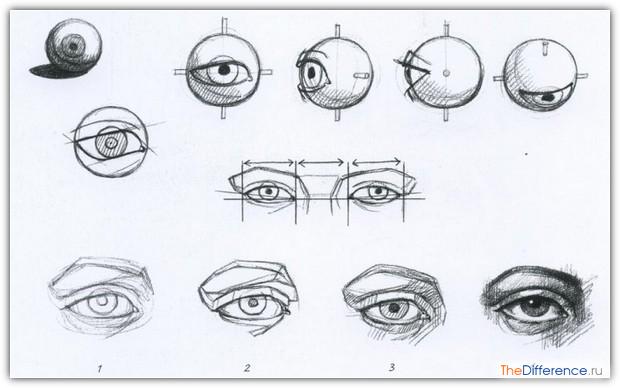
Before you start drawing a portrait, you should study the photograph, what position the head of the depicted person occupies, how it is rotated relative to the vertical and horizontal. Be sure to pay due attention to the proportional relationships (sizes, as well as relative positions) of the eyes, nose, ears and mouth. Precise adherence to proportions when applying the first strokes is an important guarantee of the final image’s resemblance to the face in the photograph. Check out the average proportions shown in the figure. human face, and then compare them with the original image in the photograph. If they diverge a little, there is nothing to worry about, since it is in deviations from the standard that the individuality of a living person captured with a camera lies.
To get more detailed information about the structural features of the human skull that may be needed when depicting a portrait, you can always refer to the anatomical atlas. Apply with light lines general outline oval of the face, hair, lip line, nose, eyes and eyebrows.

After this, you can begin analyzing the planes of the face. At this stage, you should mark the height of the nose with a plane. In order to better see the volume, it can be shaded. This should be done with all areas of the future portrait that are in the shadow. Next, we designate the plane of the lips, the cheekbone, located closer to us, as well as the plane of the eyes, which connects to the eyebrows. At this stage of creating a portrait, it is quite easy to outline the geometric features inherent in the face of the person being depicted, without even drawing it with smooth lines.

Detailing the face
Remove the top layer of the pencil using a scratch eraser until the previously drawn lines become almost invisible. After this, we begin to draw all the facial features. We round them to give the portrait maximum resemblance to the photograph.

It's no secret that eyes are often called the mirror of a person's soul - they are very expressive. Therefore, there is no need to prove the importance of accurately conveying their location and shape. In order for eyes drawn on paper to look more alive, the sclera (the so-called white part of the eye) does not need to be depicted as snow-white, since in fact its color changes under the influence of its own shadow and the shadow that the eyelid casts on it. Apply highlights to the lower eyelid and inner corner of the eye.

The picture below shows the sphericity of the eye and how the eyelids rest on the eyes. Here, a novice artist can familiarize himself with the sequence of depicting eyes in a portrait, starting with highlighting illuminated and shaded areas (2 and 3) and ending with applying highlights and shadows. It should be noted that women and men of different age categories have different eyes. For example, women tend to have longer and thicker eyelashes, and eyebrows that are thinner and more clearly defined than men.
The mouth is not very expressive compared to the eyes. It is the lips that are the place of transition of the mucous membrane to the skin. This is the reason for their characteristic pink color. When depicting lips in a portrait, you should remember that they are the most movable element on the face, capable of taking one form or another. Upper lip, as a rule, is thinner than the lower one.

Many people, when drawing a portrait from a photograph, are faced with the problem of depicting the nose, which looks completely different from different points of view. The main task is to be able to convey the main contrast of shadow and light on the nose, so that the drawing does not become overloaded with unnecessary elements. Usually, but not in all cases, the maximum light falls on the tip of the nose and the bridge of the nose, and the thickest shadow falls on the base of the nostrils (picture).

As for the ears, their shape varies greatly among different people, but does not have pronounced characteristics among representatives of the stronger and fairer sex. Despite the fact that in photographs the ears are often hidden by the hairstyle, professional artists recommend not neglecting them, in particular their most expressive and precise position on the sides of the head. The length of the ear in adults is approximately equal to the length of the nose (see figure). Children's ears are proportionally slightly larger.

Hatching, elaboration of halftones as important stages of drawing a portrait
Upon completion of work on the detailing of the face, we begin to begin shading. First, you should erase all the extra lines on the portrait, since once you start laying out the tone, it will no longer be possible to do this with sufficient accuracy. Certain rules there is no shading - everyone does what is most convenient for him. Professional artists advise starting shading from the darkest parts of the portrait. In the future, you can build on them so as not to darken your clothes, eyes, or skin too much.

When adding tone to the skin of the face, clothes and hair, you should not use a nag (unless, of course, you accidentally put a stain on the future portrait). If you are right-handed, then intensive shading of halftones should begin from the upper left corner of the sheet, in order to avoid smearing what has already been depicted. Accordingly, a left-hander needs to do everything in a mirror manner. At this stage, minor elaboration of the background is allowed.
Highlighting and darkening are the last stages of working on a portrait from a photograph.
At the end of the shading, if you did everything correctly, you will get an almost finished portrait, which, however, will not look three-dimensional. To correct this defect, it is necessary to highlight some places on the face, such as the tip of the nose, the brow ridges, the upper part of the cheekbones, the sclera of the eyes, the lower lip and sometimes the chin. Using a nag, the artist can draw small folds on the lips and wrinkles, as a result of which the portrait will become more alive. Hair lightening should be done in areas of the largest fractures. This will make them appear shiny and more realistic.

After highlighting, we proceed to final stage– darkening those areas where you need to demonstrate space. Such places can be the ears, the edge of the hair, the background, the folds on the hair. After this, the portrait will be almost ready. However, in any case, you will be left with unnecessary strokes, stains from fingers stained with a pencil. Therefore it follows last time pick up a nag and eliminate everything that visually seems unnecessary to you.

After reading this article, you should not take it as a ready-made guide to how to draw a portrait of a person from a photograph. After all, even with the maximum similarity of the resulting portrait to a photograph, we always have room for creativity. When redrawing, you are not at all obliged to copy exactly everything that you do not want to see in the portrait. In front of you Blank sheet, ready to implement all your ideas. As you know, photography does not always turn out successful according to all criteria. Well, an artist, working on a portrait, can think out, adjust and get as a result something that turned out to be beyond his capabilities due to the specifics creative process, photographer.
This lesson is about how to draw a girl's face without pronounced emotions with soft facial features.
In this tutorial we will need:
- sketchbook;
- HB pencil;
- eraser;
- ruler.
I know this tutorial spends a lot of time on measuring. In my opinion, on initial stage this is necessary, especially if you are a beginner. Once you've mastered proportions and become proficient at drawing women's faces, you can repeat this lesson without wasting time on metrics. Ready to practice? Then let's begin!
How to draw a girl's face. Step 1: Face Shape.
Draw a circle and draw a small horizontal line at the bottom, half the diameter of the circle. It is important to follow this rule, since the circle was drawn by hand.
Women have smaller chins than men. Chin augmentation will add masculinity to a woman's face.
After that, draw the cheekbones by connecting the chin with the circle. The shapes of women's faces are extremely diverse. I'll use an image of soft cheekbones as an example.
Then draw a vertical line exactly in the middle of the future face.
How to draw a girl's face.Step 2: Outline the proportions.
Measure the length of your face and divide it into eight equal parts. Label each part serial number or a letter, as shown in the figure. Then, using a ruler, draw straight horizontal lines through the points marked Center line, 2,3, A and C.

If you have completed this tutorial several times and want to try drawing a face without using a ruler, draw the lines in this order: Center line, 2, 3, B, A, C, breaking the lines in the middle each time over and over again.
How to draw a girl's face. Step3: Eyes.
Divide the center line inside the face into five equal parts. Remember that women's eyes are wider and more open than men's.

How to draw a girl's face.Step 4: Nose.
To draw the nose, draw two vertical lines down from the inner edge of the eye to line 3. These lines will define the width of the nose. Then draw a small circle just above line 2. My nose will be short and narrow, with a narrow bridge.

How to draw a girl's face.Step 5: Eyebrows.
In the drawing on the left, I drew the brow arch to show the organic position of the eyebrow itself in relation to the arch. In the picture on the right, we see that the eyebrow is located under the C line. To portray a surprised expression, the eyebrow will need to be brought even closer to the C line.

How to draw a girl's face.Step 6: Lips.
To mark the boundaries of the lips, you will need to draw from the middle of each pupil perpendicular line down to line 3. Then draw a triangle, the beginning of which will go from the tip of the nose. The base of the triangle should be inside the square. The apex of the triangle should be located strictly at the tip of the nose. As mentioned earlier, this example characteristic of a face that does not express strong emotions. If you want to put a grin on your face, as if the girl is bluffing in the process of the classic version known to everyone card game, position your lower lip slightly lower. Mark the teeth by drawing several perpendicular lines.

After you've drawn in the lips, you may want to lengthen the chin. Or vice versa, make it shorter so that the proportions look more natural. It's quite normal. I constantly adjust these proportions.
How to draw a girl's face.Step 7: Ears.
The boundary lines for the ears are the center line and line 2. To practice drawing realistic ears, we recommend checking out this tutorial (not yet translated).

The center line and line 2 define the ears above and below.
How to draw a girl's face.Step 8: Hair.
When you draw women's hair, remember that women's foreheads are usually smaller and narrower than men's. In my example, the hairline starts below line A. I also draw hair on both sides of the temples, but make sure that the hair is not too close to the eyebrows. Don't forget to add volume to your hair by leaving a little space between your hair and your head. For more detailed instructions on depicting realistic hair, I recommend contacting one of.

Before erasing all the auxiliary lines, check again how harmonious the proportions of the face are. If after checking you are satisfied with the result, you can safely wash them.

Well, after you have mastered the image lesson female face, it’s time to experiment and perform a few exercises without a ruler.

The article was translated from the siterapidfireart. com
Three-quarter turn
Drawing a portrait of a young woman

For everything to work out as it should, you need to start with the basics. Let's try to figure out how to draw a portrait with a pencil - for this we will depict a portrait of a young woman with large expressive eyes.
First you need to make a blank - it will be a circle divided into 4 equal parts and a small elongated part at the bottom. Approximately in the middle of the lower half of the circle we outline two ovals - eyes. It is important that the distance between the eyes is equal to the length of the eye itself, and the distance from the edge of the face to the outer corner of the eyes is half this length. Let's immediately sketch out the line of the mouth - it will be located below the circle, at a distance equal to the width of the eye.

Let's add the upper eyelids and eyebrows. The eyebrow should have a curve. It is best to follow this rule: the beginning of the eyebrow should be at the level of the inner corner of the eye, the end - slightly diagonally from the outer corner.

Now let's take care of the nose - it will be located at the bottom of the circle.

And the mouth is on the same strip just below the circle that we marked in advance.

When drawing lips, it is important to remember that the lower lip should be a little fuller than the upper. Also, you should not make the lip line perfectly straight - it has a peculiar bend. Let's also outline the basic shape of the ears. The bottom of the ear will be approximately in line with the nose, and the top will be in line with the upper eyelid.

Let's work on the eyes in more detail. It is important to remember here that there should be a light spot on the iris - a highlight, and the upper lash line is a little more expressive than the lower one.

Let's draw other contours. At this stage, all auxiliary lines are also erased. You also need to draw the ears - cartilage, lobe, etc.

All that remains is to draw the hair. Under no circumstances should they be made into a monolithic block - it looks very unnatural. Individual hairs should be visible, laid with slight carelessness. You can also add a little volume: to do this, we very lightly shade the shadow part of the face.
Great, our portrait is completely ready. To find out more details, you can watch this video:
How to draw a male look - basic nuances

If in the previous section we learned how to draw a female portrait in stages, now we will practice creating a male portrait.
Let's start with the eyes. They should be sufficiently elongated and located at a distance of one more eye from each other:

Then we will add eyebrows. You should not make them one solid line - eyebrows consist of individual hairs, often growing at random.

Let's work in more detail with the eyes: we will make the eyelash line more expressive and slightly darken the iris. We leave a small amount on the iris White spot- glare. You also need to depict the nose: to choose the correct height, set aside a distance from the eyes that is one and a half times greater than the length of the eye.

Now the mouth. It is located just below the nose. As for the width, you need to focus on the pupils. Mentally lower the vertical lines from the pupils down - this distance will be the line of the mouth.

A little shade is what you need now. Shade the shadow side of the nose and upper lip.

Now we need to outline the oval of the face and ears. Don't forget that this male portrait- Cheekbones should be clearly defined.

Now the hair. There is no need to make them “one size fits all” - the direction of the hair on the head can be very different. It is best to draw individual hairs rather than try to make the hairstyle a monolithic piece.

And, of course, the head cannot just hang in the air - you need to finish drawing the neck and shoulders.

And then - enhance the shadows. The direction of each new layer of hatching may not coincide with the previous one - do not be afraid of this.

Stubble will add more masculinity, and highlights in the eyes will make the look more lively.
Drawing a girl - a guide for beginners

In this section we will learn to draw a portrait of a young girl. You don't have to be at all to do this. professional artist: Now we will figure out how to draw a portrait for beginners.
First of all, let's draw an oval - the general shape of the face.

Then we mark it: we need to draw a vertical axis of symmetry, as well as three horizontal lines - for the eyes, nose and lips. We will also sketch out the basic shape of the ears - their height will be approximately between the line of the eyes and nose.

Let's draw the nose in a little more detail - we need to note its wings, the bridge of the nose, and the front part.

Now the eyes and eyebrows. To do this, you will need two more auxiliary lines, located symmetrically on both sides of the main eye line. It is important to remember that the distance between the eyes should be approximately equal to the length of one eye.

Let's add details. We need to draw a hairline for our girl, outline her cheekbones, and outline the folds near her eyes.

General sketches have been made, so you need to carefully erase all the auxiliary lines and draw the hair. In order for the hairstyle to look natural, do not make all the strands the same, licked - they should lie a little carelessly, out of order. You can put earrings in a girl's ears.

Now we need to add volume - shade the shadow parts, enhance the contours.

We must not forget about the falling shadows: from the hair, from the nose, the shadow on the neck. This is all neatly shaded too. Light parts of the hair can be further lightened using an eraser.

Let's enhance the shadow a little more and add light tones on the strands of hair, lower lip, and eyes.
That's it, the portrait of the girl is drawn. If you are interested in this lesson, you can also watch this video:
Lesson on drawing portraits for little artists

Children often love to draw different characters: characters from books or cartoons, just abstract people. This lesson will describe in detail how to draw a portrait of a young girl, so even the most young artist can easily cope with this task.
First you need to outline the oval of the face and divide it into 4 parts.

Then - in general outline set the shape of the eyes, lips, location of the tip of the nose.

We need to add details: we draw irises in the eyes, give more natural shape lips, draw the nose.

And now we need to sharpen the oval of the face, finish drawing the upper and lower eyelashes, pupils and eyebrows.

And, of course, what girl would do without beautiful long hair.

To make the drawing look more alive, you need to apply a little shadow. This must be done very easily and carefully.
That's all - the portrait of the girl is ready. For a more complete understanding of the lesson, it will be useful to watch this video:
Portrait of a person - learning to draw together

Drawing portraits is a rather difficult task, requiring attention, accuracy and precise adherence to proportions. And with the help of this lesson we will learn how to draw a portrait of a person.
Let's start with the basics - draw an oval face and divide it into three parts. Attention - the top point of these three fragments should be slightly below the top point of the oval itself - there will be a hairline.

At the separation points, you need to draw three horizontal lines, and then two more. One will be just below the center mark, and one will be just below the bottom mark. Also, symmetrically to the axis from the second base mark (eyebrow line) to the bottom (nose line), you need to draw two vertical lines - blanks for the front part of the nose.

Using this blank we draw a nose - with a bridge of the nose, a small hump and wings. We also mark the eyes - they will be on a line located just below the eyebrow line. In terms of width, it should be roughly divided into 5 parts - parts 2 and 4 will contain the eyes.

You also need to draw the lips - they will be on a line located under the line of the nose. The width of the mouth will be determined by the middle of the eyes - from the middle of the left to the middle of the right. It is important to note that the lower lip should be slightly wider than the upper lip.

A little more detail: draw the iris and pupil in the eyes, add volume to the eyebrows.

Now we draw the hair along the already marked lines and begin to work with the ears.

We work on the cheekbones - they are especially pronounced in a man. We also draw the neck - it will be quite massive.

That's it, at this stage you can erase all additional lines. By the way, you can also add a shirt collar to the drawing.
Portrait of a girl - three-quarter turn

Before that, we painted faces mainly from the frontal view - that is, the person is looking directly at us. Portraits in profile are also quite common - when the person is positioned sideways to the artist. But much more complex and interesting is the three-quarter turn - something between a full face and a profile. Let's try to depict this option.
At the beginning general forms- an elongated, upwardly expanded oval and axes of symmetry. Unlike the frontal position, the axles will not divide the oval into almost equal parts - they will follow the line of the oval, leaving slightly less space on the turning side. For now we are interested in the lines of the eyebrows and eyes.

Then you can outline the hairline, mouth and start drawing the nose. As you can see, his left wing is almost invisible, and the left part of the bridge of the nose is much smaller than the right.

Now the girl’s eyes are quite large, with a wide upper eyelid.

Now we draw the eyebrows. They are quite thin and widely spaced.

Let's do the mouth and chin. The mouth will be small, slightly open. Also at this stage the lower eyelids will be depicted - they are also wide, which is why it seems that the eyes are a little bulging.

Add strands of flowing long hair.
That's it, now our sketch is ready. We have a real forest nymph - alert, graceful and very beautiful. To understand the lesson better, you can watch this video:
Learning to draw a portrait of a teenage girl
The face of an adult is quite noticeably different from the face of a child or teenager in terms of proportions. Therefore, for the full, multifaceted development of you as an artist, it is important to learn how to draw portraits of not only adults, but also teenagers and children.
First, draw a circle and divide it into 4 equal parts.

On the center line we will make the basic shape for the eyes and eyebrows, and at the bottom - for the nose and mouth. The ears will be located on the sides at a height from the eyebrows to the nose.

The nose in children is usually quite wide, without a pronounced dorsum.

And the lips are quite plump. As for the width, the line of the mouth should be between the two pupils. For convenience, you can even draw vertical lines from them down. And don't forget about the fold above the upper lip.

Now let's slightly lengthen the oval of the face and start drawing the hair.

Hair should fall in waves, in separate large strands. And in these large strands you need to draw individual hairs. Also at this stage you can erase all auxiliary lines and start working with shadows.

You need to shade lightly and very carefully. You should remember not only about natural shadows, but also about falling ones.
That's it, now our drawing is completely and completely ready. More nuances and small parts You can watch this video here:
This tutorial shows the stages of drawing a quick sketch portrait. To draw this portrait, you need to know at least the very basics of shading.
Step 1. First you need to draw a sketch, for this we draw the outline of the head and neck, draw auxiliary lines indicating the direction of the face, the location of the eyes, nose and lips of the girl. The image size is very large, so click on the image and look at the details.

Step 2. Let's roughly understand the perspective. In this stage we draw the eyes, eyebrows, nose, lips and chin. Then we erase all the auxiliary elements.

Step 3. I begin to work in volumes, adjusting the construct as I go. Draw the eyes, apply shadows.

Step 4. We begin to do shading from dark places, smoothly moving towards the illuminated ones.

Step 5. While applying the stroke, I try not to shade it, because the shade often looks like dirty spots. Add dark shadows and move on to drawing the neck.

Step 6. I correct the anatomy with volumes, making it more human. We finish drawing the neck, begin to shade the shoulder and jacket, then move on to the hair.

Step 7. At the end, highlights are added, the perspective is checked again, and details are added.


